In this guide, I will show you how to unlock the bootloader and root Samsung Galaxy Tab A7 10.4 (2020) using Magisk. This guide is applicable to any Galaxy Tab A7 running Android 10 (One UI 2.5) firmware with SM-T500 (WiFi variant) and SM-T505 (LTE variant) model numbers.
Advertisement
In a time when most device manufacturers have backed out from building Android tablets, Samsung is still in the game. According to recent data, Samsung holds the second major share in the tablet marketplace, right next to Apple. The manufacturer released the Galaxy Tab A7 10.4 a few months ago and it packs quite a punch of powerful hardware in a pretty affordable price tag.
On the software end, the Tab A7 runs Android 10 out-of-the-box with Samsung’s One UI 2.5 skin sitting atop. There’s no doubt that Samsung has quite significantly improved its software game with One UI, compared to the old Samsung Experience.
Page Contents
- Introduction
- Before You Begin
- Instructions
- Step 1: Enable OEM Unlocking
- Step 2: Unlock the Bootloader
- Step 3: Verify the bootloader status to disable VaultKeeper
- Step 4: Extract the AP firmware and transfer it to the Tab A7
- Step 5: Patch the AP Firmware with Magisk
- Step 6: Boot your Galaxy Tab A7 into Download Mode
- Step 7: Launch the Odin Tool on your computer
- Step 8: Flash the Patched AP Firmware to Root Galaxy Tab A7
- Step 9: Perform a factory reset via stock recovery
- Step 10: Complete the Additional Magisk Setup
- Your Galaxy Tab A7 is now Rooted!
Introduction
Rooting your Galaxy Tab A7 will give you full freedom to customize and tweak the software to your own liking. Be it UI customizations, using root applications, or installing audio mods such as ViPER4Android, rooting opens the gate wide open for everything.
Advertisement
Did you know? You can easily remove bloatware for the Galaxy Tab A7 without root.
Moreover, rooting with Magisk has its own perks. Unlike the traditional root solutions, Magisk allows you to apply modifications to the software systemless-ly, that is, without ever touching the /system partition. You could also use the built-in Magisk Hide functionality to hide root access from banking and security apps, and games such as Pokemon Go.
But in order to achieve root access, you must first unlock the bootloader of your Galaxy Tab A7.
The instructions in this guide will take you through the process of bootloader unlocking and rooting the Galaxy Tab A7 in a step-by-step and comprehensive manner. It doesn’t matter if you’re a beginner or a veteran in the field of Android software modding, you will be able to follow and perform these instructions quite easily.
Before You Begin
Before you start performing the given instructions, there are a couple of things you should do.
1. Take a Complete Backup: Before anything, you should take a complete backup of all your important data stored on your tablet. Unlocking the bootloader will completely erase all the data, including installed apps, messages, contacts, and everything stored in the internal storage. Moreover, another reset will be performed during the rooting process.
You could also take a look at our article here on backing up different types of data stored on Android devices.
2. Install Samsung USB Drivers: Generally, your Windows computer will automatically install the required USB drivers for your Samsung tablet. But that is not always the case though. So, if you’re operating on a Windows machine, you might want to download and install the latest Samsung USB drivers.
If you’re using a macOS/Linux PC, you wouldn’t need any additional drivers at all.
3. Charge your Galaxy Tab A7: If you’re new to things like bootloader unlocking, we strongly suggest that you take your time to understand what each step does.
Having a sufficient battery charge in your Tab A7 will ensure that it doesn’t power off while you’re following the instructions and performing them. We suggest charging your tablet to a minimum of 40-50% battery level.
4. Update your tablet to the latest firmware: Make sure that your Tab A7 is updated to the latest available firmware. You can check and download available updates by going to ‘Settings’ → ‘Software update’ → ‘Download and install’ on your tablet.
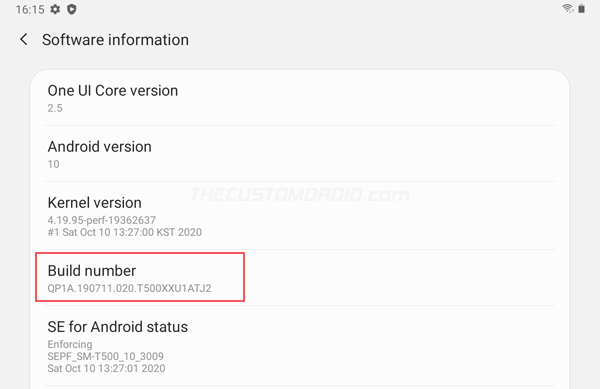
5. Verify the software build number: It’s important that you verify the build number of the software installed on your Galaxy Tab A7. This will ensure that you use and patch the correct firmware file during the rooting process.
To do this go to ‘Settings’ → ‘About tablet’ → ‘Software information’ and note down the information right under the ‘Build number’ section. The latter part of the shown information is the build number.
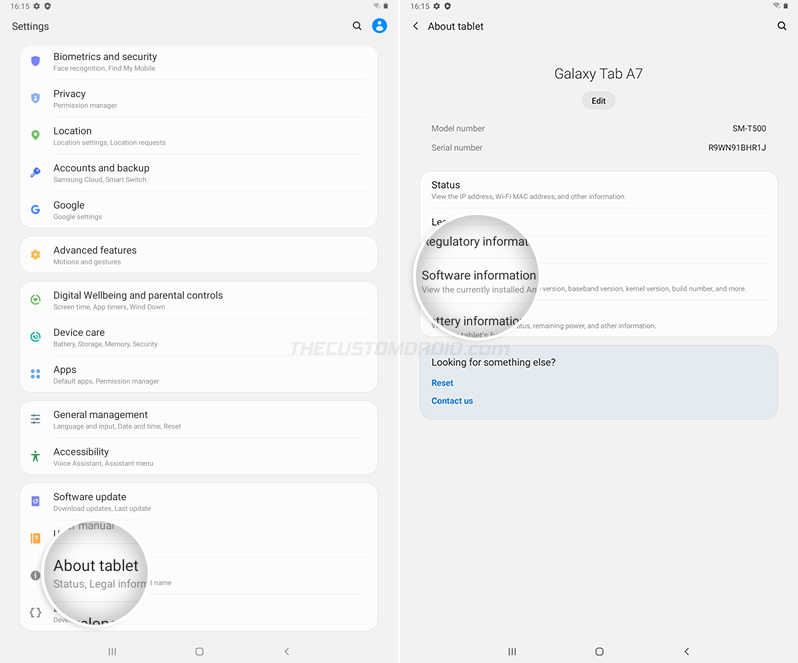
As an example, see the screenshot below. It shows the complete build number information on my Galaxy Tab A7 (SM-T500) as – “QP1A.190711.020.T500XXU1ATJ2”. Here, “T500XXU1ATJ2” is the software build number I will need.
6. Download the stock firmware package: You will need to download the stock firmware package that matches the firmware that’s currently installed on your tablet.
While you could use online databases like SamMobile, SamFrew, etc, we recommend using Frija or Samloader tool to download the stock firmware package. These tools download the latest firmware directly from Samsung’s update servers without any speed caps.
7. Download Magisk App: To patch the firmware for rooting, you will need the Magisk companion application. So, download the latest available version directly from the official Github releases page to your computer.
8. Download Odin: To flash the patched AP firmware, you will need to download Odin (v3.14.1 or newer) to your computer. After downloading, extract the contents of the ZIP file to get the tool’s executable and binaries.
Instructions
The method of unlocking the bootloader and rooting the Galaxy Tab A7 is a true and tried one. We have split the instructions into ten steps so that it’s easy for you to understand the complete process.
The only things you’ll require are:
- Your Galaxy Tab A7 with SM-T500/SM-T505 model number
- A Windows computer
- A compatible USB Type-C cable
With the requirements out of the way, let’s begin with the instructions.
Step 1: Enable OEM Unlocking
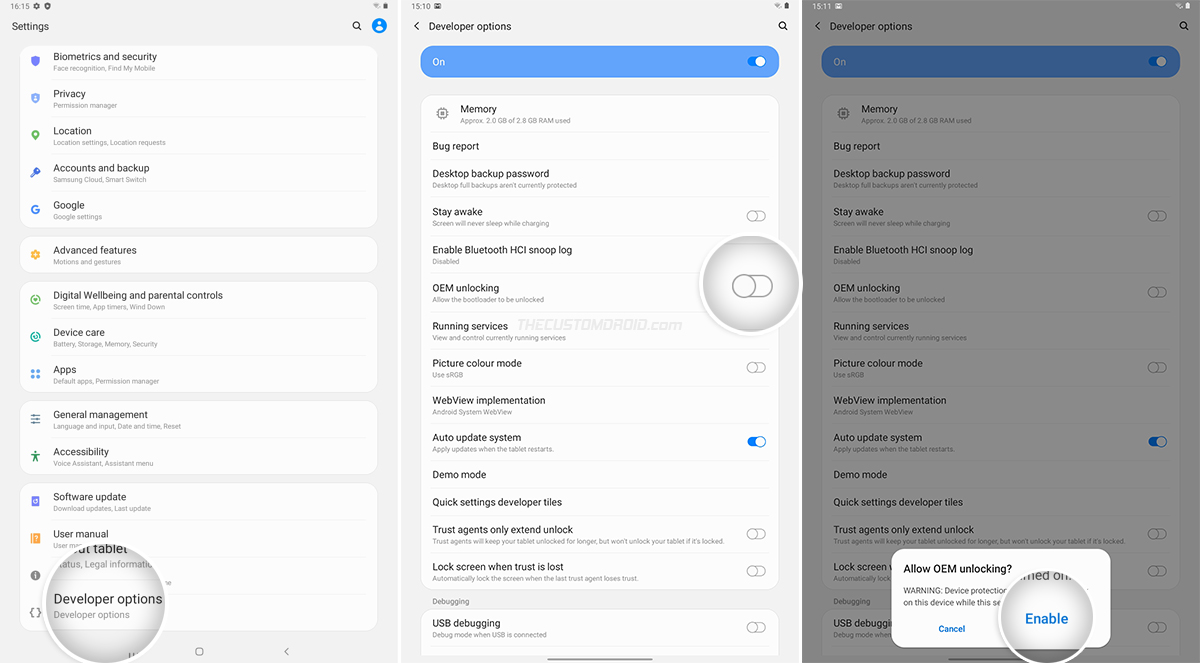
The first step is to enable the ‘OEM Unlocking’ toggle on your tablet. This option must be turned on before you can attempt to unlock the bootloader of your Samsung device. OEM unlocking resides inside the ‘Developer options’ menu, which is hidden by default to prevent users from unknowingly accessing them.
Follow this tutorial to activate Developer Options on Tab A7. Once you have enabled it, go to ‘Setting‘ → ‘Developer options‘ on your Galaxy Tab A7 and turn ON the toggle next to ‘OEM unlocking‘. Then select ‘Enable‘ when prompted to confirm.
Step 2: Unlock the Bootloader
With OEM unlocking enabled, you can now unlock the bootloader on your Tab A7.
Unlike a majority of other OEM devices, Samsung doesn’t require using any fastboot commands or involve retrieving any unlock keys. It could be done straight on the device itself. When you turned ON the toggle, the bootloader enabled a special ‘Device Unlock Mode’ which is used for unlocking.
To unlock the bootloader, power off your Tab A7 first. Then connect it to the computer while holding the Volume Up and Volume Down keys together until you see the bootloader screen (as shown in the figure below).

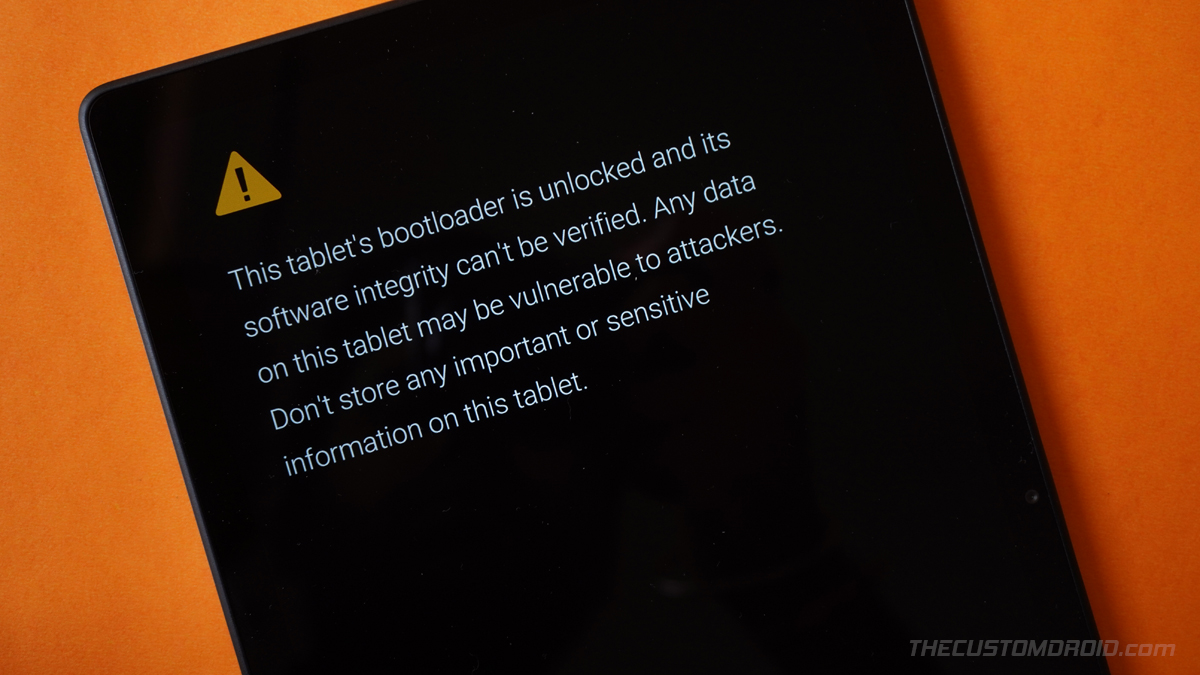
Now long-press the Volume Up key to enter ‘Device unlock mode‘. You should now be presented with a confirmation prompt for unlocking the bootloader. Finally, press the Volume Up key to confirm and unlock the bootloader on your Galaxy Tab A7.
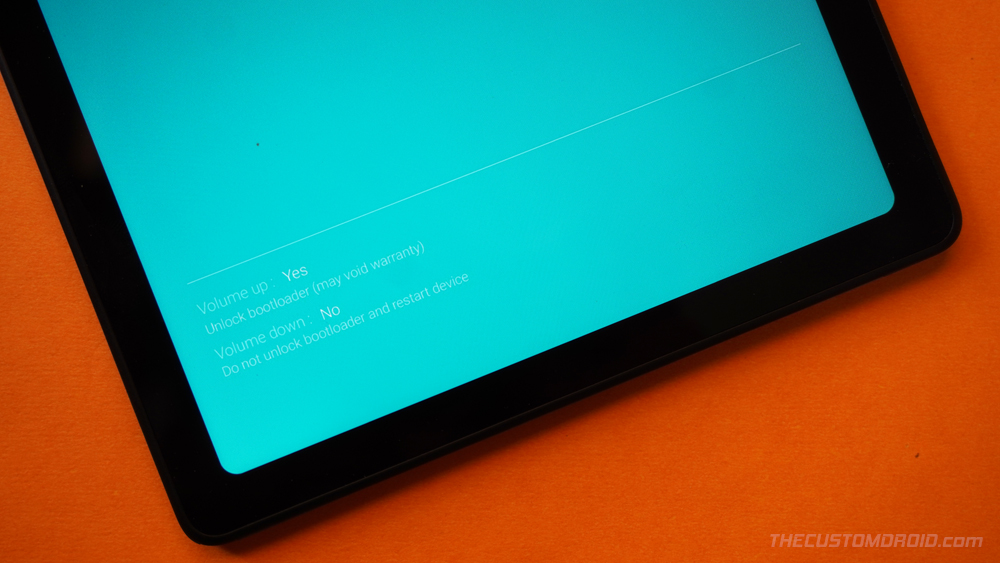
Your Tab A7’s bootloader is now unlocked and it should reboot automatically. You should also see a warning message right before the Samsung splash screen, just as shown in the picture below. This is an obligatory warning message and completely normal. And before you ask, no, there’s no way to get rid of it (unless of course, you relock the bootloader).
Advertisement
The first boot after unlocking the bootloader could take some time (took around 3-4 minutes for me). So be patient.
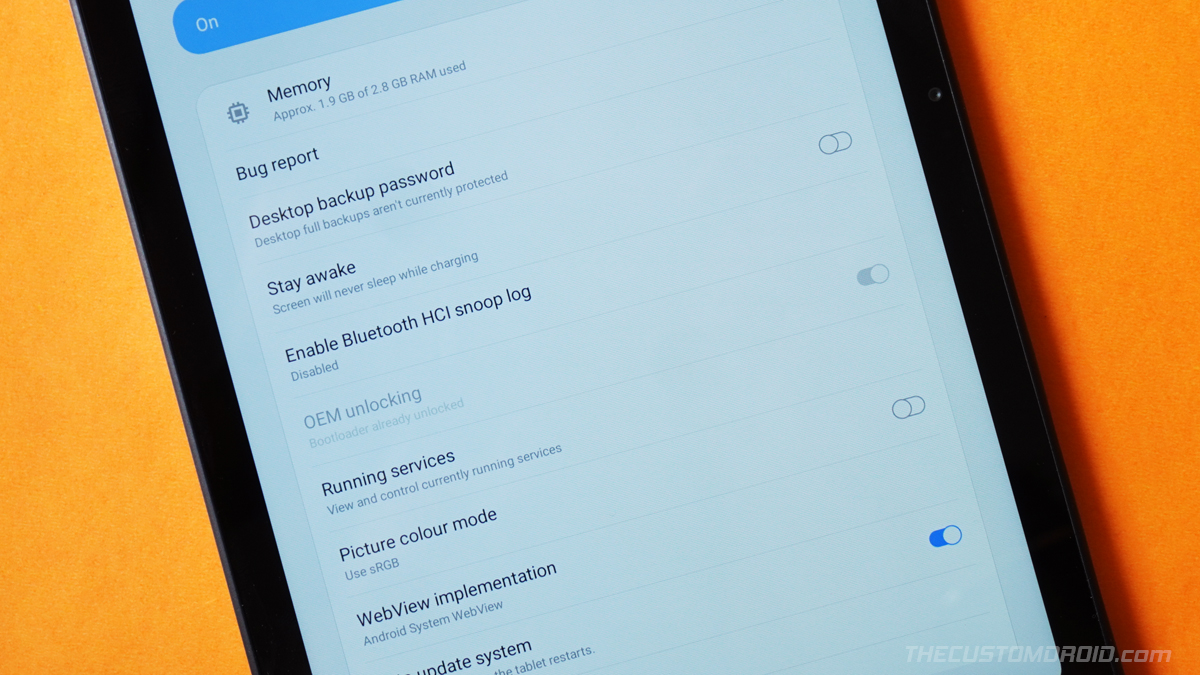
Step 3: Verify the bootloader status to disable VaultKeeper
Now that the bootloader is unlocked, you will need to verify it to prevent Samsung’s VaultKeeper service from kicking in and relocking the bootloader.
After your tab boots, set it up by following the on-screen instructions (no need to sign in to your accounts at this point) and connect it to the internet. Then enable the Developer options as shown in step #1 and go to ‘Settings‘ → ‘Developer options‘. The OEM unlocking toggle should be greyed out and say that the bootloader is already unlocked.
Now that the bootloader is unlocked, it’s time to start with the rooting process.
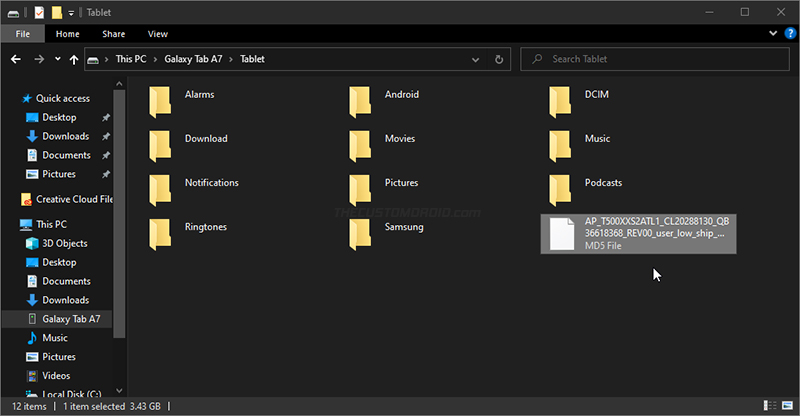
Step 4: Extract the AP firmware and transfer it to the Tab A7
The downloaded firmware package should be in .zip file format, so you need to extract its contents to get the flashable firmware binaries. So, open the location on your computer where the firmware package was downloaded, right-click on the file, choose “Extract All” and then select “Extract”.
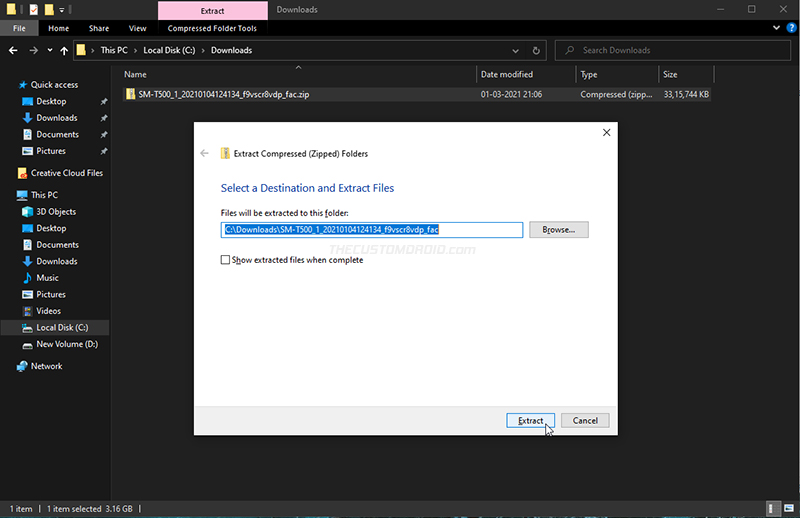
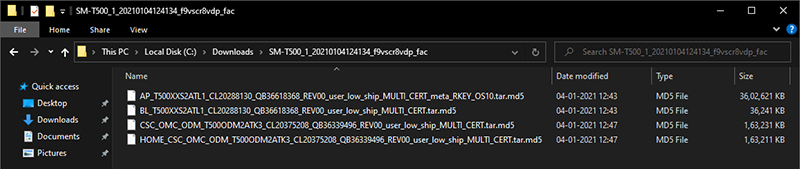
The extracted folder should contain the individual firmware files in .tar.md5 format. These will be:
- AP
- BL
- CP (Only for SM-T505)
- CSC and HOME_CSC
While you’ll only need the AP firmware for patching, don’t delete the rest of the files. You will need these files later on during this guide.
Now, connect your Galaxy Tab A7 to the computer via USB and enable ‘File Transfer’ mode. Copy over the extracted AP firmware file to the tab’s internal storage. Although you can copy this file anywhere, we suggest copying it to the root directory (i.e. outside all the folders) for easier access.
Step 5: Patch the AP Firmware with Magisk
With the required AP firmware now transferred to your tablet, it’s time to patch with Magisk, using the official Magisk companion app. To do this, transfer the downloaded Magisk APK file (e.g. Magisk-v22.0.apk) to your tablet’s internal storage and then install the APK using a file manager application.
Next, go to the app drawer and launch the Magisk Manager application on your Galaxy Tab A7. Then press the settings icon (cogwheel) on the top-right of the app’s window and press the ‘Update channel‘ option. Select ‘Beta‘ from the list and go back to the app’s main screen. Not needed anymore as Magisk v21 has been pushed to the Stable channel as well.
Launch the Magisk app, press the ‘Install‘ button and choose ‘Select and Patch a File‘ from the list of available installation methods. This should instantly open the file selection window for you to choose the file you want to patch with Magisk. So, navigate to the location where you transferred the AP firmware file and select it.
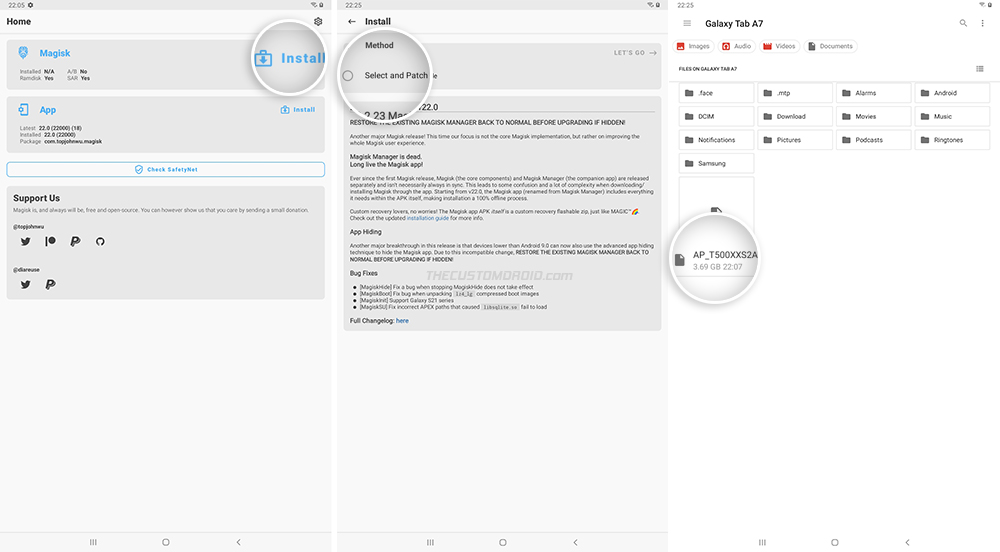
Once the file has been selected, press ‘LET’S GO!‘ to patch the file. The app will download the latest version of Magisk and patch the AP firmware with it. The patching process might take a minute or two depending on the filesize.
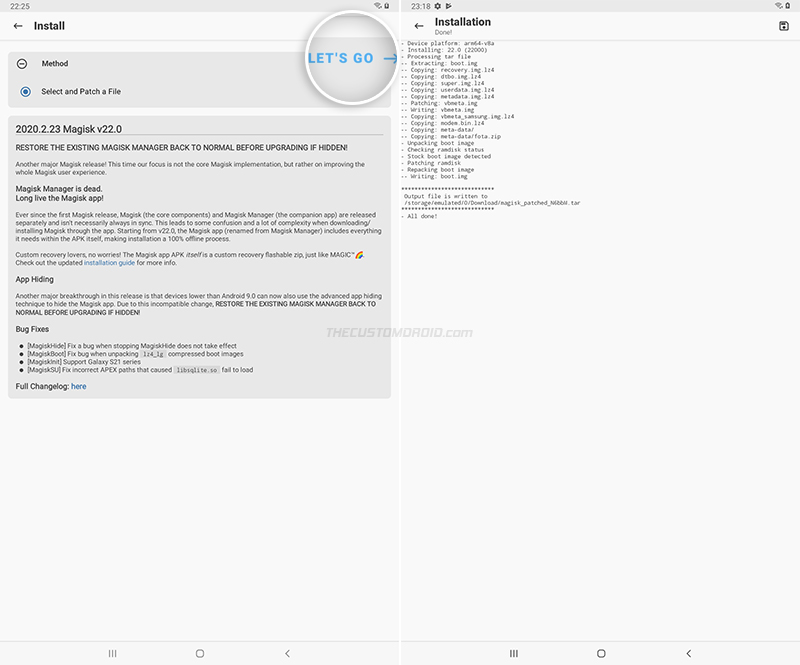
After the process finishes, the patched AP firmware TAR file will be stored inside the ‘Download‘ folder of your Tab A7’s internal storage. The filename should be “magisk_patched_xxxxx.tar”, where “xxxxx” will be a series of random letters.
Connect your tab to the computer and copy the patched AP firmware file to the folder where the rest of the firmware files are present (BL, CP, CSC, etc).
Advertisement

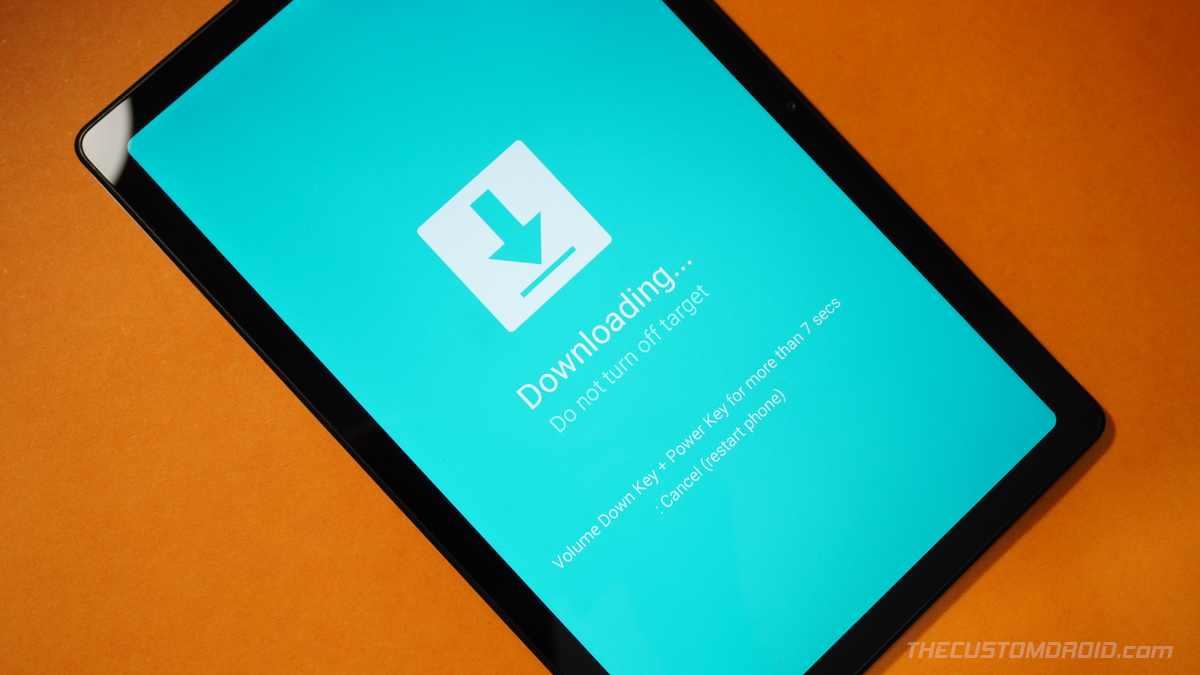
Step 6: Boot your Galaxy Tab A7 into Download Mode
For Odin to recognize your Galaxy Tab A7 and flash the patched AP firmware, you must boot it into Download Mode.
To do this, power off your tab first. Then connect it to your computer over USB while holding the Volume Up and Volume Down keys together. You should now see the Bootloader screen (what you saw while performing step #2). Simply, tap the Volume Up key once to enter Download Mode.
- Detailed instructions: How to enter Download Mode on Samsung Galaxy Tab A7
Here’s how it looks like:
Step 7: Launch the Odin Tool on your computer
Now, open the folder where the Odin tool was extracted and launch the tool by double-clicking the ‘Odin3 v3.14.4.exe‘ executable file. If you’re prompted with a message on the screen, select “Ok“. You should now see Odin’s interface on your computer screen.
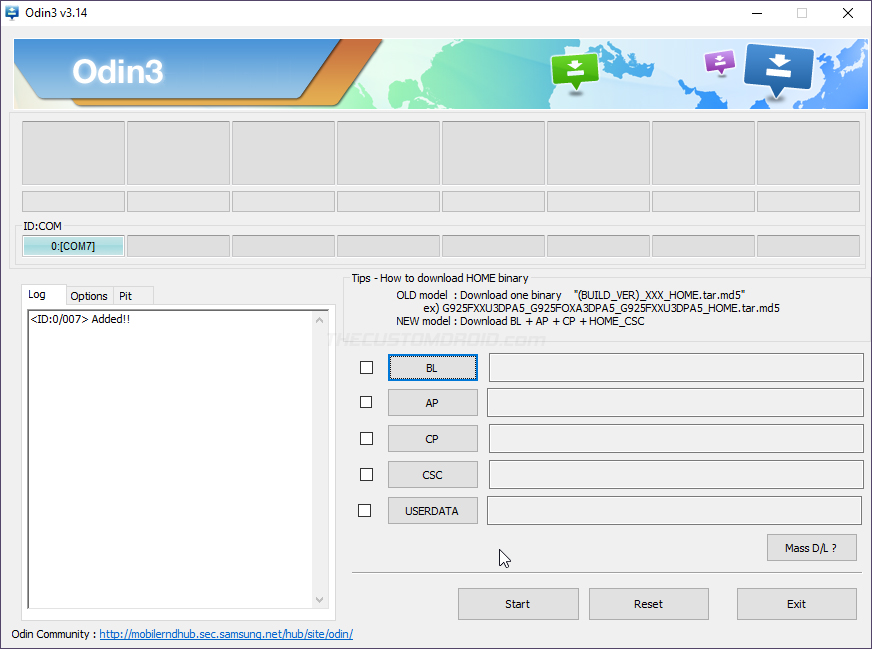
The tool will automatically recognize your Galaxy Tab A7 in Download Mode and display the corresponding COM port number on the top-left of the interface.
Tip: If you’re operating on a Linux/macOS computer, you can flash the firmware on Samsung devices using Heimdall.
Step 8: Flash the Patched AP Firmware to Root Galaxy Tab A7
With everything now ready, it’s time to flash the patched AP firmware file and root your Samsung Galaxy Tab A7 with Magisk.
Now, load the firmware files in the Odin tool as instructed below:
- First, click ‘BL‘ and select the BL firmware file (BL_xxxxxxxxxxx.tar.md5)
- Click ‘AP‘ and select the Magisk-patched AP firmware file (magisk_patched_xxxxx.tar)
- Next, click ‘CP‘ and select the CP firmware file (CP_xxxxxxxxxxx.tar.md5)
- Finally, click ‘CSC‘ and select the CSC firmware file (CSC_xxxxxxxxxxx.tar.md5)
Few things to note:
- The CP firmware is only applicable for the LTE variant of the Tab A7 with the SM-T505 model number. This file does not exist for the WiFi variant.
- When rooting, make sure to use the regular CSC for flashing instead of the HOME_CSC.
- Do not attempt to flash the patched AP firmware on its own. Always flash it along the rest of the firmware files like BL, CP, and CSC).
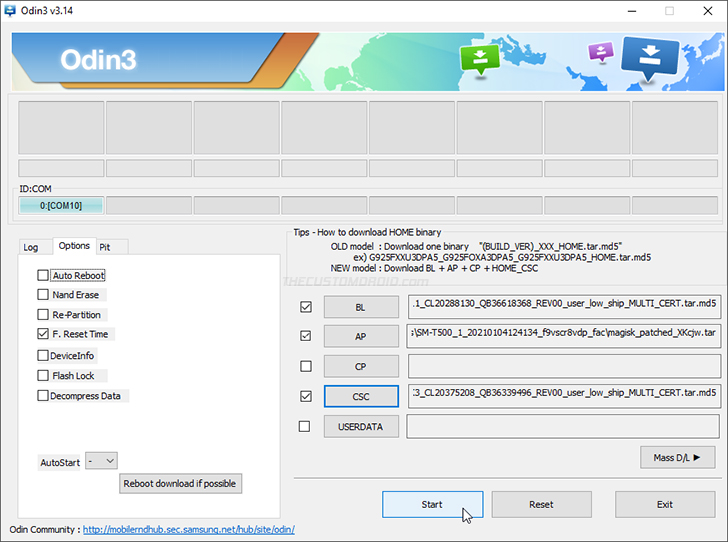
Once all the firmware files have been loaded in their corresponding slots, click the ‘Options’ tab in Odin and make sure to uncheck ‘Auto Reboot’. This will prevent your tablet from automatically rebooting after the flash is complete.
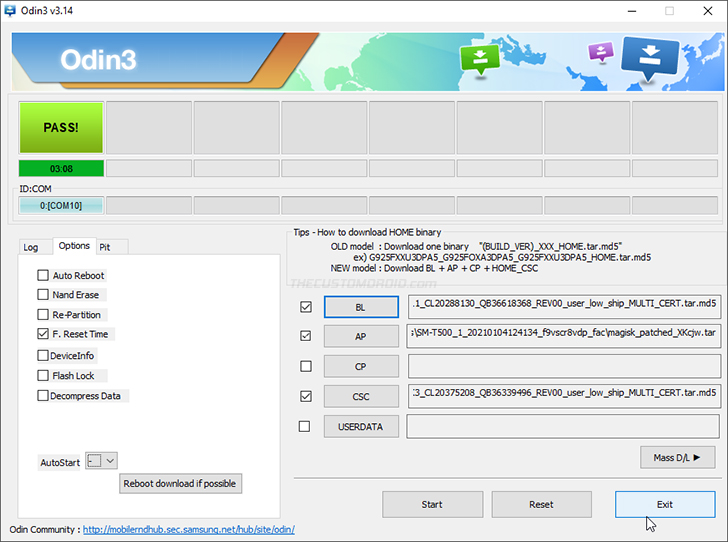
Finally, click ‘Start‘ to begin the flashing process. Once it finishes, you should see a ‘PASS!‘ message in Odin. You can close Odin and disconnect your tablet from the computer.
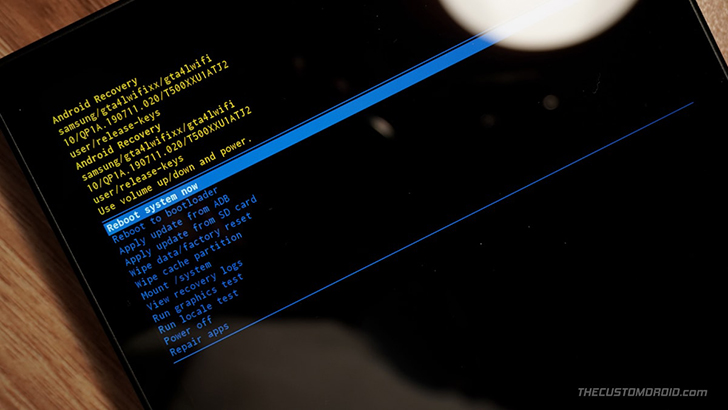
Step 9: Perform a factory reset via stock recovery
Now, you will need to boot your Tab A7 into the stock recovery mode and perform a factory reset.
To do this, hold the Volume Down and Power keys together for about 7 seconds to exit Download Mode. As soon as the screen turns off, release the Volume Down key and quickly hold the Volume Up key, while still holding the Power key.
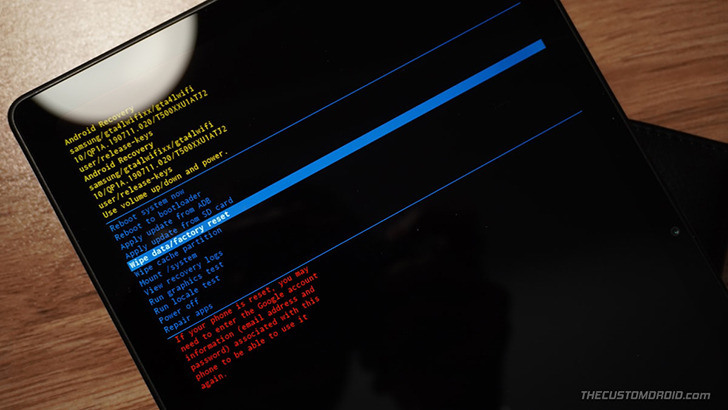
Your tab should now enter the stock recovery mode. Here’s what the recovery mode looks like:
Advertisement
Use the Volume keys to move the selector to ‘Wipe data/factory reset’ and hit the Power key to confirm the selection. Finally, select ‘Factory data reset’ to confirm when prompted.

Once the factory reset is complete, select ‘Reboot system now’ from the recovery’s main menu to boot your Tab A7 into the system (OS).
Your tab may reboot once (or more) during the first boot after rooting. It could take some time, so be patient. Once it boots, you will need to go through the initial setup by following the instructions and connect it to the internet.
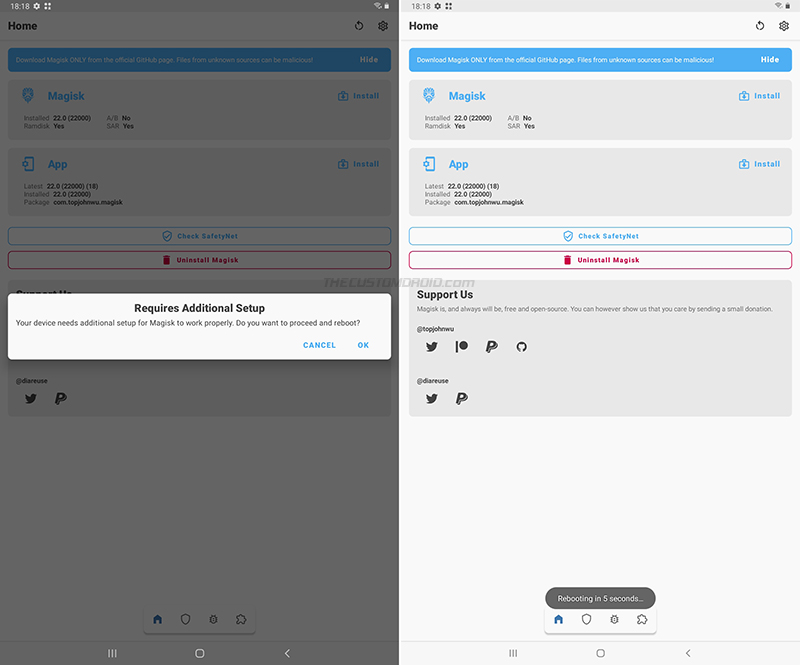
Step 10: Complete the Additional Magisk Setup
While the rooting process is now complete, there are just a couple of things left to do before you could start using Magisk.
So, go to the app drawer and launch the Magisk app. The app initially installs a stub and will prompt you to install the full Magisk app. So select ‘Ok’ and then ‘Install.
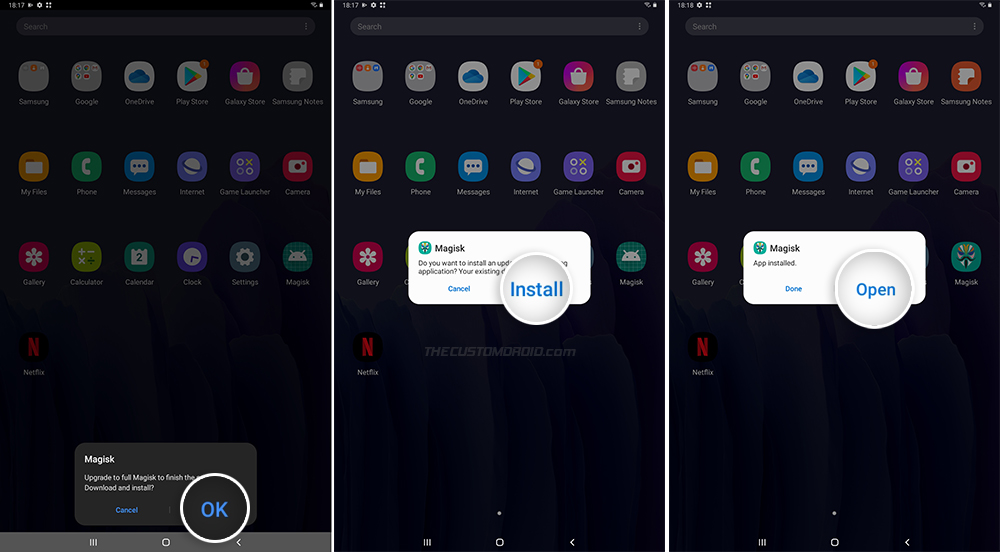
Once the full Magisk app is installed, launch the app and it will prompt you to complete the additional setup. So press ‘Ok’ and wait for the magic to happen. Once it is complete, your tab will reboot automatically.
Your Galaxy Tab A7 is now Rooted!
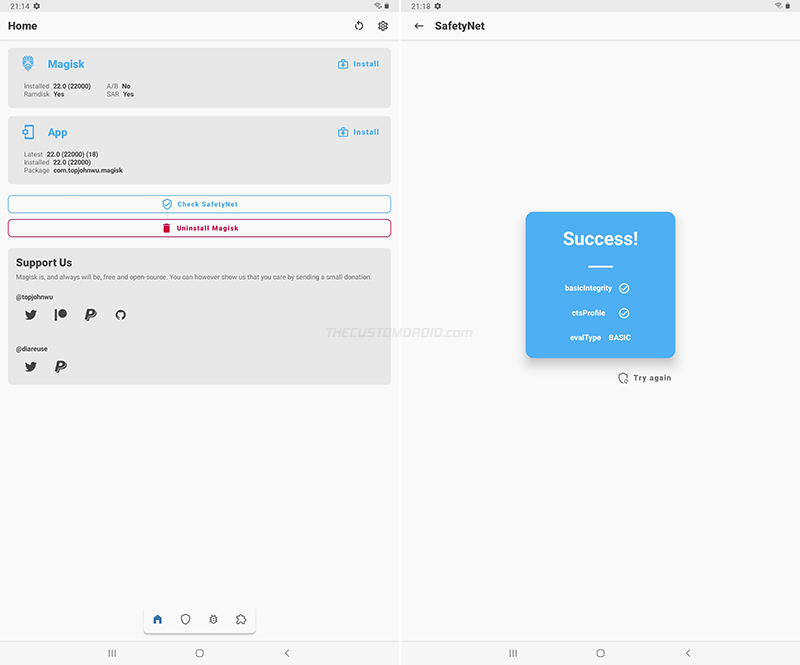
That’s it! You have successfully rooted your Galaxy Tab A7 10.4. To verify this, you can launch the Magisk app and you should see the installed Magisk version right next to the ‘Installed’ label. You can further check if your rooted tab passes SafetyNet by pressing the ‘Check SafetyNet’ button in the Magisk app.
SafetyNet fails and shows ‘Hardware’ evalType? It means that Google’s new hardware-backed attestation is now in effect on your tablet. You can try fixing this by using the Universal SafetyNet Fix module.
Now go ahead and start using root applications like Titanium Backup. You could also hide root from banking and security apps that might generally not work on a rooted device. From Magisk v20.4 onwards, Magisk Hide is turned off by default on new installations. So, you will need to turn it ON manually by going to the Magisk app’s settings menu.
Frequently Asked Questions (FAQs)
Now let’s take a look at some questions you might have after rooting your tablet.
Q: How can I install software updates on my Galaxy Tab A7 after rooting?
- Yes. After a new software update is released, download its firmware package and re-perform step 5-9 of this tutorial again. Do not attempt to flash the stock AP firmware file once you have rooted.
- During the upgrade process, you can use the HOME_CSC file when performing step #9 instead of the regular CSC. This will ensure that no data is erased while performing the upgrade.
Q: Do I need to press a special button combination to enter the rooted Magisk system and stock recovery?
- Unlike some other Samsung phones, you do not need to press any specific button combo for any boot modes. A normal boot (without pressing any buttons) will always boot the tab into the rooted system with Magisk. You can boot your Galaxy Tab A7 straight into the stock recovery as described in this tutorial.
Q. I wish to unroot my tab and revert back to the stock Samsung software, what should I do?
- All you have to do is download and install the latest stock firmware on your Galaxy Tab A7.
That’s it! You have learned how to unlock the bootloader and root the Samsung Galaxy Tab A7 10.4 using Magisk. If you have any questions or face any difficulties while performing the instructions, feel free to let us know.
Comments 6 Comments
Comments are moderated, and published only if they are relevant to the topic and add value in a constructive way. If you disagree with something, please be polite and respectful. We suggest you read our comment policy before commenting.
Does this still work if the tablet runs Android 11 instead?
Chris, I don’t find any reason that it shouldn’t work on Android 11. I personally haven’t been able to test because my Tab A7 is back at my parent’s home.
Just make sure that you download and use the correct firmware and the latest version of Magisk, that is version 23.0.
NO FEEDBACK IF YOU PUT COMPLETELY THE WRONG DATA INTO FRIJA
BTW, when Frija says ‘no update available’, it doesn’t provide any more info.
So if you are putting utterly irrelevant info into the mysterious ‘PHONE’ field, you wouldn’t know. You could put different numbers in there forever and still get no feedback at all about what you’re doing wrong.
Perhaps the creators of Frija could put a bit more info about how to find this info into the app?
One easy way would be to match the names of the fields exactly to the field-names the “Phone INFO ★SAM★” app uses.
After all, Frija does link to that app specifically if you click SUPPORT in the app.
Perhaps another way would be for Frija to detect (especially for “PHONE” field) if the user has put in utterly irrelevant numbers (eg. the wrong number of digits), and respond with:
“This is not a “PHONE” code”…whatever “PHONE” means!
PHONE is frankly a very nondescript term and I found it very difficult to find anything matching it, including in the “Phone INFO ★SAM★” app.
The app is clearly designed to make it easier, but in this case it doesn’t
So confusing.
Hello Tim, there were some issues with the Frija v1.4.2 related to downloads. These have been fixed in v1.4.3. You can find the latest release on Github. I will make sure to update the post on Frija and add the link to the releases page so that readers could cross-verify that they are using the latest version at all times.
As for the tool not providing apt feedback, I think it would be practically impossible to verify what wrong information was provided. In theory, to do this, the tool would need to verify the information with a well-maintained database. Given the number of devices, their variants, and possible firmware versions available, it would be almost impossible to implement.
Thus, it’s left upon the users to make sure that they input the correct information when using Manual mode. Another reason why the “Auto” mode is activated and used out-of-the-box.
Yes, the “Phone” field for Manual mode could be labeled to more descriptive/related firmware terms like CP/Modem. You can provide your feedback directly to the developer over at this XDA thread.
Hi. I had successfully completed the Odin process and rebooted it. Now to complete step 10, I clicked on the magisk icon. After clicking OK on upgrade to full magisk to finish the setup. I get a message of there is a problem parsing the package and other window show staging app. The process is incomplete and the tab is not properly rooted. Plz help
Mayank, the issue seems like an incomplete download. Try downloading the full Magisk APK file to your Tab from the official GitHub page and launch the Magisk app after installation, it should then prompt you to finish the additional setup as shown above.