In this step-by-step guide, you’ll learn how to root OnePlus 6 and OnePlus 6T using Magisk Patched Boot Image, without having to install TWRP recovery at all. The instructions will work on any OnePlus 6/6T running Android 10 (OxygenOS 10+) or Android 9 Pie (OxygenOS 9+).
Advertisement
Rooting your phone with Magisk not only allows you to use root applications but also enables you to apply modifications to your phone’s software systemless-ly. That is without actually mounting or altering the system partition of the phone. We have already covered a guide to install TWRP on OnePlus 6/6T and root the phone using it.
However, if you do not plan on flashing custom ROMs and just want to root your phone, then installing TWRP isn’t even necessary. Furthermore, Magisk creator and developer topjohnwu also provided an explanation as to why having both TWRP and Magisk root installed together could cause problems, especially on Android 10 or above. Even if you plan on using custom ROMs, you could simply boot TWRP temporarily and use it to install ROMs or anything else for that matter.
So, rooting your OnePlus 6/6T without installing TWRP can make things more streamlined, leading to minimal scope for any errors. Plus, rooting via this method also enables you to easily install OTA updates on your rooted phone.
Advertisement
The process is very simple. In brief, the first step is to download the stock boot image corresponding to the OxygenOS version installed on your phone. Then, the second step is to patch the stock boot image with Magisk, via the Magisk Manager app. And finally, the third step is to flash the resultant patched boot image to your phone via fastboot.
So now, without any further ado, let us begin with the instructions.
Page Contents
Before You Begin
Before you head to the instructions, ensure that all the requirements listed below have been fulfilled.
Advertisement
- Rooting, if done wrong, can lead to data loss. So, it’s always best to safeguard your data beforehand. Make sure to take a complete backup of all your data first. Should you need it, you can also visit this guide for the purpose.
- In order to root, you must first unlock the bootloader of your phone. If you’ve already done that, you can proceed further. If not, then follow our separate guides for the OnePlus 6 and OnePlus 6T. Once you have unlocked the bootloader, come back here and follow the instructions.
- Download and install OnePlus USB drivers on your PC.
- Install the latest Android SDK platform-tools on your computer and open a Fastboot command window inside the Platform-Tools folder.
Instructions to Root OnePlus 6/6T using Magisk
It’s quite easy, even if you’re new to the whole rooting scene. For making the whole process easier to understand, we have split the instructions into three major steps that I just mentioned above.
Step 1: Download Stock Boot Image
The first step in order to root OnePlus 6/6T is to download the stock boot image corresponding to the installed OxygenOS version (Stable or Open Beta).
Yes, you could also use pre-patched boot images from XDA and we could have provided them as well. But, I decided not to do so. That’s because when you use Magisk Manager to patch the stock boot by yourself, it will create and store a backup of your stock boot image. This backup will not only allow you to take OTA updates on your rooted phone but is also necessary during the unrooting procedure.
For OnePlus 6 (codename: enchilada)
- Stable:
- OxygenOS 10.3.9: stock_boot_oos_10.3.9_op6.zip
- OxygenOS 10.3.8: stock_boot_oos_10.3.8_op6.zip
- OxygenOS 10.3.7: stock_boot_oos_10.3.7_op6.zip
- OxygenOS 10.3.6: stock_boot_oos_10.3.6_op6.zip
- OxygenOS 10.3.5: stock_boot_oos_10.3.5_op6.zip
- OxygenOS 10.3.4: stock_boot_oos_10.3.4_op6.zip
- OxygenOS 10.3.3: stock_boot_oos_10.3.3_oneplus6.img
- OxygenOS 10.3.2: stock_boot_oos_10.3.2_oneplus6.img
- OxygenOS 10.3.1: stock_boot_oos_10.3.1_oneplus6.img
- OxygenOS 10.3.0: stock_boot_oos_10.3.0_oneplus6.img
- OxygenOS 10.0.1: stock_boot_oos_10.0.1_oneplus6.img
- OxygenOS 10: stock_boot_oos_10_oneplus6.img
- OxygenOS 9.0.9: stock_boot_oos_9.0.9_oneplus6.img
- OxygenOS 9.0.8: stock_boot_oos_9.0.8_oneplus6.img
- Open Beta:
- OxygenOS 10 Open Beta 5: stock_boot_oos_10_ob5_oneplus6.img
- OxygenOS 10 Open Beta 4: stock_boot_oos_10_ob4_oneplus6.img
- OxygenOS 10 Open Beta 3: stock_boot_oos_10_ob3_oneplus6.img
- OxygenOS 10 Open Beta 2: stock_boot_oos_10_ob2_oneplus6.img
- OxygenOS 10 Open Beta 1: stock_boot_oos_10_ob1_oneplus6.img
For OnePlus 6T (codename: fajita)
- Stable:
- OxygenOS 10.3.9: stock_boot_oos_10.3.9_op6t.zip
- OxygenOS 10.3.8: stock_boot_oos_10.3.8_op6t.zip
- OxygenOS 10.3.7: stock_boot_oos_10.3.7_op6t.zip
- OxygenOS 10.3.6: stock_boot_oos_10.3.6_op6t.zip
- OxygenOS 10.3.5: stock_boot_oos_10.3.5_op6t.zip
- OxygenOS 10.3.4: stock_boot_oos_10.3.4_oneplus6t.img
- OxygenOS 10.3.3: stock_boot_oos_10.3.3_oneplus6t.img
- OxygenOS 10.3.2: stock_boot_oos_10.3.2_oneplus6t.img
- OxygenOS 10.3.1: stock_boot_oos_10.3.1_oneplus6t.img
- OxygenOS 10.3.0: stock_boot_oos_10.3.0_oneplus6t.img
- OxygenOS 10.0.1: stock_boot_oos_10.0.1_oneplus6t.img
- OxygenOS 10: stock_boot_oos_10_oneplus6t.img
- OxygenOS 9.0.17: stock_boot_oos_9.0.17_oneplus6t.img
- OxygenOS 9.0.16: stock_boot_oos_9.0.16_oneplus6t.img
- Open Beta:
- OxygenOS 10 Open Beta 5: stock_boot_oos_10_ob5_oneplus6t.img
- OxygenOS 10 Open Beta 4: stock_boot_oos_10_ob4_oneplus6t.img
- OxygenOS 10 Open Beta 3: stock_boot_oos_10_ob3_oneplus6t.img
- OxygenOS 10 Open Beta 2: stock_boot_oos_10_ob2_oneplus6t.img
- OxygenOS 10 Open Beta 1: stock_boot_oos_10_ob1_oneplus6t.img
Note: I will try my best to update this post with the latest stock boot images. However, sometimes it may not be possible to do so at all times. In that case, you can download the full ROM of the latest OxygenOS version from here and follow the instructions in this guide to extract the payload.bin file and get the boot image.
Advertisement
Step 2: Patch Stock Boot Image via Magisk App
- Download the stock boot image for your OnePlus 6/6T from above.
- Extract the downloaded ZIP file to get the
boot.imgfile. - Connect your device to the PC using the USB cable.
- Transfer the extracted stock boot image file to the device’s storage.
- Now, download the latest Magisk app from GitHub and install the APK on your device.
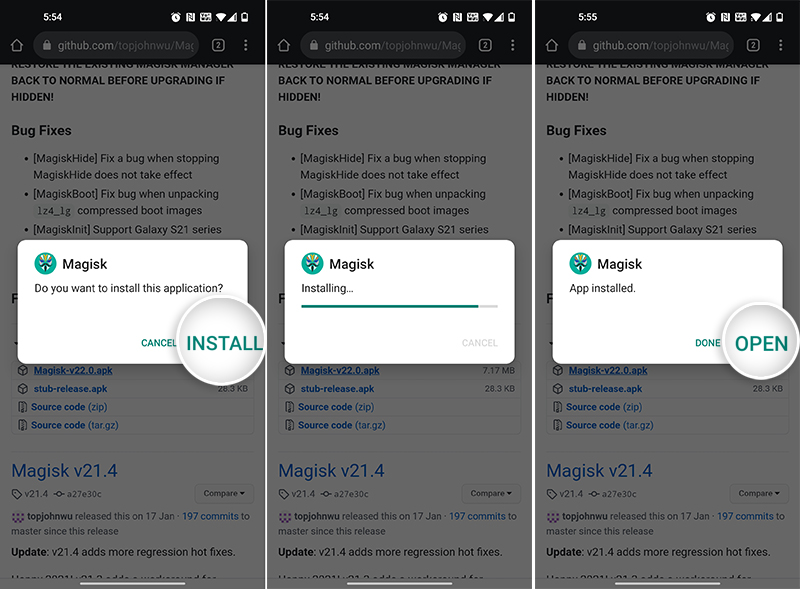
- Once installed, press “OPEN” to launch the Magisk application.
- Press “Install” and tap on “Select and Patch a File”.
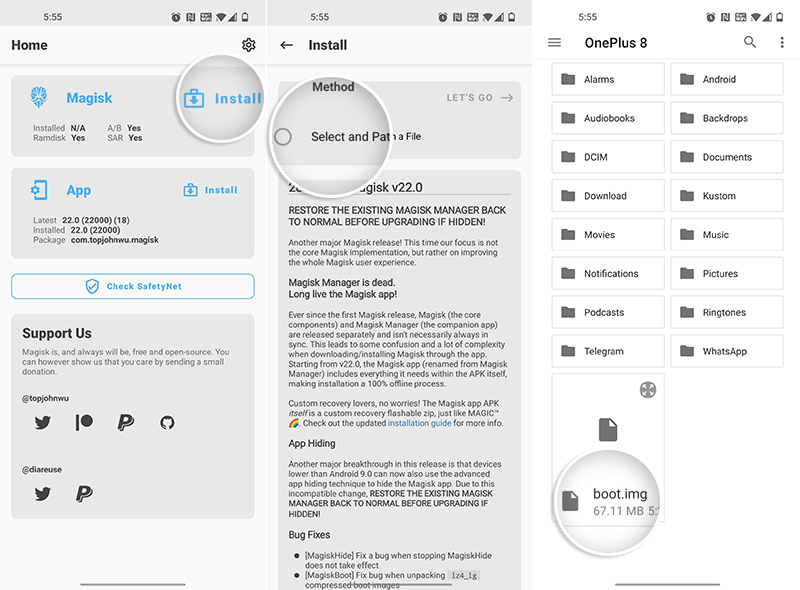
- Navigate to your phone’s internal storage and select the stock boot image file (
boot.img). - Once the file has been selected, press “Let’s Go” to patch the boot image using Magisk.
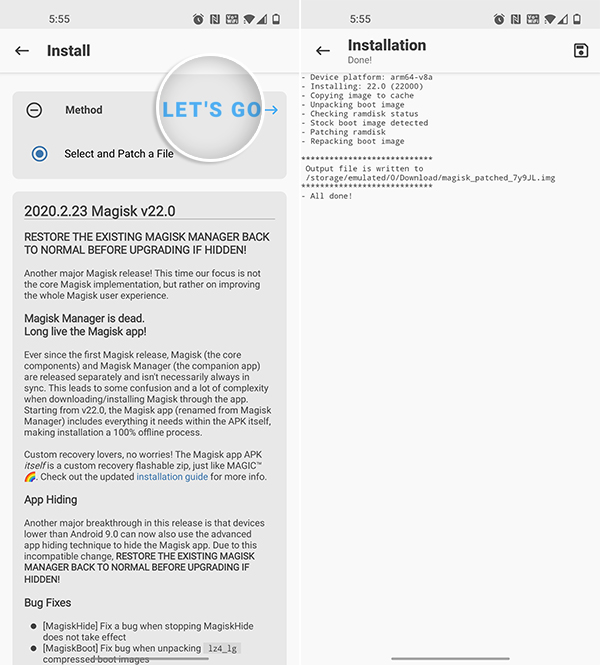
The app will automatically patch the stock boot with the latest version of Magisk. The resultant patched boot image will be placed inside the “Download” folder of your phone’s internal storage.
Now, the last and final step to root OnePlus 6/6T is to flash the patched boot image using fastboot. Follow the instructions in the next step for the same.
Step 3: Flash Patched Boot Image to Root OnePlus 6/6T using Magisk
- Transfer the patched boot image (magisk_patched.img) from the phone to the folder where the Android SDK platform-tools are installed on the PC.
- Example: ‘C:\platform-tools’ on Windows or ‘Documents/platform-tools’ on macOS/Linux.
- Power off your OnePlus 6/6T completely.
- Hold the Volume Up and Power buttons together to boot your OnePlus device into Fastboot Mode.
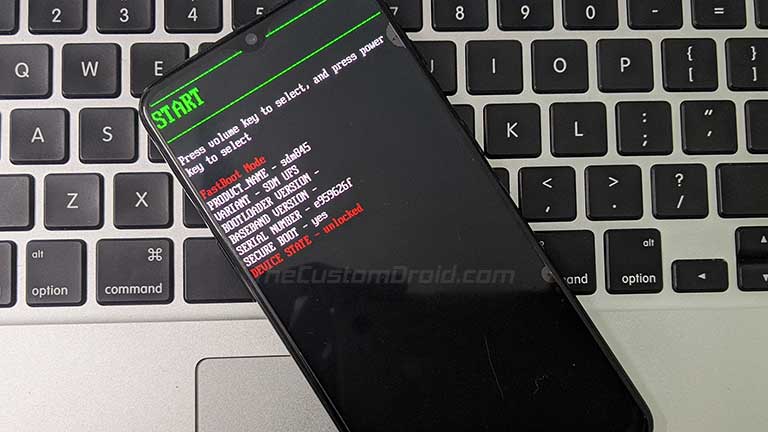
- Connect the phone to the PC while it is in Fastboot Mode.
- Now, launch the command-line window on your PC.
- Enter the following command to ensure that your OnePlus 6/6T is successfully being detected by the PC over fastboot:
fastboot devices
- The command should output the device ID, along with the “fastboot” message.
- Finally, enter the following command to flash the patched boot image and root OnePlus 6/OnePlus 6T using Magisk:
fastboot flash boot magisk_patched.img

- Once the file has been flashed, reboot your device by entering:
fastboot reboot
Your OnePlus device should now boot into the system (OS) and rooted with Magisk. Now go to the app drawer, open Magisk Manager, and follow the on-screen instructions to perform any additional process, if required.
Advertisement
Now that you have successfully rooted your OnePlus 6/OnePlus 6T, you may go ahead and modify the phone’s software by installing Magisk Modules. You can also use Magisk Hide to hide root from apps that might detect it and stop working. And of course, you can now download and use root applications like Titanium Backup.
And like I mentioned earlier, rooting through this method allows you to install OTA updates on your phone as well. When an update arrives, you can follow the instructions in this guide to install it.
There you go! This was our guide on how to root OnePlus 6 and OnePlus 6T using Magisk, without installing TWRP. If you have any questions regarding the rooting procedure, just reach me by commenting below.
Comments 32 Comments
Comments are moderated, and published only if they are relevant to the topic and add value in a constructive way. If you disagree with something, please be polite and respectful. We suggest you read our comment policy before commenting.
I used this method on my oneplus 6. All the steps worked but one fastboot reboot, the phone is now stuck at Qualcomm crashdump mode. Force restart doesnt work. Cant go to the fastboot mode either. Any help would be highly appreciated.
Hi Ganesh, can you please share the version of Magisk that you used? Which OxygenOS and Android version is your OnePlus 6 running on? Also, have you ever experienced the Crashdump Mode in the past with your OnePlus 6?
To exit Qualcomm Crashdump Mode, press and hold the Volume Up and Power buttons together for about 8-10 seconds. On doing so, your phone will shut down and try to boot normally. See if you can get into the OS or if it loops back into the Crashdump Mode.
My Oneplus 6 is at 10.3.11. Can you please let me know where can I get Stock Boot Image file for this
Gaurav, you can download the OxygenOS 10.3.11 OTA package from the OnePlus 6 OTA repository and then follow this tutorial to extract the OTA payload.bin file.
You might find a copy of the stock boot image over at XDA, but I personally like the more hands-on approach of extracting the boot image by myself. It’s fun and in the process we also learn something.
Thanks, I have downloaded 10.3.11 OTA package from the link you have shared and extracted all the files. Can you please confirm if we need to just copy boot.img file from extracted files or anything else as well is required? This boot.img file is around 64MB
Yes, it’s just the stock boot image (
boot.imgfile) that you’ll need for rooting your OnePlus 6.Hey Brother,
I have my Oneplus 6 I have installed Custom rom on my phone ( Evolution X) and it is very good but the battery SOT is Average I wanted to ask you which is the best kernel for Oneplus 6 with Evolution Kernel?
Hi Santosh, I stopped using custom kernels for a while now. I usually run stock OxygenOS software with Magisk root on almost all my devices.
But, I have used A LOT of custom kernels in the past. For the most part the following three kernels have always worked best for me across various ROMs, and on various different devices. I am providing you with the links to each of these kernels below in order of my preference.
1) blu.spark kernel: https://forum.xda-developers.com/t/kernel-blu_spark-r149-op6-t-oos-10-custom-a10.3800965/
2) ElementalX kernel: https://forum.xda-developers.com/t/kernel-february-5-elementalx-op6-4-00-android-10.3799054/
3) Franco Kernel: https://forum.xda-developers.com/t/kernel-op6-francokernel-r22-25th-aug-stock-custom-roms.3806062/
I suggest you do some testing by running each one of them for at least three days and get the metrics before finalizing which one works the best for your current ROM.
Hi, I have just rooted my phone with the help of your process, Thank You for it
and i have a doubt in the magisk manager that ctsprofile is false in the safetyNet check process any suggestion for this?
what to do?
Hi Santosh. Happy that my guide proved helpful.
As for CTSprofile failing, it could be due to Google’s new hardware-based attestation. If that has been enabled on your device, there’s nothing anyone could do. To check if it’s enabled for your phone or not, check this page.
I had a similar issue. Go to the Google Play store>settings and ensure that your phone is certified. If your phone is not play store certified, it can cause the mismatch. I watched a Youtube video on how to certify my phone while using Magisk hide props and Busybox. Google search the steps if you get a chance. You use a terminal emulator after installing those modules to update your phone’s fingerprint and become certified within the Play store. My cts profile mismatch worked after it became certified.
Thanks, Joel, for taking out the time and helping out others here. Really appreciate it.
Google’s latest hardware-based attestation for SafetyNet has made things further complicated. Yes, Magisk Hide Props, along with some other tricks are still working. So we might enjoy it while we can.
First of all I wanna say, huge thanks for the very detailed guide on how to root OP6T 🙏 as a newcomer in the world of rooting I really appreciate it!
Now I have a couple of questions:
1. I noticed in the USB driver guide that you can install them to Mac and Windows, is there a Linux version too? Since the adb and fastboot can be downloaded to Linux.
2. Can I use the hisuite or cloud backup to get my data back on the phone after the bootloader reset? Or maybe after the root and reboot process? Will it remove my root access?
3. If I want to install fx: custom finger print scanner animation or the fancy notification mod, do I neew TWRP?
4. Do you have a guide somewhere on what to do if it half-bricks or gets stuck in the bootloader part?
I have a OP6T running 10.3.4
Again – Huge thanks for your work man! You’re a hero
Hello. Thank you so much for such kind words. I am really glad that the guide was helpful.
1) There’s no need for drivers on Linux, or in fact Mac. The reason why you’d need the Android File Transfer tool on Mac is for transferring data to/from the device. This is because Mac cannot mount the device’s storage over MTP protocol.
2) Yes, you can. As far as the tool doesn’t function in a way that involves updating the firmware, it should be just fine.
3) Could you provide a link to this specific mod? In general, most compatible mods are now available as Magisk modules. However, there are certain mods that are still provided as ZIP file flashable through only TWRP.
4) I did cover quite a detailed tutorial to unbrick the OnePlus 6T from a hard bricked state. Most soft-bricks are caused due to a bad flash (flashing an incompatible firmware or a mod). In these cases, you can simply re-flash the correct firmware/ROM, or if it’s a mod, then you can remove it. It all comes down to what caused the brick. Once you figure that out, you can then device the plan-of-action.
I would give a personal reassurance on this one. If you ever encounter a brick, you can let me know by commenting on the unbricking tutorial. I will give it my best shot to get your phone out of the misery.
You’re welcome! And yet again, thank you for such nice words. It keeps me going.
Hey, I have a question.
So before rooting, I unlock my bootloader and after flashing the patched image, I’d like to lock my bootloader again, so as to not show that unlocked message while rebooting as well as to use banking apps and install OTA updates.
But on locking the bootloader back, it wipes the data again. Will the root be lost then?
Hi Vishrut. Do not lock back the bootloader if your phone is rooted or has any other sorts of modifications done to any of the device partitions. It will probably end up in brick.
Here are a few key things I want you to know about.
1) If you want to root, you will need to keep the bootloader unlocked and bear with the warning message you see on the bootup. That’s normal and in no way has any impact over the installed apps or OTA updates.
2) Banking apps can still be used on a rooted phone. Magisk (which is used to root the phone) has a feature known as “Magisk Hide”. It allows you to hide root from such apps so that they cannot detect root and still work.
3) For OTA updates, you can still take OTA updates and preserve root after updating. To do this, please take a look at this page.
If you have any more questions, please feel free to reach back.
Hi Dhananjay,
As per your guidance, i got to know that :
1. To use magisk in One plus 6t with 10.3.4 , I don’t have to unlock the Bootloader, if to root with Patch file. Right!
2. But If I have to root through TWRP, then only have to unlock the Bootloader ( back up to be taken, as may erase data), Right!
Hi Shivam. Sorry, but that’s incorrect. If you take a look over at the pointers listed under the “Before You Begin” section, you will see that I have mentioned the following: “In order to root, you must first unlock the bootloader of your phone”.
I believe you’re new to this stuff. So, I will take some time to provide an explanation.
A bootloader is basically a program that instructs the phone on how and what to load when your phone boots. Manufacturers lock the bootloader of their phones to prevent any unauthorized access to the phone’s software.
With a locked bootloader, one cannot meddle or change the phone’s software. And so, if you want to flash unofficial software, be it root, TWRP, custom ROMs, etc, you will need to unlock the bootloader first.
Like in this case, both Magisk Root and TWRP are unofficial software. So, in order to install or flash either of them, it is important to unlock the bootloader first.
Hi Dhananjay,
Thanks for the guide, everything works fine on my oneplus 6 oos 10.3.3 until i reboot the phone. Each time i lost the root and had to reflash the magisk patched img. Do you have some solution?
Hi FrameZh. I do have something that you might want to try.
After flashing the patched boot image, go to ‘Magisk Manager’, press ‘Install’, and select ‘Direct Install (Recommended)’. After this reboot your phone twice to see if root sticks.
You’re the best, thanks! It works!
I am glad it did. I just another comment from a reader regarding the same problem. I will update the instructions right away.
Thanks for the confirmation as well for the kind words.
Thanks Dhananjay, it is the first time that I root, I am afraid to do it, In case it is successful, how do I unroot the device?
Could you make a guide in all possible ways?
and how is the Stock Boot Image restored?
Thanks, I used google translator.
Hi. You can always unroot by opening the Magisk Manager app and using the ‘Uninstall’ option in it. The app will automatically restore the backup of the stock boot image and unroot the phone completely.
If there’s a 1% chance that the option fails, you can always unroot by flashing the stock boot image using the same command you used to flash the patched boot. That is:
.\fastboot flash boot stock-boot-filename.imgHere “stock-boot-filename.img” will be replaced by the actual filename of the stock boot you’re flashing. For instance, if your phone is running OxygenOS 10.3.3 while it’s rooted, you will need to use the OxygenOS 10.3.3 stock boot image from above. And so, the command should look like:
.\fastboot flash boot stock_boot_oos_10.3.3_oneplus6.imgOr, if it’s the OnePlus 6T:
.\fastboot flash boot stock_boot_oos_10.3.3_oneplus6t.imgIf you have any more questions or need any help with rooting, please feel free to ask me.
hey I’m totally new to this, do I have to unlock bootloader before this process? (so that I won’t lose any data) also what am I losing without using twrp? and will I be able to go back if it gets stuck? and how do I backup the stock rom?
Hi Zenith. Yes, an unlocked bootloader is mandatory to perform any sort of modification to the software, including ‘rooting’ in this case. And unlocking the bootloader will erase all the data, there’s no way to prevent it. The instructions for rooting can be found here, they are the same, for both the 6 and the 6T.
There’s nothing you’ll be losing if not opting for TWRP. It all depends on what you plan on doing further. For instance, if you want to flash custom ROMs or perform NANDroid backups, then TWRP is recommended. But if you’re only looking for root permissions to use root applications or to use Magisk Modules, then rooting without TWRP is enough.
Consider TWRP as a tool for flashing/wiping firmware and taking OS backups.
Hi, appreciate your work mate. I successfully rooted my oneplus 6t then ended up in a fastboot loop after installing a magisk module. I managed to flash the stock boot.img and the device works perfectly fine, unrooted. I am trying to root the 6t again using the same method but now after flash the patched image file im stuck in the fastboot loop again. Can you help me out, thanks.
Hi Harry, it’s possible that the said Magisk Module left some traces in the /vendor partition.
The only solution I could think of is the following:
1) Reflash the stock boot image and boot into the OS.
2) Download the OxygenOS full ROM package (Here) of the OOS version installed on your phone.
3) Flash the package using the Local Upgrade option in Settings.
After flashing the phone will reboot. Then try rooting again using the patched boot image.
So I tried rooting in a different way, Worked when updated to 10.3.1 in this way
When you get the OTA just follow this steps.
1. Download the OTA and let it Install, Just don’t reboot.
2. Open Magisk, go to install and select Install to Inactive Slot.
3. Reboot
4. The update will be installed and you will have root.
Yes Sterben, that’s the beauty of using Magisk on devices with A/B slots.
I already have a detailed tutorial covering all the steps here. And thank you for bringing this to other users’ notice by commenting here.
Nice info, Work for me keep posting brother
I root my OnePlus 6T within 5 minutes with help of this tutorial
Thanks
Hi. I am glad the tutorial proved helpful to you!