Has your ROG Phone 2 entered an endless boot loop or is it showing a black screen and not responding? This could be caused while performing things like rooting, flashing custom ROMs, restoring stock firmware, or performing any other sort of manual flashing. In this guide, you will learn how to unbrick your ROG Phone 2 from a hard-bricked state by flashing the stock firmware using EDL mode.
Advertisement
Asus’ ROG Phone 2 has received some decent support from the custom development community in terms of software modding. You can root the phone via Magisk, install TWRP recovery on it, flash custom ROMs, and do much more. However, any of these sorts of software modifications also come with a slight possibility of bricking the phone if done wrong.
Normally, these are soft-bricks, which means the phone can easily be recovered by manually flashing the stock firmware, which should also be your first plan-of-action in such situations.
Page Contents
A Hard-Bricked ROG Phone 2
But what should you do if it’s a hard-brick? In such a case, your phone wouldn’t be able to enter Fastboot Mode, could show a black screen, and might even not respond to any physical button presses. You might feel like the phone is beyond recovery and the last resort would be to take it to an official service center for a repair, which could also be costly.
Advertisement
But here’s some light of hope for you – It can be recovered with the right tool and the right firmware! If your ROG Phone 2 has landed in such an ordeal and has been hard-bricked, you can unbrick it by flashing the stock firmware via EDL mode.
Emergency Download Mode (EDL Mode) is a special mode triggered by the primary bootloader that allows users to force-flash the software on Qualcomm Android devices. While not all phones equipped with a Qualcomm chipset support EDL mode, and some times even if they do, the required firmware or flashing tool is not available.
Thankfully, that’s not the case with the ROG Phone 2. XDA Junior Member Johnny886 has shared a firmware file that could be flashed on the phone in EDL mode, using QPST (Qualcomm’s Flash Tool) or Xiaomi’s Mi Flash tool. For demonstrating in this guide, I will be using the Mi Flash Tool, since it’s much easier to operate and use, especially if you’re new to firmware flashing.
Prerequisites
- The flashing tools used in this guide only supports Windows PC. So, make sure that you’re operating on one.
- Charge your phone for about 40-50 minutes to ensure that it has sufficient battery juice to last for the flashing process. This will prevent your phone from shutting down during the flashing.
- For step #5 (bootloader relocking) in the instructions below, you will need the Android SDK platform-tools. Simply download the latest package of the tool from here, then extract its content to the C:\ drive of your PC. After extracting, the required tools will be inside “C:\platform-tools“.
Instructions to Flash Firmware on ROG Phone 2 using EDL Mode
The process itself is quite simple. I have split the instructions below into 6 major steps in an attempt to make it easier for you to understand every part of the process. So, follow the steps below to flash the firmware and unbrick ROG Phone 2 using EDL.
Step 1: Download EDL Firmware for ROG Phone 2 and Extract it on PC
Below, you will find the direct link to download the EDL firmware file for the ROG Phone 2, as a ZIP package. Download the firmware package from above and extract it to an easily accessible location on your PC (like Desktop, Documents, etc) using an archive utility like 7-Zip.
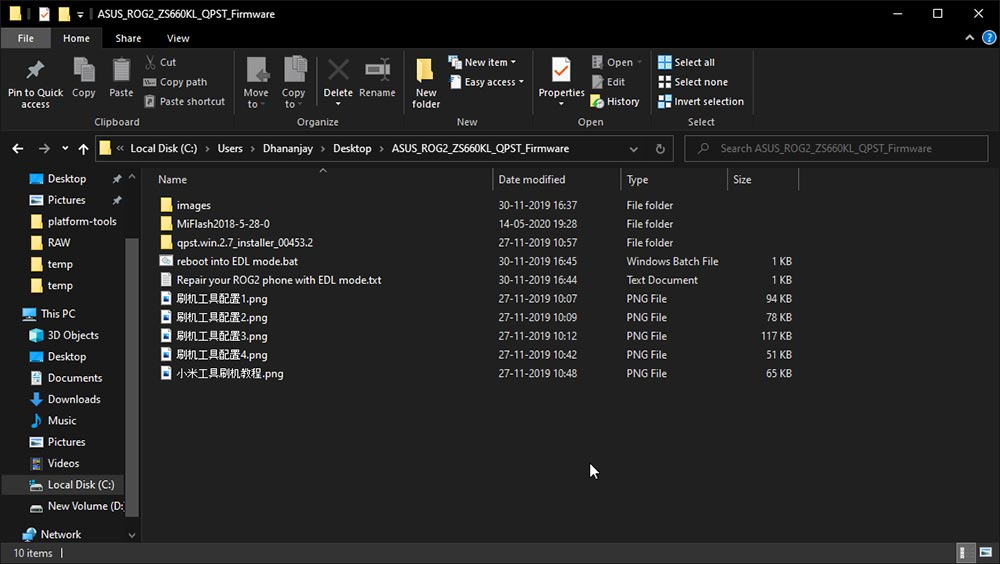
The package contains the individual partition images that need to be flashed to the phone. The flash tool that you’ll need for this procedure is also included in the firmware package, so you wouldn’t need to download it separately.
- ASUS_ROG2_ZS660KL_QPST_Firmware.zip (Mirror link; The original link provided by the source was removed)
This firmware is based on Android 9 Pie. So, if your phone was running Android 10, it will be downgraded to Pie. But don’t worry, you can easily upgrade later once you have unbricked.
Step 2: Boot ROG Phone 2 into EDL Mode
The first step of the unbricking process is to put your phone into EDL mode. If your ROG Phone 2 is showing a black screen and vibrates upon press the power button, it’s probably already in EDL mode and you skip to step #2.
In case your phone isn’t already in EDL mode, you will need to do it manually. First, make sure that your phone is powered off completely. Then hold the Volume Up and Power keys together until your phone enters Fastboot Mode. Once your ROG Phone 2 is in Fastboot Mode, connect it to the PC by plugging the USB cable into the side port (not the bottom port).
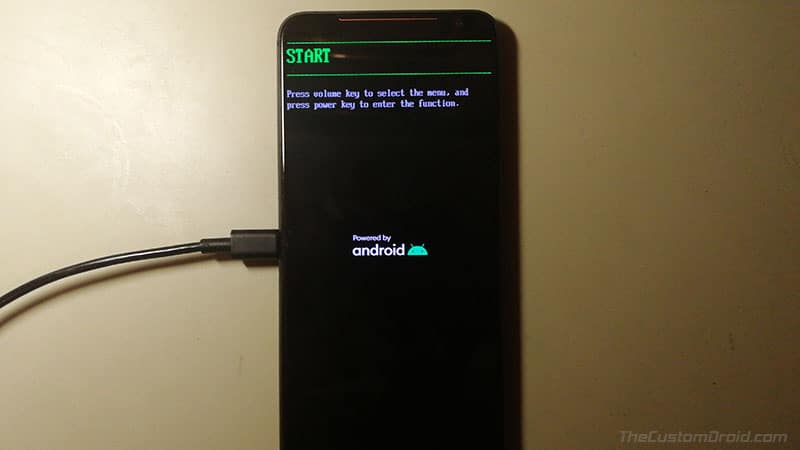
Now, open the folder where the firmware file was extracted and double-click on the “reboot into EDL mode.bat” file. This will launch a script in the Windows Command Prompt and automatically boot your phone into EDL mode. It will show nothing else apart from a black screen at this point.
Advertisement
Step 3: Install Required Qualcomm USB Drivers on PC
In order to flash the firmware via the Mi Flash Tool, your ROG Phone 2 in EDL mode must communicate with the PC over a special serial interface known as “Qualcomm HS-USB QDloader 9008“. To check this, go to ‘Control Panel‘ > ‘Device Manager‘ on your Windows PC.
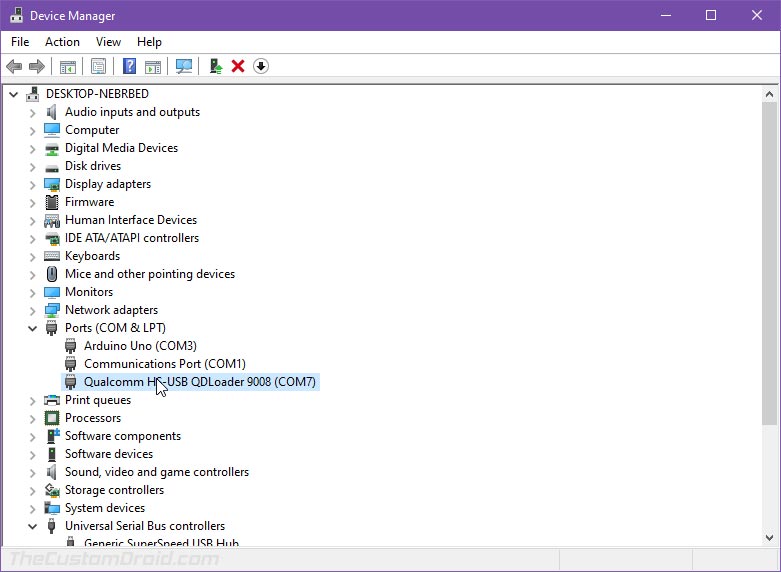
In case the phone is detected through “QUSB_BULK“, it means that the required USB drivers are missing. Normally, Windows automatically downloads and install these drivers. But if it doesn’t, then you’ll need to do it manually by yourself.
It’s actually very simple. Just download the latest version of the Qualcomm USB drivers from this link and follow the provided instructions to install them. Once the drivers are in place, your phone will be ready for flashing.
Step 4: Flash Firmware on ROG Phone 2 in EDL Mode
Now, this is the step where the recovery process actually takes place. That is, flashing the firmware using the Mi Flash Tool to your phone while it’s in EDL mode.
Start by opening the folder on your PC where the firmware package was extracted. This folder should contain another folder named “MiFlash2018-5-28-0“, which holds the tool you’ll need. Open this folder and double-click on the ‘XiaoMiFlash.exe‘ file to launch the Mi Flash Tool on your PC.
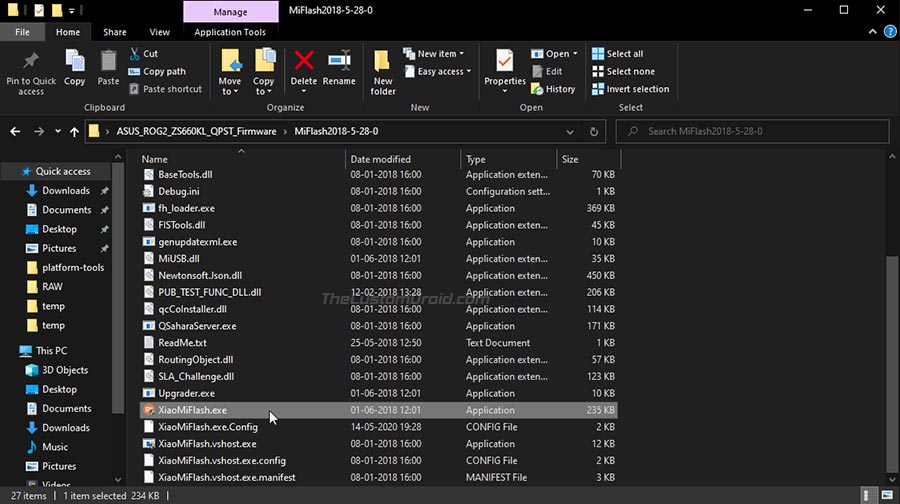
When the tool opens, it will prompt you to install the required USB drivers. Since you have already done this during the previous step, there’s no need to do it again. Simply close the prompt.
Advertisement
The tool should automatically recognize your ROG Phone 2 in EDL mode and you should see your phone’s unique serial under the “device” column. If not, then try clicking the ‘Refresh‘ button.
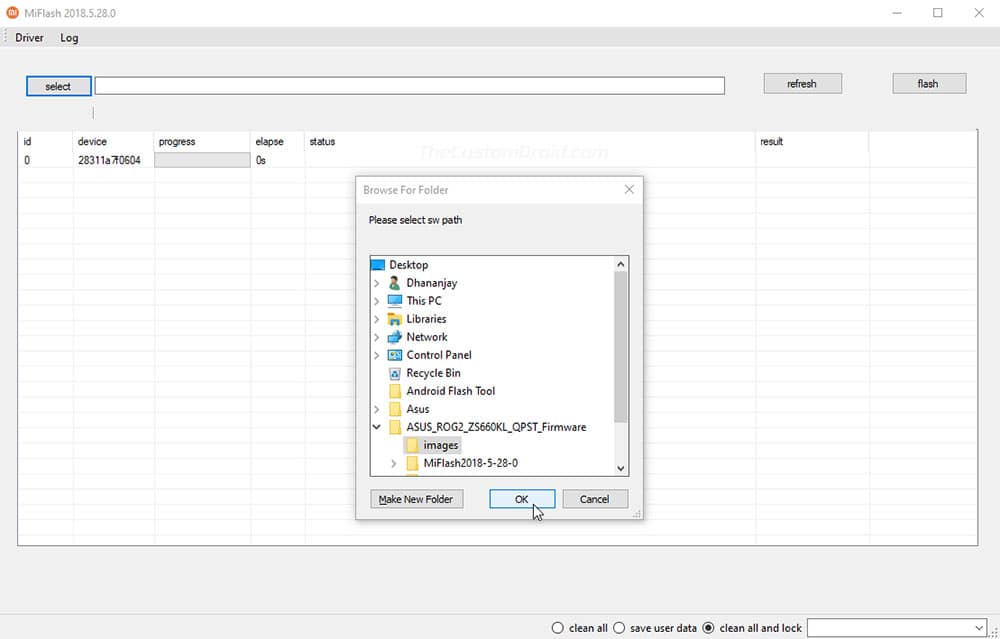
Now, click on ‘Select‘ in the tool’s GUI and then navigate to the folder where the firmware package was extracted. Select the ‘images‘ folder and click on ‘Ok‘ to confirm. Finally, click the ‘flash‘ button to begin the flashing process.
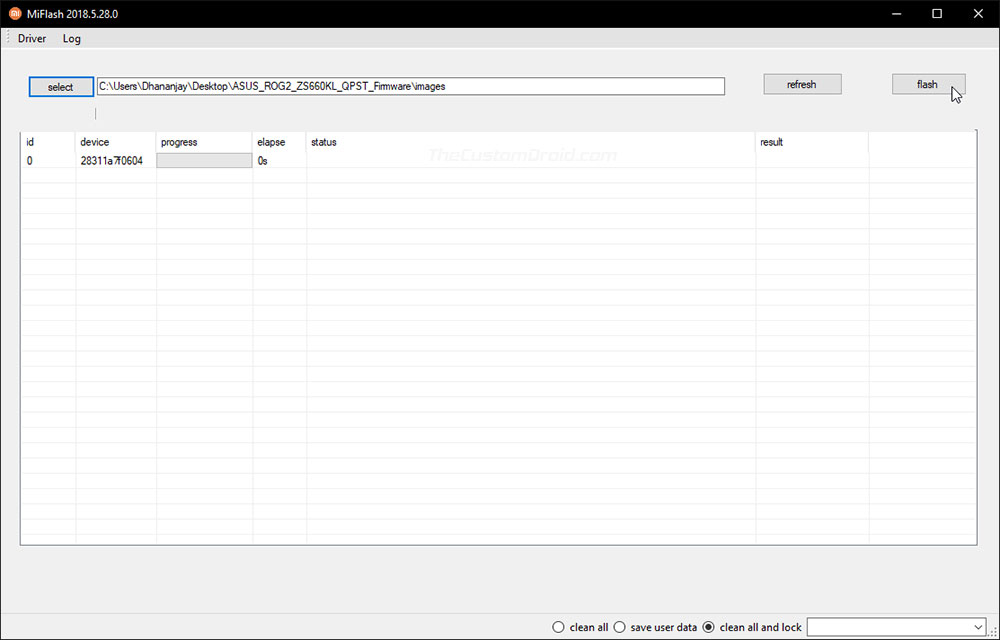
The tool will now flash the firmware on your ROG Phone 2 to unbrick it. This could take a few minutes to finish, so leave the phone-PC connection uninterrupted. Once finished, you will see ‘success‘ in the tool’s window.
Note: From here on, if you want, you can re-root your phone, install TWRP recovery on it, or flash custom ROMs. If you want that, then there’s no need to follow the next two steps.
Step 5: Relock the Bootloader
Now that you have unbricked your ROG Phone 2, you can relock its bootloader, that is, only if you do not want to root or install custom ROMs, and want to stick to the stock firmware. Relocking the bootloader will not only make your phone more secure but will also restore its Widevine status to L1, thus allowing you to stream HD content in apps like Netflix.
Advertisement
To relock the bootloader, first power off your ROG Phone 2. Once it is off, hold the Volume Up and Power keys together to enter Fastboot Mode. Then connect the phone to your PC via the USB cable.
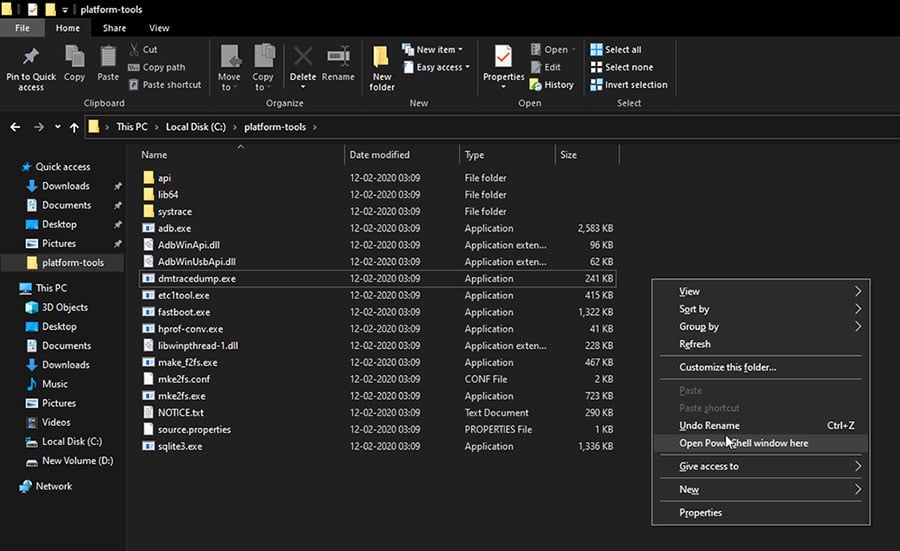
Now, go to the folder where you have the Android SDK platform-tools installed (e.g. C:\platform-tools). Hold the Shift key on the keyboard, and right-click on any empty space inside the folder. Then select ‘Open PowerShell window here‘.
Enter the following command in the PowerShell to relock the bootloader:
.\fastboot oem asus-csc_lk
Step 6: Perform a Factory Reset via Stock Recovery and Reboot
Now, your phone’s bootloader has been locked again. But before you boot it back into the OS, it is important to perform a factory reset. To do this, press the Volume Up/Down keys until you see “Recovery Mode” on the top of the screen. Then press the Power button to confirm and boot your ROG Phone 2 into the stock recovery mode.
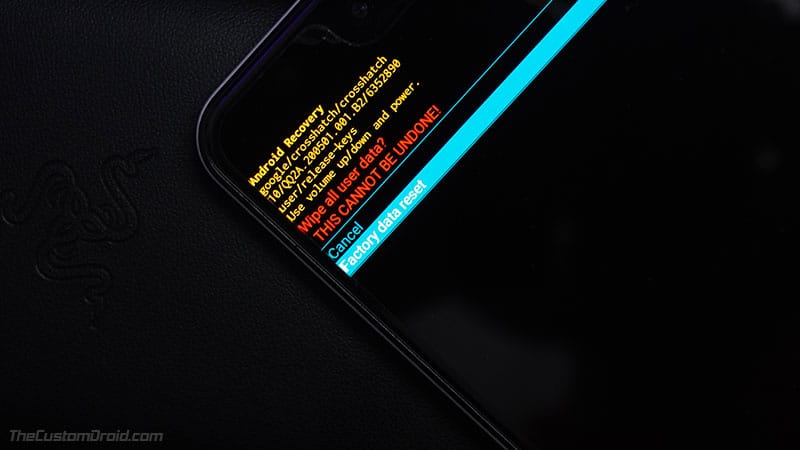
Once in stock recovery, use the Volume keys to select ‘Wipe data/factory reset‘ and press the power button. Then select ‘Factory data reset‘ and press the Power button again to confirm and perform a factory data reset. Finally, select ‘Reboot system now‘ in stock recovery to boot your phone into the system (OS).
That’s it! You have just flashed the stock firmware and unbricked your ROG Phone 2 using EDL successfully. If you feel stuck anywhere while performing the instructions or have any questions regarding this topic, feel free to ask me through the comments.
Firmware source: XDA
Comments 17 Comments
Comments are moderated, and published only if they are relevant to the topic and add value in a constructive way. If you disagree with something, please be polite and respectful. We suggest you read our comment policy before commenting.
Flash Tool not detecting my phone when i tried to click refresh…Plz help?
Naresh, check Windows Device Manager to see if your ROG Phone 2 is being detected as
Qualcomm HS-USB QDloader 9008. This seems like an issue with the USB drivers.Hello
I also, like some others, immediately recognized 9008 when ROG PHONE 2 is connected to a PC without any manipulation beforehand.
But the next problem starts here.
Running a bat file named reboot into EDL mode has no response, and the MI Flash program recognizes it as a COM (number) rather than a unique line number.
In this state, of course, Flash does not work.
In addition, operating the power button and volume control button will exit 9008 mode and operating the button again will enter 9008 mode.
I’m desperate for your help.
Thank you.
Your ROG Phone 2 is already in EDL mode, and you should proceed with the flash through the Mi Flash Tool. You can skip following step #2 and #3 as the computer already downloaded and install the Qualcomm EDL drivers for you.
After successful flash through Mi Flash, my mobile is not ON and also not in fastboot mode. While connected to the computer in EDL mode, it is detected as Qualcomm HS-USB QDLoader in device manager. My mobile doesn’t show any display.
Hi Noor, it seems that your device is still in EDL mode. Hold the Volume Up, Volume Down and Power keys together to force-exit EDL mode. Once the phone powers off, release the keys and quickly hold the Volume Up and Power buttons to enter Fastboot mode.
Once your device is in Fastboot Mode, you can proceed with Step 6 and perform a factory reset via the stock recovery.
Thanks brother successful unbricked my asus rog 2 using given method..
But when i am going to update manually it says UPDATE FAILED..
kindly help..
Hassan, your ROG Phone 2 had the WW ROM or the CN ROM installed on it originally?
It turns out that the firmware download link does not have the file. The link does not work. Is there another place to download it?
Alex, the original link provided on XDA was removed. I was able to find the file hosted on AFH and I have updated the download link with the same.
Hi. I’ve been searching trough the internet for a while now, and I can’t find any guides on how to unbrick my rog phone 1. For some reason it froze and a beep sound came from the speakers, the only option was to restart it by holding the power button. It then started to boot but did not vibrate and went black, now it’s in EDL mode (it just bricked itself, I didn’t do anything). You wrote a guide for this phone so I thought you could help me.
Hi there, i have follow each of ur steps carefully but it seems that I was unable to do my flash, it just keep getting error in the result tab with the status, [4:09:03 AM COM4]:System.Exception: set boot partition failed at XiaoMiFlash.code.bl.SerialPortDevices.SetBootPartition() . So I was wondering why this still happen I even charge my phone for 30 – 45 minutes like u mentioned on your previous reply. Still, it just keep on popping error. So I was wondering can u help me out with it. And also I did try out all my USB port. By the way, this just happen to me so sudden like in the afternoon my phone still working fine but in the evening it suddenly just blacked out I still remember that my phone has around 70 percent of the battery at that time. Really hoping that u can help me out with it
I can tell that you’re not alone. Several Xiaomi/Redmi phone owners have faced that error without a possible solution.
According to the person who shared the firmware, it could also be flashed via the QPST/QFIL tool. I have a pretty detailed guide on using QPST/QFIL to flash firmware, you might wanna give that a go.
hello,
My phone doesnt boot at all to anything. even when holding volume up or down button. totally dead. but when i plug it to pc usb, it is recognised as Qualcomm HS-USB QDLoader 9008.
Hello. This indicates that it’s in EDL mode. All you have to do is follow the steps in the article.
Since your ROG Phone 2 is already in EDL mode and detected as “Qualcomm HS-USB QDLoader 9008” by your computer, you can skip step #1 and step #2 of the instructions.
Hi I am sorry the link is not working. Is there other source for me to download it?
The download link has been updated. Please recheck.