In this step-by-step guide, you’ll learn how to root OnePlus 7 and OnePlus 7T using Magisk Patched Boot Image, without having to install TWRP recovery at all. The instructions will work on any OnePlus 7/7 Pro running Android 10 (OxygenOS 10+) or Android 9 Pie (OxygenOS 9+).
Advertisement
Page Contents
Overview
Rooting your phone with Magisk not only allows you to use root applications but also enables you to apply modifications to your phone’s software systemless-ly. That is without actually mounting or altering the system partition of the phone. We have already covered a guide to install TWRP on OnePlus 7/7 Pro and then using it to root the phone.
A custom recovery like TWRP is usually preferred while flashing custom ROMs/kernels, taking Nandroid backups, wiping device partitions, etc. But if none of that is your concern and you just want to root your OnePlus 7 (Pro), then there’s no need to install TWRP at all.
Furthermore, Magisk creator and developer John Wu also provided an explanation as to why having both TWRP and Magisk root installed together in the /boot partition could cause problems, especially on Android 10 or above. Even if you plan on using custom ROMs, you could still boot TWRP temporarily and use it to install ROMs or anything else for that matter.
Advertisement
To sum up, rooting your OnePlus 7 / 7 Pro without installing TWRP can make things more streamlined, leading to minimal scope for any errors. Plus, rooting via this method also enables you to easily install OTA updates on your rooted phone.
The process is very simple. In brief, the first step is to download the stock boot image corresponding to the OxygenOS version installed on your phone. Then, the second step is to patch the stock boot image with Magisk, via the Magisk Manager app. And finally, the third step is to flash the resultant patched boot image to your phone via fastboot.
So now, without any further ado, let us begin with the instructions.
Related Article: Download Google Camera (GCam) Port for OnePlus 7/OnePlus 7 Pro
Prerequisites
- Rooting your phone will not erase any data stored on it. However, we’d still strongly suggest taking a full backup to safeguard the data, just in case. If you want, you can refer to our detailed guide for the same.
- Make sure to charge your device up to a safe battery percentage. Minimum 50-60% is recommended. This will ensure that the device does not suddenly turn off during the rooting process.
- Rooting your OnePlus 7/OnePlus 7 Pro will require an unlocked bootloader. If you haven’t unlocked yet, then follow the instructions in this guide.
- Also, make sure to install the latest OnePlus USB Drivers on your PC.
Instructions
For your convenience and a better understanding of the complete procedure, we have split the instructions into different steps. So, let’s start!
Step 1: Download the Stock Boot Image for your OnePlus 7/7 Pro
The first step of the process is to download the stock boot image of the OxygenOS version installed on your OnePlus 7 and OnePlus 7 Pro. We have extracted and provided the links to download the stock boot images for all different variants of the said phones.
Although we could have provided pre-patched boot images, we decided not to do so. That’s because when you patch the stock boot image by yourself, Magisk Manager takes a backup of your phone’s stock boot image. This makes it easier to further install OTA updates on your rooted OnePlus 7 device and also important should you want to unroot and restore the stock boot backup.
Note: If you have got your hands on a full ROM package of a more recent OxygenOS update, then use this tutorial to extract the payload.bin file. This will help you get the stock boot image for the latest OxygenOS version.
Advertisement
OnePlus 7
- Global & Indian variants (GM1901 and GM1905 model number):
- OxygenOS 10.3.3: Stock_Boot_OnePlus_7_OOS_10.3.3_Global.zip
- OxygenOS 10.3.1: stock_boot_oos_10.3.1_oneplus7_global.img
- OxygenOS 10.3.0: stock_boot_oos_10.3.0_oneplus7_global.img
- OxygenOS 10.0.2: stock_boot_oos_10.0.2_oneplus7_global.img
- OxygenOS 10.0.1: stock_boot_oos_10.0.1_oneplus7_global.img
- OxygenOS 10.0: stock_boot_oos_10.0_oneplus7_global.img
- OxygenOS 9.5.8: stock_boot_oos_9.5.8_oneplus7_global.img
- OxygenOS 9.5.7: stock_boot_oos_9.5.7_oneplus7_global.img
- European variant (GM1903 model number):
- OxygenOS 10.0.6: Stock_Boot_OnePlus_7_OOS_10.0.6_EU.zip
- OxygenOS 10.0.4: stock_boot_oos_10.0.4_oneplus7_eu.img
- OxygenOS 10.0.3: stock_boot_oos_10.0.3_oneplus7_eu.img
- OxygenOS 10.0.2: stock_boot_oos_10.0.2_oneplus7_eu.img
- OxygenOS 10.0.1: stock_boot_oos_10.0.1_oneplus7_eu.img
- OxygenOS 10.0: stock_boot_oos_10.0_oneplus7_eu.img
- OxygenOS 9.5.8: stock_boot_oos_9.5.8_oneplus7_eu.img
- OxygenOS 9.5.7: stock_boot_oos_9.5.7_oneplus7_eu.img
OnePlus 7 Pro
- Global & Indian variants (GM1911 and GM1917 model number):
- OxygenOS 10.3.3: Stock_Boot_OnePlus_7_Pro_OOS_10.3.3_Global.zip
- OxygenOS 10.3.1: stock_boot_oos_10.3.1_oneplus7pro_global.img
- OxygenOS 10.3.0: stock_boot_oos_10.3.0_oneplus7pro_global.img
- OxygenOS 10.0.2: stock_boot_oos_10.0.2_oneplus7pro_global.img
- OxygenOS 10.0.1: stock_boot_oos_10.0.1_oneplus7pro_global.img
- OxygenOS 10.0: stock_boot_oos_10.0_oneplus7pro_global.img
- OxygenOS 9.5.13: stock_boot_oos_9.5.13_oneplus7pro_global.img
- OxygenOS 9.5.11: stock_boot_oos_9.5.11_oneplus7pro_global.img
- EU Version (GM1913 model number):
- OxygenOS 10.0.6: Stock_Boot_OnePlus_7_Pro_OOS_10.0.6_EU.zip
- OxygenOS 10.0.4: stock_boot_oos_10.0.4_oneplus7pro_eu.img
- OxygenOS 10.0.3: stock_boot_oos_10.0.3_oneplus7pro_eu.img
- OxygenOS 10.0.2: stock_boot_oos_10.0.2_oneplus7pro_eu.img
- OxygenOS 10.0.1: stock_boot_oos_10.0.1_oneplus7pro_eu.img
- OxygenOS 10.0: stock_boot_oos_10.0_oneplus7pro_eu.img
- OxygenOS 9.5.11: stock_boot_oos_9.5.11_oneplus7pro_eu.img
- OxygenOS 9.5.10: stock_boot_oos_9.5.10_oneplus7pro_eu.img
- EU 5G (GM1920 model number):
- OxygenOS 10.0.4: stock_boot_oos_10.0.4_oneplus7pro_eu_5g.img
- OxygenOS 9.5.11: stock_boot_oos_9.5.11_oneplus7pro_eu_5g.img
- OxygenOS 9.5.10: stock_boot_oos_9.5.10_oneplus7pro_eu_5g.img
- OxygenOS 9.5.7: stock_boot_oos_9.5.7_oneplus7pro_eu_5g.img
- OxygenOS 9.5.5: stock_boot_oos_9.5.5_oneplus7pro_eu_5g.img
Step 2: Patch the Stock Boot Image using Magisk Manager
Once you have downloaded the correct stock boot image, transfer it to your phone’s internal or external storage.
Next, download the latest Magisk Manager from here and install the APK on your OnePlus phone using a file manager app. Then go to the app drawer and launch the ‘Magisk Manager’ app.
Now to patch the stock boot image, tap the ‘Install’ button in Magisk Manager. Then press ‘Install’ again and select the ‘Select and Patch a File’ option.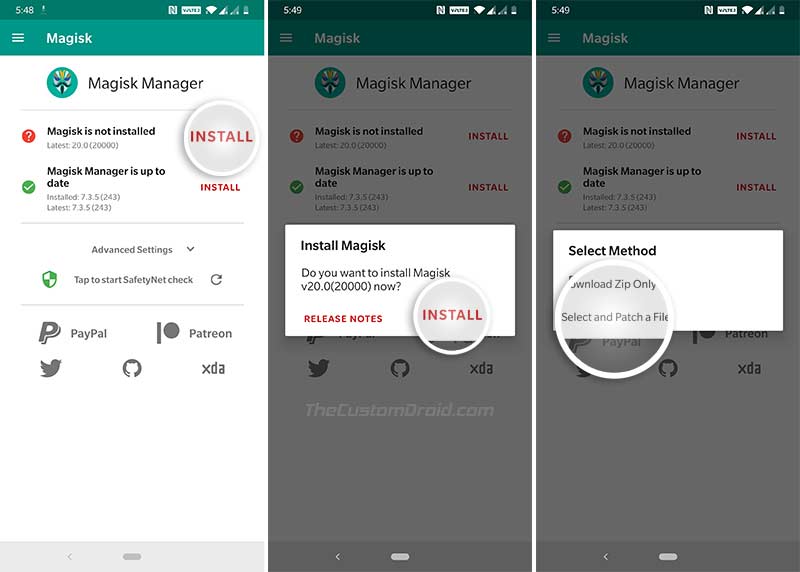
Navigate to the phone’s internal storage and select the stock boot image file that you transferred earlier. As soon as you select the file, Magisk Manager will download the latest version of the Magisk Installer and patch the stock boot with it.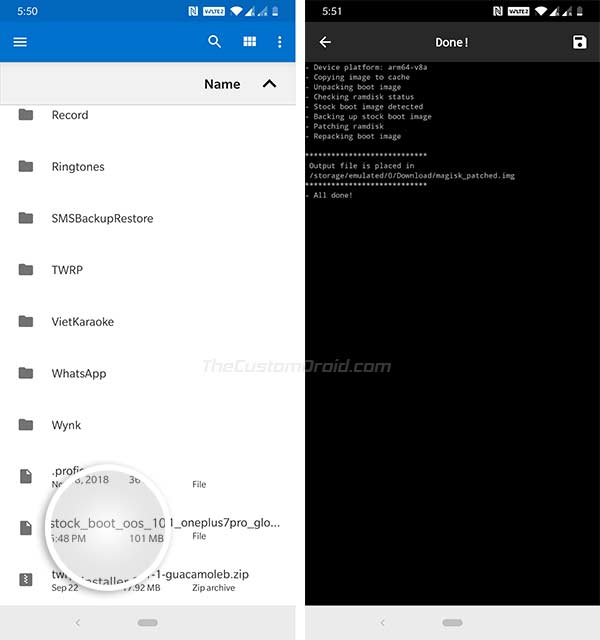
Once finished, the resultant Magisk patched boot image (filename: magisk_patched.img) should be stored inside the ‘Download’ folder of your phone’s internal storage.
Step 3: Install Android SDK Platform-Tools on PC & Launch Command-Line
You now have to install the Android SDK platform-tools on your PC. The platform-tools include the fastboot tool, that you’ll be using flash the patched boot image to your phone in the next step.
So, download the platform-tools package according to your PC’s OS from below:
Advertisement
Once downloaded, extract the ZIP file to get the ‘platform-tools’ folder containing fastboot and other tools. You can copy this ‘platform-tools’ folder to the C:\ drive if you’re using a Windows PC or to the ‘Documents’ directory on a macOS/Linux PC for easier access.
Next, launch the command-line inside the ‘platform-tools’ folder (Where ADB and Fastboot binaries are installed) on your PC:
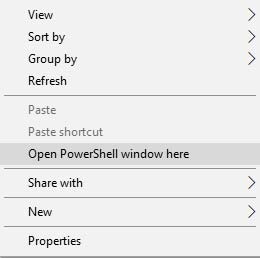
- PowerShell on Windows: Hold the SHIFT key and right-click on an empty space inside the ‘platform-tools’ folder, then select ‘Open PowerShell window here’.
- Terminal on macOS/Linux: ‘cd’ to the ‘platform-tools’ folder. For example: If you extracted the payload_dumper.zip’ to the ‘Documents’ folder, then the command should look like:
cd Documents/platform-tools

Step 4: Flash Magisk Patched Boot Image to root OnePlus 7/OnePlus 7 Pro
Transfer the Magisk patched boot file (magisk_patched.img) from the ‘Download’ folder of your phone’s internal storage to the ‘platform-tools’ folder on your PC.
Now that you have the patched boot image in place, you can flash it to root your OnePlus 7 or OnePlus 7 Pro. To do this, first power off your phone and boot it into Fastboot Mode by holding the Volume Down and Power keys together. Then connect your phone to the PC using the USB cable once it is in Fastboot Mode.
Enter the following code in the command-line to verify that your PC can communicate and identify your phone over the fastboot interface:
Advertisement
- On Windows:
.\fastboot devices
- On macOS/Linux:
./fastboot devices
The command-line should return your phone’s unique ID along with the ‘fastboot’ message. In case it doesn’t, make sure that you have the proper USB drivers installed on your PC.
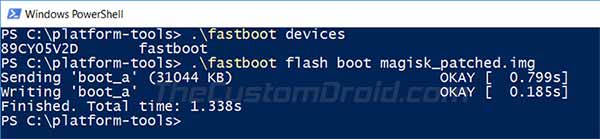
Now issue the following command to flash the patched boot image and root your OnePlus 7/OnePlus 7 Pro using Magisk:
- On Windows:
.\fastboot flash boot magisk_patched.img
- On macOS/Linux:
./fastboot flash boot magisk_patched.img
Since the OnePlus 7 devices support the A/B partition scheme, Magisk will only be installed on your phone’s current active slot; leaving the inactive slot untouched. Once the file has been flashed, reboot your phone into the OS by entering the following code:
- On Windows:
.\fastboot reboot
- On macOS/Linux:
./fastboot reboot
That’s it! Your phone will now boot into the system (OS) and should be rooted with Magisk.
You can now install root apps or mods like the EdXposed Framework, ViPER4Android, etc. You can also use Magisk Modules to apply modifications to the software or the Magisk Hide feature to hide root from certain apps.
So, you have just learned how to root the OnePlus 7 and 7 Pro using the Magisk Patched Boot Image method, and all without installing TWRP. If you have any questions regarding the instructions or rooting in general, then feel free to ask us.
Comments 2 Comments
Comments are moderated, and published only if they are relevant to the topic and add value in a constructive way. If you disagree with something, please be polite and respectful. We suggest you read our comment policy before commenting.
so in the future, how to update OTA but keep phone rooted ?
Hi Henry, I have a guide here that will help.