In this guide, we will show you how to root Xiaomi Mi A2 and Mi A2 Lite using Magisk, without installing/using TWRP recovery at all. The instructions in this guide will work on any Mi A2/A2 Lite device running Android, 10, Android Pie, and Android Oreo.
Advertisement
Like its predecessor, the Xiaomi Mi A2, and Mi A2 Lite quickly gained a lot of attention from the custom development community, thanks to the Android One program. Both the devices support TWRP recovery officially, which means you can easily flash custom ROMs/kernels, mods, and root your phone by flashing the Magisk zip file.
We already have a tutorial published on how to install TWRP on Xiaomi Mi A2/Mi A2 Lite and root it through it. So why would you need to root your phone without TWRP? There are various scenarios, for example:
- TWRP recovery for your device doesn’t support the latest software version or render issues.
- Also, using this method makes it easier to take OTA updates on your rooted Mi A2/A2 Lite.
- Or, you might only need root (and not TWRP) for things like enabling camera2 API and install a GCam Port on it.
- Finally, if you are not planning on flash any custom ROMs, kernels, or mods, then it’s quite redundant to install TWRP in the first place.
As you can see, there are several reasons why you would want to use this method. Now that you are here, let’s begin with the instructions.
Advertisement
Related Article: Enable Camera2 API on Xiaomi Mi A2/A2 Lite without Rooting
Page Contents
Requirements
Make sure that you fulfill all the instructions listed below.
- Like always, we can’t help but strain enough that you take a complete backup of all your data stored on the phone. Although this process will not wipe anything, it is best to safeguard your data in case anything goes unplanned. We also have a comprehensive guide on how to backup Android phones completely.
- In order to root, you must first unlock the bootloader of your Mi A2/A2 Lite.
- If you have previously rooted your phone or applied any sort of modifications to your phone, then it is strongly advised to flash the stock firmware (fastboot image) using the Mi Flash tool before proceeding. This will ensure that you do not face any issues while installing OTA updates on your rooted Mi A2 device.
- Download Android platform-tools package and extract it on your PC. When asked to launch PowerShell (on Windows) or Terminal (on Linux/macOS), use the following instructions.
- On Windows: Go to the ‘platform-tools’ folder that you extracted earlier. Now, while holding the SHIFT key, right-click on an empty space inside this folder. Select ‘Open PowerShell window here’ from the menu.
- On Linux/macOS: Open the ‘Terminal’ and cd to the location of the ‘platform-tools’ folder. Example:
cd Documents/platform-tools
Instructions to Root Xiaomi Mi A2 and Mi A2 Lite using Magisk
For your convenience and a better understanding of the rooting procedure, we have split the instructions into three different steps. These are as follows.
Advertisement
Step 1: Download Boot Images
The first step of the rooting process is to download the stock boot image for the Android build number/software version currently installed on your Mi A2/A2 Lite.
Along with the stock boot images, we have also provided links to download the corresponding patched boot images. If you choose to use them, you can skip step (#2) of patching the stock boot image using Magisk Manager, and directly head over to step #3 and flash the provided patched boot image to root your phone.
Advertisement
However, we strongly recommend that you patch the stock boot image by yourself, using the instructions in the next step. That’s because Magisk takes a backup of the stock boot image during the patching process. This will allow you to easily restore the stock images for installing OTA updates on your phone after rooting.
For Xiaomi Mi A2 (jasmine_sprout)
| V11.0.28.0.QDIMIXM | Stock Boot Image | – |
| V11.0.27.0.QDIMIXM | Stock Boot Image | – |
| V11.0.22.0.QDIMIXM | Stock Boot Image | – |
| V11.0.21.0.QDIMIXM | Stock Boot Image | – |
| V11.0.20.0.QDIMIXM | Stock Boot Image | – |
| V11.0.19.0.QDIMIXM | Stock Boot Image | Patched Boot Image |
| V11.0.17.0.QDIMIXM | Stock Boot Image | Patched Boot Image |
| V11.0.15.0.QDIMIXM | Stock Boot Image | Patched Boot Image |
| V11.0.14.0.QDIMIXM | Stock Boot Image | – |
| V11.0.13.0.QDIMIXM | Stock Boot Image | – |
| V11.0.12.0.QDIMIXM | Stock Boot Image | – |
| V11.0.11.0.QDIMIXM | Stock Boot Image | Patched Boot Image |
| V11.0.10.0.QDIMIXM | Stock Boot Image | Patched Boot Image |
| V11.0.8.0.QDIMIXM | Stock Boot Image | Patched Boot Image |
| V11.0.5.0.QDIMIXM | Stock Boot Image | Patched Boot Image |
| V11.0.4.0.QDIMIXM | Stock Boot Image | Patched Boot Image |
For Xiaomi Mi A2 Lite (daisy)
| V11.0.21.0.QDLMIXM | Stock Boot Image | – |
| V11.0.20.0.QDLMIXM | Stock Boot Image | – |
| V11.0.18.0.QDLMIXM | Stock Boot Image | – |
| V11.0.17.0.QDLMIXM | Stock Boot Image | – |
| V11.0.16.0.QDLMIXM | Stock Boot Image | Patched Boot Image |
| V11.0.14.0.QDLMIXM | Stock Boot Image | Patched Boot Image |
| V11.0.12.0.QDLMIXM | Stock Boot Image | Patched Boot Image |
| V11.0.11.0.QDLMIXM | Stock Boot Image | Patched Boot Image |
| V11.0.10.0.QDLMIXM | Stock Boot Image | Patched Boot Image |
| V11.0.7.0.QDLMIXM | Stock Boot Image | Patched Boot Image |
| V11.0.5.0.QDLMIXM | Stock Boot Image | Patched Boot Image |
| V11.0.4.0.QDLMIXM | Stock Boot Image | Patched Boot Image |
Huge thanks to Roy Goldberg, Nico van Draanen, and XDA Senior Member Aerobatic for contributing to this article by sharing the patched and stock boot images!
Step 2: Patch Stock Boot Image using Magisk Manager
- Download the stock boot image for your Xiaomi Mi A2/A2 Lite. Ensure that you download the version corresponding to the current software version (build number) installed on your phone.
- Transfer the downloaded file to your phone’s storage.
- Now download the latest APK file of the Magisk app on your phone.
- Use a file browser app and install the downloaded APK file.
- Next, go to the app drawer and launch the ‘Magisk Manager‘ app.
- Tap on the ‘Install‘ button and select ‘Install‘.

- Tap on the ‘Select and Patch a File‘ option.
- Navigate through the phone’s storage and select the stock boot image file (e.g. stock_boot_10.0.14.0_mi_a2_lite.img).
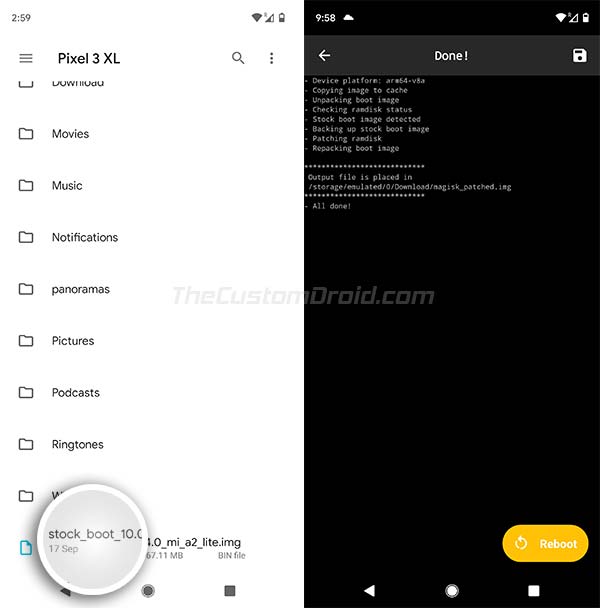
- Magisk Manager will now start the patching process.
- Once finished, the resultant Magisk-patched boot image (magisk_patched.img) file would be placed in ‘[internal storage]\Download‘ of your phone.
Now that you have the Magisk Patched Boot Image, move down to the third step to finally root your Xiaomi Mi A2 device.
Advertisement
Step 3: Flash Patched Boot Image to root Xiaomi Mi A2/Mi A2 Lite
- Connect your Mi A2/A2 Lite to the PC using the USB cable.
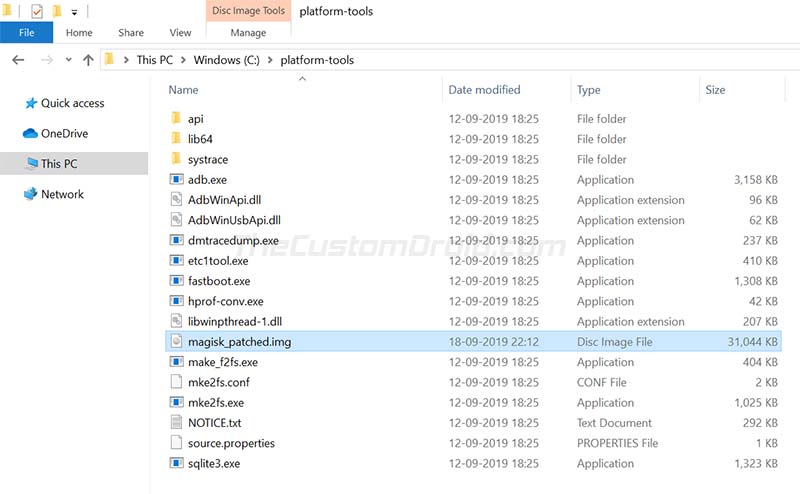
- Transfer the ‘magisk_patched.img‘ file to the directory on the PC where the Android SDK platform-tools (ADB and fastboot) are present.
- Launch the PowerShell on Windows or the Terminal app if you’re using Linux/macOS PC (Refer to pointer #4 in Prerequisites).
- Power off your Mi A2/A2 Lite completely.
- Boot your phone into Fastboot Mode by pressing and holding the Volume Down and Power buttons together.

- Connect your phone to the PC using the USB cable once it is in Fastboot Mode.
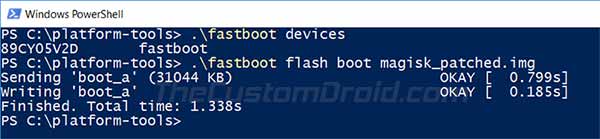
- Enter the following code to flash the patched boot image and root Xiaomi Mi A2/A2 Lite using Magisk.
- In PowerShell on Windows:
.\fastboot flash boot magisk_patched.img
- In Terminal on Linux/macOS:
./fastboot flash boot magisk_patched.img
- In PowerShell on Windows:
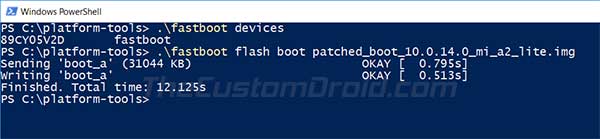
- If you downloaded the pre-patched boot image from above, then make sure to replace [“patched-boot-image.img“] with the actual filename of the downloaded patched boot image. For example, if you downloaded the V11.0.10.0 patched boot image for Mi A2, the command would the following.
fastboot flash boot patched_boot_11.0.11.0_mi_a2.img
- Since the Mi A2 and A2 Lite support the A/B partition scheme, Magisk will only be installed on your phone’s current active slot; leaving the inactive slot untouched.
- Finally, reboot your phone into the OS by entering the following code:
fastboot reboot
Your Xiaomi Mi A2/A2 Lite will reboot into the system (OS) and should be rooted now. To confirm that the process was successful, simply launch the Magisk Manager application from the app drawer.
With your phone rooted now, you can install Magisk Modules to add third-party features or to simply apply modifications systemless-ly. You can also use MagiskHide to hide root from root-detecting apps. To sum up, there’s a lot you can do on your phone now.
So, you have just succeeded to root Xiaomi Mi A2/Mi A2 Lite running Android 10/Pie/Oreo using Magisk, without installing TWRP. If you have any questions regarding the procedure, let us know via the comments.
Comments 36 Comments
Comments are moderated, and published only if they are relevant to the topic and add value in a constructive way. If you disagree with something, please be polite and respectful. We suggest you read our comment policy before commenting.
Thank You! Everything went fine!
This was my first root process but it was easy thanks to your great manual!
Thanks for your efforts. I’ve done everything as said up, I’ve the latest build 11.0.15.0 but everytime i flash the magisk patched image and reboot it always opens on the android recovery page saying that “Cannot load android system. Your data maybe corrupt. If you continue to get this message, you need to perform a factory data reset and erase all user data stored on this device.” Actually even when i erase it also opens on this android recovery page, it only works when i flash the stock image with fastboot. So, is there any solution how can i root my phone? by the way i tried the TWRP method not working also. Thanks in advance.
Ahmed, it’s a problem (a possible bug) with the V11.0.15.0 update for the Mi A2. There have been several reports regarding the same on XDA and Reddit as well.
My suggestion would be to revert back to v11.0.14.0 and wait for the next update.
Is there any guide you recommend for reverting to the v11.0.14.0 ?
Yes, it’s here. Make sure that you use the “flash_all.bat” or the “flash_all_except_data_storage.bat” flashing scripts. The latter will not erase the data, while the former will.
Hi Dhananjay,
I used to root my Mi A2 phone before. But there was a time of OTA update making it unroot somehow. I was trying to root my phone again following your suggested procedure. I downloaded the stock image (stock_boot_11.0.13.0_jasmine_sprout.zip) and flashed using Magisk. But it said unsupported/unknown image format. And installation failed. What do I do now?
And if I successfully root it this time, what can I do about OTA update in the future without losing my root again? I think once root, Magisk has a mode to hide from root detection from apps. Right? Some apps won’t run if they detect root. Thanks in advance!
Anon, you have to extract the “stock_boot_11.0.13.0_jasmine_sprout.zip” file to get the “boot.img”. That’s the file you want to patch.
After rooting, you can follow the instructions on this page to take OTA updates and retain Magisk root after updating.
And yes, Magisk Hide (inside Magisk Manager) allows you to hide root from individual apps. Do note that this feature cannot hide the bootloader unlocked status due to Google’s new hardware-backed SafetyNet attestation. You can read more about that here.
Hi Dhananjay,
Thanks! Oh, I should have known to unzip it first. And what a shocking news about bootloader unlocked status checking. That’s really sad. It’s as if they are trying to prevent all sort of rooting whatsoever. I just want the superuser access to cheat on single player games. It seems like I have to find another way. And thanks once again for your help. I appreciate your work.
Yes, seems like so. I am glad I was able to help.
Hi,
After rooting the device by flashing the patched boot image, can I unroot by flashing the stock image? And after rooting, Magisk asks to download some additional files. Should I allow it? Also, I want to use my banking apps, but after root they are not launching. How can I resolve it? Hope to hear from you soon.
Hi Fahim. Yes, you can unroot by refreshing the stock boot image (corresponding to the installed firmware on your phone). Or, you can also use the ‘Uninstall’ button in Magisk Manager to fully unroot the phone.
As for your question related to banking apps, yes, it’s totally possible to get them working with Magisk. That’s the beauty of Magisk.
With the new hardware-level attestation implemented by Google, Magisk developer topjohnwu disabled ‘Magisk Hide’ by default. The feature can still be enabled to hide root from apps that might stop working, like the banking apps you’ve mentioned.
Just go to Magisk Manager, press the menu icon on the top-left of the app’s screen, and press ‘Magisk Hide’. Enable that feature and use it to hide root from the specific apps that have stopped working while your phone is rooted.
Hi again, Pablo. Thanks for confirming me this.
Hi! I’, on Mi A2 lite. I’m curious about the procedure to extract the boot.img. Is it extracted from the OTA dump? So how do you get the OTA dump and then you extract the boot.img?
I also noticed that there are 64 MB boot.img, which I believe are created by making a backup of the entire boot partition, using the TWRP. Right? These boot.img are not reliable because they are modified in some way by the installation of the TWRP, no?
Sorry for my bad English!
Hi Deki. Yes, the boot.img can directly be obtained from a full OTA dump (Note, that incremental OTA dumps should and cannot be used). Most OTA files are shared over at online communities such as XDA or 4PDA. You can grab the OTA, extract it to get the “payload.bin” and then further extract the payload.bin file using the steps in this guide to finally obtain the boot.img.
Yes, if you have TWRP permanently installed, then your boot.img is surely patched and no more the “stock” boot.img.
One major question. If A2 finally receives the Android 10, will this tutorial still works? Like uninstall magisk, then apply the OTA update, then install magisk and reboot?
Yes, of course it will. The latest version of Magisk fully supports Android 10’s new 2-stage-Init system-as-root approach.
Once the OTA arrives, follow this guide that I recently posted. I would suggest that you disable automatic updates right now itself, not only for Android 10 (when it arrives), but also for future monthly updates. Once done, just follow the instructions in the linked guide and install the OTA. It will retain root after the update too.
Hello, i download patched_boot.img for mi a2 (V10.0.7.0.PDLMIXM) but when i write fastboot boot patched_boot.img i see: no such file or directory. Can u help me?
Hi. You must ensure that the patched boot image file is placed where the fastboot.exe (platform-tools) are extracted on the PC. Once copied, hold the SHIFT key on the keyboard and right-click on any empty space inside that folder. Then select ‘Open PowerShell window here’ option and you should be good to go.
Hi,
I’m stuck with 10.0.2.0 as I’ve been scared to update OTA as when I did it in december with PIE I ended up in bootloop using the XDA OTA method (which worked well until PIE arrived). I was wondering now how to safely update to 10.0.7.0. I’va latest magisk with cam2api installed (just for the gcam). If I go to update in settings it doesn’t tell me a generic “problem with installation” as when there was 10.0.3.0 and 10.0.4.0 available. It just tells me the update is about 1GB and there’s a button “reboot now”. If I reboot phone myself nothing happens (I switch it off every day) as i switched off the automatic updates. Don’t know which improvements the 10.0.7.0 brought but I wouldn’t like to remain in 10.0.2.0 forever 🙁 many thanls
Hi. Don’t worry. The rule of thumb when it comes to OTA updates on rooted devices is that they should be completely stock (Boot, System, everything else).
Here’s what you can do:
1) Download stock boot image for V10.0.2.0 for your device (Make sure you choose for the correct device Mi A2 or A2 Lite).
2) Uninstall Magisk completely from Magisk Manager
3) Then boot your phone into fastboot mode and flash the stock boot image:
fastboot flash boot stock-boot-filename.img
4) Then reboot your phone and install the OTA
Once you have updated, let me know. I will guide you further to re-root without any problems.
Dear Dhananjay! Thank you very much for sharing your knowledge!
I used your information to root my Xiaomi Mi A2 Lite with Magisk. This happened in January 2019.
Then in February 2019 I successfully followed these steps of another guide (from XDA forum) to apply OTA update v.10.0.4.0 to my phone:
“12. When you know that a new OTA update is available and you want to install it, open Magisk Manager, and tap on “Uninstall” > “Restore Images” but very important: absolutely don’t reboot the phone now!
Important note: Magisk Manager will restore the boot.img that was found on the phone while installing Magisk. If the boot.img was already non-vanilla (for example you flashed the boot.img with TWRP before installing Magisk), Magisk Manager will backup that modified version of boot.img, and when restored the OTA will not work, as that’s not a vanilla boot.img.
13. Close Magisk Manager and go to “Settings” > “System” > “System update” and install the OTA update.
After the update is downloaded, a two-stages update will begin.
14. When both stages of the update process completed, it will ask to restart: DON’T DO IT!. Open Magisk Manager again and tap on “Install” > “Install” > “Install to Inactive Slot (After OTA)” and after that you can tap on “Reboot”.
After the reboot you will have the updated Android version with Magisk already working.”
I was able to update to v.10.0.4.0, but now the guide from XDA forum is no longer working for me in my attempt to apply v.10.0.7.0.
I stumbled on step 13, where I go to “Settings” > “System” > “System update” and try to install the OTA update. It downloads successfully but after some little time the “System update” interface reports that it will automatically resume when the device will go into idle mode (also the “Resume” button at the bottom of the screen is available). When I tap on it, it fails to install update.
So, according to the warnings in the guide, I think now I can’t reboot without issues. (And I need to reboot to change SIM card in my phone.)
Please kindly tell me what to do after I uninstalled Magisk by tapping “Uninstall” in Magisk Manager? Do I
What steps to take to safely update via OTA in the future?
Thank you and God bless you!
Hi Pavel. The instructions that you listed above are correct for when you need to take the OTA.
BUT, they will only work if you yourself patch the stock boot image using Magisk. Magisk Manager only backs up your stock boot image when you patch it by yourself. On the other hand, if you take the patched boot image from somewhere else (Like here), then restoring the stock boot images via Magisk Manager to take the OTA update wouldn’t work.
So, to deal with this, you can simply uninstall Magisk from the app. Also, make sure that you disable and remove any and all of the installed Magisk modules. And, also undo any modifications that you might have done to the system manually.
Once done, reboot your phone into Fastboot and restore the stock boot image (Provided above) for the software version/build number installed on your phone.
When you do this, you ensure that the system is completely untouched and also has the stock untouched boot image running. Then you can take the OTA.
In short, here’s what you have to do:
1) Disable and then remove all Magisk Modules
2) Undo any system modifications that you might have done (Like editing the build.prop file)
3) Uninstall Magisk completely using Magisk Manager
4) Restore the stock boot image via Fastboot
5) Reboot the phone and install the OTA
Once the OTA has been installed, you can follow the rooting procedure again. I know it sounds lengthy but when you get hold of the process, it is a matter of just a few minutes.
Let me know if you have any further questions. And yes, the instructions you posted for OTA update, if you want to do that from now on, you can patch the stock boot by yourself. When you do that, Magisk Manager will be able to backup the stock boot image and you can then follow the instructions to take the OTA update.
To know how to patch the stock boot image using Magisk Manager, please refer to this tutorial of ours.
Thank you very much for your work. However, I tried it and everything seems fine but after reboot the root disapears. I have tried several times without luck.
I am on V10.0.7.0.PDLMIXM, any ideas?
Thanks!
Hi. Root will disappear since we are only temporarily booting the patched boot image. Once you have successfully booted the patched boot image, open Magisk Manager from the app drawer and tap on the ‘Install’ button.
HI, I have downloaded V10.0.4.0.PDLMIXM patched, but when I start it from fastboot the a2 lite reboot and i don’ t see magisk in the app menu.
.\fastboot.exe boot patched_boot_10.0.4.0_mi_a2_lite.img
Downloading ‘boot.img’ OKAY [ 0.605s]
booting OKAY [ 0.606s]
Finished. Total time: 1.299s
Are you sure that patched IMG work?
Hi. Once you execute that command, and the phone boots into the OS with the Patched Boot Image, download Magisk Manager APK (Click to download) and install it. Then run Magisk Manager, and let me know if it detects root.
Thanks bro,
I just rooted my mi a2
How to install custom OS?
Please guide me bro🙏
Hello. Here’s what I’d like to tell you first. In order to install custom OS/ROM, you don’t need root. You will need an unlocked bootloader, which you have already done, and TWRP recovery.
The instructions for that could be found here: https://www.thecustomdroid.com/install-twrp-recovery-root-xiaomi-mi-a2-a2-lite/
how to install TWRP on android a2 lite
Hi. To do that, you can follow our tutorial here. If you’re on Pie, note that you will need to format the /data partition (Which includes the internal storage) to be able to decrypt storage in TWRP.
Hello everybody! Please read the note in Red box. It is important!
Android Pie January update probably brings some changes to the boot (kernel). I am not sure, but it seems like it.
So, if you were previously rooted using Magisk, please ensure that you first flash the stock boot image of V10.0.3.0 and only then proceed with this procedure using the patched boot image.
The commands you to need to use to flash the stock boot image (While your phone is connected to the PC in Fastboot Mode) are as follows:
fastboot flash boot_a boot.imgfastboot flash boot_b boot.img
I will try my best to keep you guys posted!
HELP PLEASE!!!
Hello! I want to root my mi a2 but im wondering: what will be if do something incorrect and what if my phone will start bootlooping? Is there a way to make everything like i had it before doing all this stuff and bring my phone to life? (Even if all the files will be removed, i would just want to return my phone to life) And after installing magisk, if an update comes out, can I simply do a factory reset (yeah i know it will remove all the files) and will be Magisk and root access be deleted after factory reset? Would i be able to update so?
Im a noob in all of these stuff, so could you please help me!
Hi. I understand it is always better to be safe than sorry.
I’d explain what happens when you root your phone using the provided files:
1) When you install Magisk, it modifies your /boot partition (That stores the kernel, recovery, and other stuff)
2) The benefit of rooting via this method is that you can always remove root by restoring the stock boot image, which comes packed in the stock firmware for your phone. Once restored, you will also be able to take OTA updates.
If all else fails for some reason (Shouldn’t normally happen), then you can always flash the complete stock firmware.
One thing that I’d like to correct is ‘factory reset’ is not the same as flashing the stock firmware. A factory reset simply formats the /data partition (Storage) and cache.
Don’t worry, it shall be alright. Just make sure to use the correct files and read the instructions thoroughly before you begin and it will all be good!
Thanks for the update and time you’ve spent making the guide. Root checker says we’re now rooted. For other peoples’ sake, I used the ./fastboot command on the patched_boot.IMG file, rather than the .ZIP file. It booted and everything appeared as it it did previously – didn’t think it worked as Magisk was not in the app drawer. After manually installing it, it went fine.
OP: is it my understanding that without TWRP, we won’t be able to flash custom roms? Also, what things can we do with this situation – I.E rooted with no custom recovery. I’ve already trimmed the little bloat that was on there.
You’re welcome Nick! Yes, without the recovery, you won’t be able to install ROMs. But you can definitely use it to install Magisk Modules for additional features, like ViPER4Android. Or, edit build prop to enable camera2 API in order to use Google Camera port.
If you’re really interested in installing TWRP to flash custom ROMs, etc, I updated the Mi A1 rooting tutorial yesterday with the required steps.