Do you want to root your Galaxy S9/S9 Plus flagship? Well, you just landed in the right place for the job. This tutorial will help you install TWRP recovery and root Samsung Galaxy S9 and Galaxy S9 Plus. This is compatible and will work on any Exynos Galaxy S9/S9+ running Android 10 (One UI 2.0), Android Pie (One UI 1.1/1.0), and Android Oreo.
Advertisement
Samsung is counted among one of the top manufacturers and is well known for its Galaxy flagship phones. In 2018, the company did another exceptional job with the Galaxy S9 and Galaxy S9 Plus by adapting the most recent trends in the smartphone market. The phones were launched in March 2018 and certainly turned out to be the best Galaxy flagships to date. Following a very similar design to the predecessor, the hardware and software are where the said phones excel.
Despite all the latest features, users might often want to further customize the software beyond what the manufacturer has to offer. And if you feel the same, then rooting your Galaxy S9 or S9+ will provide you with a plethora of options/ways to customize the software of your phone.
Flashing custom binaries such as TWRP and rooting the Galaxy S9/S9+ will trip the KNOX counter. Apps that rely on KNOX, such as Samsung Pass, Secure Folder, etc will no longer work.
Make sure that you’re comfortable and fully understand the process of rooting before you start performing it.
Page Contents
Supported Variants and Models
Currently, only the Exynos variant of the Galaxy S9/S9 Plus is supported. Although TWRP recovery for Snapdragon Galaxy S9 and S9+ is available, we have chosen to keep this post specific to the Exynos devices only. Please make sure to check the list of supported devices below before proceeding with the instructions.
Advertisement
- Samsung Galaxy S9
- Compatible: Exynos variants (codename: starlte) with model number SM-G960F/FD/N/X are supported.
- Not Compatible: Snapdragon variants (codename: starqlte) with model number SM-G960U/U1/W/0/2/8/SC are not supported.
- Samsung Galaxy S9 Plus
- Compatible: Exynos variants (codename: star2lte) with model number SM-G965F/FD/N/X are supported.
- Not Compatible: Snapdragon variants (codename: star2qlte) with model number SM-G965U/U1/W/0/2/8/SC are not supported.
Prerequisites
- Take a complete backup of all your data on the device. Everything including apps, contacts, messages, logs, internal storage, etc will be wiped during the process. You can also follow our guide on how to backup Android devices for this purpose.
- Charge the Galaxy S9/S9+ to at least 60% battery level. This will help avoid any sudden shutdowns during the rooting process.
- Download and install Samsung USB drivers on the PC.
- Download Odin v3.14.4 zip package and extract the file to an easily accessible location on the PC.
Make sure to fulfill all the requirements stated above before you proceed to follow the instructions to root Samsung Galaxy S9 and S9 Plus.
Downloads
Below, you will find all the files you’ll need while performing the instructions.
- TWRP Recovery for Galaxy S9 (starlte): twrp-3.4.0-0-starlte.img.tar (Check the latest build here)
- TWRP Recovery for Galaxy S9 Plus (star2lte): twrp-3.4.0-0-star2lte.img.tar (Check the latest build here)
- Samsung Encryption and Disk Quota Disabler: Disable_Dm-Verity_ForceEncrypt_10.28.2020.zip
- RMM State Bypass zip (Only for Android Pie/Oreo, not needed for Android 10): RMM__Bypass_v3_corsicanu.zip (Thanks BlackMesa123 & corsicanu!)
- SuperSU 2.82 SR5 (Discontinued): SR5-SuperSU-v2.82-SR5-20171001224502.zip
- Latest Stable Magisk Installer ZIP: Magisk-v21.0.zip and check the latest version here
Instructions to Root Samsung Galaxy S9 and Galaxy S9 Plus
To make it easier for you to understand the rooting process, we have broken down the instructions into four major steps.
The first step is to enable ‘OEM Unlocking’ to allow flashing custom binaries. Once that is done, the second step is to install TWRP recovery on your Galaxy S9/Galaxy S9 Plus. Then the third step is to disable forced-encryption and prevent Prenormal KG/RMM State (Only on Android Pie and Oreo) by flashing the no-verity zip and RMM State Bypass zip files respectively. Finally, when all is done, the fourth and the last step is to flash the Magisk ZIP using TWRP to root the Galaxy S9/Galaxy S9 Plus.
While the process might not be as simple as that on devices like Google Pixel, it is still fairly easy. Even if you’re new to the scene, you will easily be able to perform the whole procedure. Just make sure that you follow each and every step as mentioned.
Step 1: Enable Developer Options and OEM Unlock in Settings
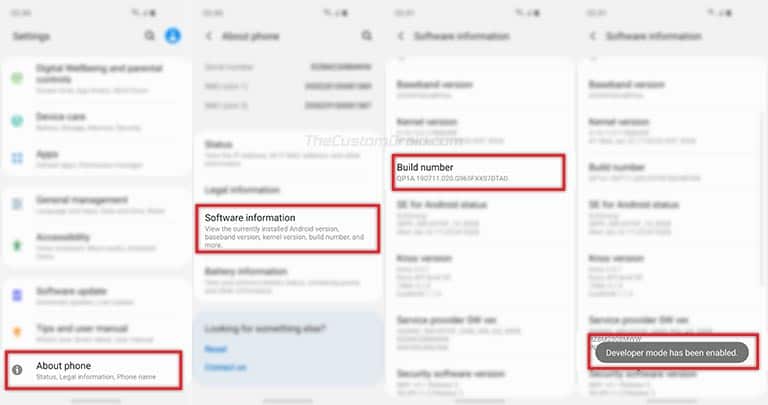
In order to install TWRP and root, you must first enable ‘OEM Unlocking in your Galaxy S9’s Settings menu. To do that, go to Settings -> About Phone -> Software Information and tap 7 times on the ‘Build number’. You shall then see a toast notification – “Developer mode has been enabled”.
Advertisement
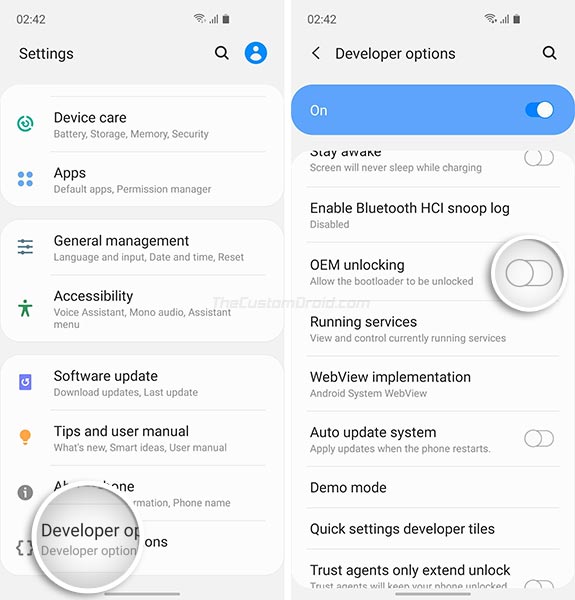
Once that is done, go back to the Settings main screen and tap on ‘Developer options’. Scroll down until you find the ‘OEM Unlocking’ toggle and turn it ON. If the option is not yet visible on your device, it means that your phone has entered a 7-day buffer period. After this time (Or, you can try bypassing it using the instructions here), the ‘OEM Unlocking’ option shall be available. If it is still not available, it means that your phone cannot be rooted.
With the option enabled, you can now go ahead and install TWRP on your Galaxy S9/S9 Plus. The next section will take you through the complete process in detail.
Also read: How to Boot Samsung Galaxy S9 Safe Mode (Guide)
Step 2: Install TWRP Recovery on Samsung Galaxy S9 and Galaxy S9 Plus
The second step is to flash TWRP on your Galaxy S9/S9+ through the Odin Flash Tool. To do this:
- First, download TWRP Recovery for Galaxy S9 and Galaxy S9 Plus.
- Double-click the “Odin3 v3.14.4.exe” executable file to launch the Odin flash tool on your PC.
- Power off the phone completely.
- Hold the Volume Down, Bixby, and Power button simultaneously.
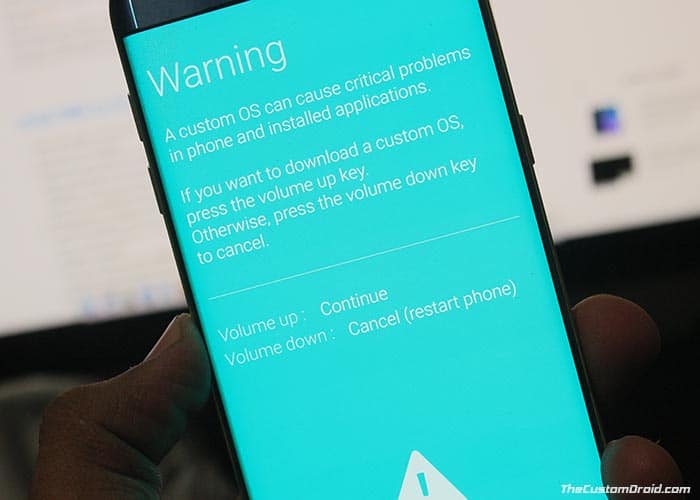
- On the warning screen, press the Volume Up button to enter Download Mode on Galaxy S9/S9 Plus.
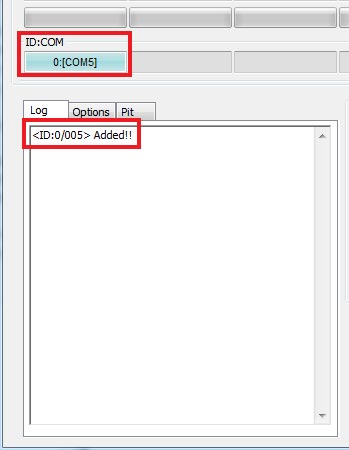
- As the Odin window loads, you shall see “Added!!” in the message box and the ID:COM port should also light up.
- Now make sure that the ‘Auto Reboot’ box is not selected in the ‘Options’ tab of the Odin tool.
- Next, click on the ‘AP’ button under the ‘Files’ section of Odin and select the TWRP recovery (.tar) file for your device.
- Finally, click the ‘Start’ button to install TWRP recovery on Samsung Galaxy S9 and Galaxy S9 Plus.
The flashing process would take a few seconds to complete. Once it is finished your phone shall stay in Download Mode.
Now it is very important to boot into TWRP mode directly, if by any chance your phone boots into the OS, the Prenormal RMM State will be set. This will force you to wait for another 7 Day period before you can actually flash anything. To do this:
- Hold the Volume Down, Bixby, and Power button simultaneously until the phone powers off.
- Important: As soon as the screen shuts down, release the Volume Down key and hold the Volume Up button while still holding the Bixby and Power buttons.
- Your Galaxy S9/S9+ should boot into TWRP recovery.
- On the ‘Unmodified System Partition’ screen, slide the ‘Swipe to Allow Modifications’ button.
With your phone now in TWRP recovery, follow the next step to disable encryption on Samsung Galaxy S9 and Galaxy S9 Plus.
Advertisement
Step 3: Flash Encryption Disabler and KG/RMM Bypass ZIPs using TWRP
Now, in order for TWRP to successfully decrypt your phone’s storage, you must format the data partition and flash the Encryption Disabler zip file.
Note: You only need to flash KG/RMM Bypass zip if your phone is running Android Pie or Oreo. It isn’t compatible with Android 10.
- Go to the ‘Wipe’ menu in TWRP and tap on ‘Format Data’.
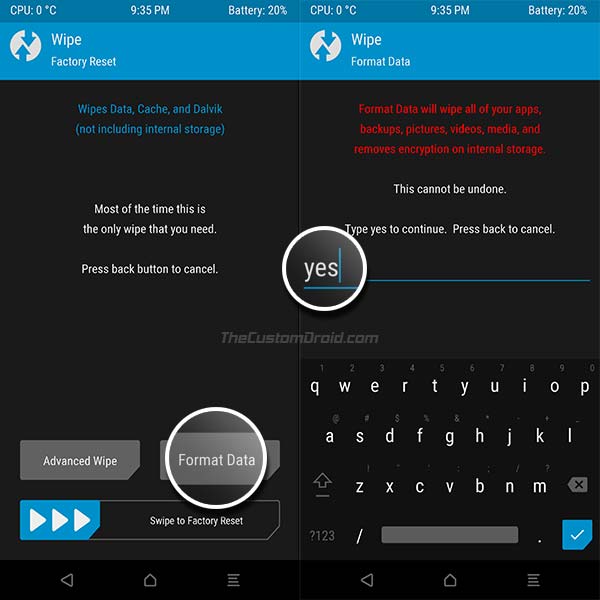
- Enter ‘Yes’ in the provided field to completely format the data partition (including internal storage).
- Once finished, go to the ‘Reboot’ menu in TWRP and press the ‘Recovery’ button to reboot your phone into TWRP. This will ensure that TWRP can decrypt the storage.
- When the phone boots back into TWRP, go to the ‘Mount’ menu.
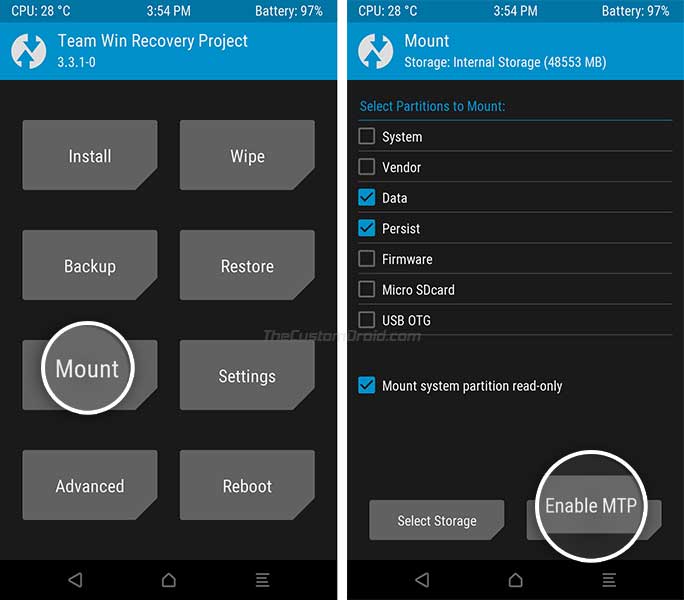
- Now select “Enable MTP” and connect the Galaxy S9/S9 Plus to the PC using the USB cable.
- Download DM-Verity disabler and KG/RMM State Bypass zip (Only for Android Pie/Oreo) files from the ‘Downloads’ section above.
- Transfer the files to the phone’s internal storage and then disconnect the phone from the PC.
- Go to the ‘Install’ menu in TWRP and select the Encryption Disabler zip file (e.g. Disable_Dm-Verity_ForceEncrypt_02.24.2020.zip).
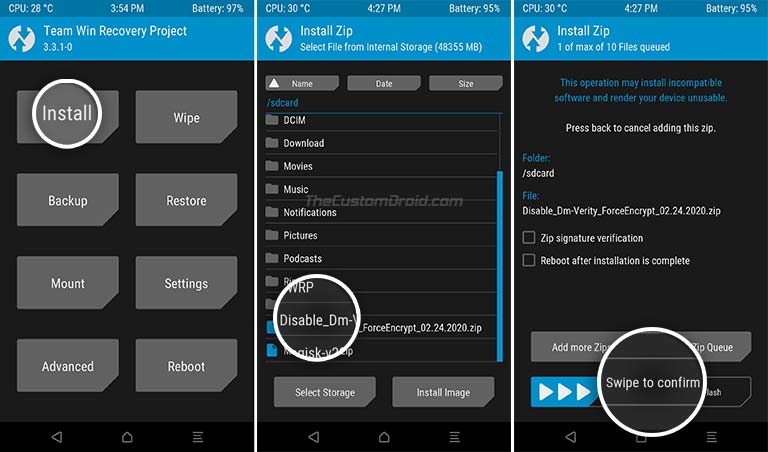
- Swipe the button to flash the file and disable encryption on Samsung Galaxy S9/S9+.
- If your phone is running Android Pie/Oreo, repeat the installation method and flash the KG/RMM State Bypass zip to prevent your phone from being locked again (Prenormal KG/RMM State).
If you see an error message that states ‘Failed to mount /odm (No such file or directory)‘, you can safely ignore it.
Now, with everything set, follow the instructions in the fourth and final step below to finally root Samsung Galaxy S9/S9 Plus.
Also read: Download Samsung Good Lock 2019 and Install Add-ons
Advertisement
Step 4: Flash Magisk to Root Samsung Galaxy S9 and Galaxy S9 Plus
The last and final step of the process is to flash the Magisk ZIP file through TWRP and root your your phone.
- First, download the latest Magisk installer ZIP file on the PC.
- Connect your Galaxy S9 to the PC using the USB cable.
- Go to the ‘Mount’ menu in TWRP and press the ‘Enable MTP’ button.
- Transfer the Magisk installer ZIP file (e.g. Magisk-v21.0.zip) to the phone’s internal storage.
- Now disconnect your Galaxy S9/S9 Plus and go back to the TWRP main screen.
- Press the ‘Install’ button and select the Magisk installer ZIP file from the phone’s internal storage.
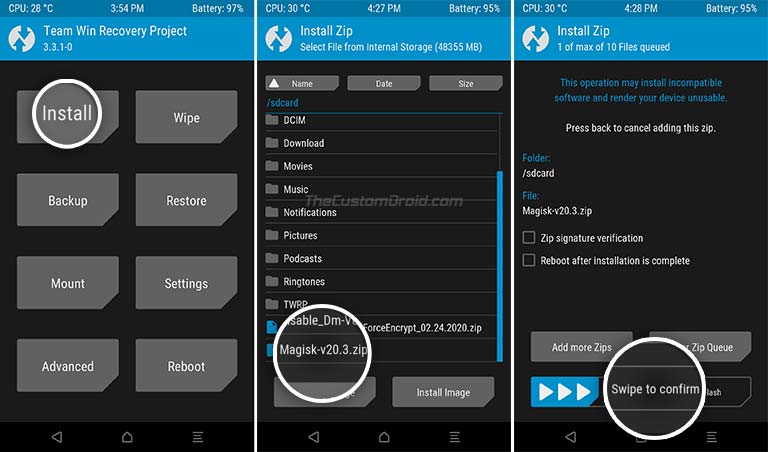
- Finally, swipe the button on the screen to flash the file and root your Samsung Galaxy S9/S9+.
When the flashing process finishes, tap on the ‘Reboot System’ button to boot your phone into the rooted OS. Note that the first boot may take a few minutes, so there’s nothing to worry about.
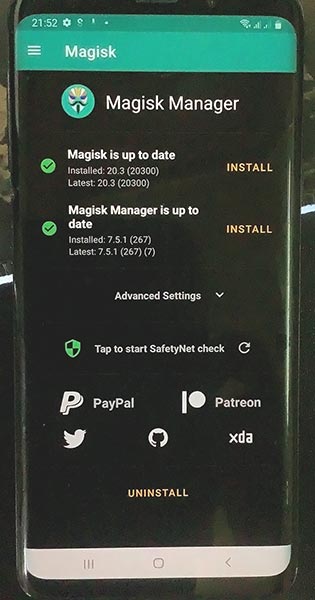
Once your S9/S9+ boots, it should be rooted with Magisk. To verify the same, go to the app drawer and launch the Magisk Manager application.
You can go ahead and start using your favorite root apps. With Magisk you can also hide root from certain apps like Pokemon Go, Google Pay, etc that may normally stop working if the root is detected. It also gives you the ability to install modules for injecting additional features and customizing the OS. The things you can on a rooted phone are way more than what we can list here.
So, this was our tutorial on how to install TWRP and root Samsung Galaxy S9/S9 Plus running Android 10, Android Pie, or Android Oreo. If you have any questions regarding the instructions or the rooting procedure on the whole, please feel free to ask us.
Comments 70 Comments
Comments are moderated, and published only if they are relevant to the topic and add value in a constructive way. If you disagree with something, please be polite and respectful. We suggest you read our comment policy before commenting.
Stuck in BootLoop.
Followed your instructions to the letter, yet here I am. I really need your help here, please. So ‘Odin3_v3.14.1’ did whatever it needed to and ‘twrp-3.7.0_9-0-starlte.img.tar’ worked fine after the volume/blixy/power button combination. I did the wipe and recovery boot then I completed the ‘Disable_Dm-Verity_ForceEncrypt_11.02.2020’ flash and the ‘Magisk-v29.0’ flash and hit ‘Reboot’ only to be staring at the ‘Samsung Galaxy S9 – powered by android’ screen flashing on/off at me.
I would much prefer if you emailed me directly so I can get better and more intricate help.
Thanks
Thank you CH for providing the details. It seems like there are several users with the same setup and are getting stuck at a bootloop after flashing the latest Magisk release. Can you try flashing Magisk v21.4 instead of version 29?
Hi
I have just gone through this tutirial, very good … but, as wit hother methods I have tried, it all works ok in Teamwin, but on reboot, I get a Google…. etc screen loop, repeating ever 3-4 secs with a beep… I can get out of it using either the Download option buttons or the Recovery option and go back to Teamwin. Its just the system wont boot. I took a Teamwin Backup yesterday, the 2nd in the last 6 days and this restores my system correctly.. I can also install the last BTU rom kit from for my S9+ from SamFW, and that install ok too. The reason for all this is that 2 weeks ago, I had to re-install a Bluotooth Library Patcher to prevent pairing loss over a reboot, which had been working for the last 2 years, but was disabled by my operating the phone in SAFE mode to fix some battery issues.. now the pairing loss is back and although I have tried everying to restore it, with what was the exsting ROM, the one I am currenlty restoring, it doesn’t work. Installed the Stock ROM latest however does work, but I then have lost all my apps, settings, data etc..
So have kept trying to ROOT the latest stock rom
G965FXXUHFVG4_G965FOXMHFVB4_BTU
in an attempt to fix the problem but as stated above the Flashing process causes a boot loop..
I even did a Factory Reset this morning, same problem in starting the system after rooting.. though without the rooting, the Factory Reset works ok…
Have you any idea what may be happening..
Regards
Anthony
Hi Anthony. Thanks for providing the details. I do not own the Galaxy S9 anymore, so I did some research and there seems to be mixed reports about working TWRP on the latest Android 10 firmware for the Galaxy S9+.
Here’s what I have concluded:
The second pointer would the reason why your Galaxy S9+ would be bootlooping. The important bit is to get into TWRP right after flashing it. Below are the steps I suggest following, which also take into account that your Galaxy S9+ currently has it’s RMM State set to Prenormal.
iode-4.19-20241218-star2lte-recovery.img). Use 7-Zip to package the recovery.imginto a.tararchive./datapartition, then restore the backup, and finally flash the latest Magisk ZIP (rename the.apkto.zip), followed by the Multi-disabler (The download link is located in the attachments section of the original post). You have to do all this while in TWRP mode and do not boot into the OS at any point in between.Once everything is done, try rebooting into the OS and let me know how it goes.
Hi again Dhananjay
Well that was a quick reply, appreciate this very much as you are the 1st one who has provided help..
You may know, but the latest Firmware for the s9+ was July 2022, see-
https://xdaforums.com/t/official-stock-firmware-thread-11-august-2022-galaxy-s9-sm-g965f.3764479/
This is the one I have .. and the one causing the problem, was just about to try a variant of this from SamFW-
SAMFW.COM_SM-G965F_BTE_G965FXXUGFUG4_fac
but now I received your message, will stick to the first one..
I know about the key presses between using ODIN_patched to flash the recovery and then straight into Teamwin without rebooting, this has not happened..
I just got the Recovery file you indicated and nearly ready to go … what do you mean by ‘restore the backup’, the TWRP one I took on Sunday has the problem with the BluetoothPatcher not working, if I restore this I will just go back to the state I am in now? A working system but without Bluetooth pairings being saved over a reboot.. You any idea how this happened simply by using ‘Safe Mode’ which is really the only problem I have with the current setup, hence doing all this to rectify it..
So, when you say, ‘just restore the backup’ do you mean reboot into the System. I also took a Titanium backup of all my apps, data and settings which is what I would restore when the system boots back properly with ‘Root’ enabled.. could you elaborate please before I start this..
Kind Regards
A
Glad to be able to help, Anthony. I think I misinterpreted your original message that restoeing the TeamWin (TWRP) backup led to the bootloop.
About Safe Mode, that is intended behavior of Magisk.
Here’s some context: Magisk Modules, could sometimes cause bootloops due to incompatibility. Up until a few years ago, users had to use TWRP or ADB to remove such modules to be able to access their OS again.
The developer of Magisk (John Wu) then implemented a way that would eliminate the usage of a third-party utility (TWRP), since not everybody who rooted their device had TWRP installed. Same with ADB, since not everybody would had access to a computer and ADB at a given time just to get their device in a working condition again. The solution was to use Android’s built-in Safe Mode. So when Magisk (not the Magisk app, but the actually tool that gets installed to your phone’s ramdisk) detects that your phone is booting into Safe Mode, it automatically disables all the installed modules to help debug and fix such problems. Once in Safe Mode, users can removed the culprit module which allows them to successfully get back to the OS.
Now, if I understand correctly, you just want to root your Galaxy S9+? So that you can restore your apps (and their respective data) and re-install the module the module to fix your Bluetooth pairing issue. Am I right?
Hi Dhananjay
I just tried to flash the recovery you indicated, having tar’d up the .img file, Odin just crashed! twice..
Any ideas…
A
Which version of Odin are you using?
Hi once more
A day fraught with failure yesterday so I am back with the TWRP Restore from the Sunday Backup.. all working fine, but with the Bluetooth pairings being lost over a reboot..
Just to be clear, if I install that stock ROM, BTU from July 2022, mentioned earlier, and do nothing else, Bluetooth pairings are NOT lost over a reboot once the phone is up and running.
Odin is Odin3 v3.14.1_3B_PatcheD.
I used 7zip and selected create tar file, nothing else.. to tar up the img file as you indicated..
Interesting about the Modules in Mazgisk being disabled. I did re-install the Module from 3arthur6,
BluetoothLibraryPatcher-2.4.1.zip
using Magisk, it installed ok, but made no difference now, pairings still lost, so it seemed to me there was someting else going on. (BTW. the first time I did this 2 years ago, it worked perfectly ever since). The Module is listed in the Magisk modules section and enabled.. nothing I tried fixed this and so I decided to try and install the Stock ROM and Root then restore my apps, data and settings from the Tiatnium Backup I made at the same time as the TWRP Backup (PHEW! eh, real glad I did these).. which is where I am now, each time I install the Stock ROM, the pairing issue is solved, each time I restore the TWRP backup, after the loss of pairing last week, the problem returns…
If it wasn’t for this, the phne operates correctly, System is decrypted, TWRP operates without showing the 1st warning page, I can install other stuff, and reboot safely back, The Root checker having correctly reported the phone is rooted.. So, if I could fix the BT pairing problem, I would stick with what I have!
Most Kind of you to continue with this, its now my 6th day at this!!
BTW, I am in the UK, though I suspect you are probably not…
Regards
A
Okay, so it seems like the issue is with the TWRP backup you’re restoring. There are two ways you could proceed from hereon:
I would suggest going with option #2 since that will take you back to the state your device was last working with all your data.
Let me know if the second option works, and if not, I might have one other thing for you to try before you even try option #1.
P.S. I am based in India, and currently on a vacation. So, please expect some delays in replies.
Hey! I just wanted to thank you for this guide! It worked like a charm and is super well written 🙂
I bricked my phone after playing around with root, but then I just looked in the comments of this guide, flashed a stock ROM and repeated.
I wish you the best – and thanks again!!
it doesn’t work to install twrp and I activate the oem unlocking bro
Andrew, where exactly did you get stuck? Also, which version of the TWRP recovery did you download and use?
Anyone knows Odin just stops responding after I added twrp to the AP folder, is there a specific version that I’m missing? Please help.
Hi, that’s a know quirk with Odin. The program takes a bit of time to read and input the AP firmware slot. Just give it a minute and you should see the file loaded into Odin.
Hello really good tutorial, but I rooted my Android 10 and now I’m stuck in a bootloop, so I tried different versions of Maagisk but always in a bootloop. Could someone help me?
Moris, I will need a bit more information from your end:
Thank you very much for the quick reply!
I tried it with very different versions of TWRP and Magisk, since I have a S9 Plus Exynos I have not flashed the RMM bypass ZIP.
I have seen in the log of TWRP in a few other tutorials a few “Mounting /apex/com.android.example”, “Mounting /vendor” and “Device is system-as-root” but in my log with all the latest versions this is nowhere to be seen even with older versions.
At what point exactly does your phone enters a bootloop? After finishing the whole process?
Here’s what I want you to do from here:
1) Reflash stock firmware on your S9 Plus using Odin. You can use Samsung Firmware Downloader for downloading the latest Android 10 firmware for your model number and region.
2) Boot into Download Mode and check if the RMM/KG state is “Prenormal” or “Checking”?
Let me know what it says so that I can guide you further.
As for the TWRP logs you saw in other tutorials, I would suggest you to ignore most of them since they are not actually from the TWRP on the S9 series.
I’m at this exact point. I flashed stock Android 10 firmware, flashed TWRP, and installed the Disable_Dm-Verity ZIP. So far, everything’s fine, and the system boots. But when I install the Magisk ZIP, it goes into a boot loop.
I’ve usually done everything following the tutorial sequence; I only tried booting just before installing the Magisk ZIP to isolate the issue.
I’d really appreciate your help. So far, I’ve tried Magisk v29 and v26, without success. Now I’m going to try Magisk v21.
Hello, thanks for provided the detailed info. Did you try using Magisk v21? Did it work?
I have finished all the steps given above and system has rebooted but I am unable to find the Magisk Manager in the apps
Nikhil, if your Galaxy S9/S9+ booted into the system after performing all the steps, then just download the latest Magisk APK file from GitHub and install it on your device.
After the installation, go to the app drawer and launch the app. If everything went alright, then you should see the installed version of Magisk within the app.
This tutorial worked like a charm. I had no problems whatsoever.
The phone stayed on the kernel logo for about 10 minutes while it was rebooting. It might have actually been a shorter length of time but it’s always an unnerving experience so it probably just felt longer!
Thank you for this – it was incredibly useful.
Right..now to start doing some serious modding!
Hi Dhananjay. Thanks for the very detailed and clear article. I’ve followed your instructions very carefully to install TWRP. It’s not working for me, however.
My phone is an S9+, Android 10, G965F, star2lte, bought in Indonesia. OEM Unlocking is visible and ON.
After turning off the phone and rebooting using V-down+Bixby+Power, and after pressing V-up, it goes into Download mode just fine. However, RMM is displayed as in Prenormal. I waited 168h (actually 172h) to make sure that wasn’t the issue. I actually have done this more than once, after trying all types of install methods. Every time I wait 168h+, but it does not change the outcome, i.e., RMM is always in Prenormal.
Odin (v3.14) shows “Added!”, “Auto Reboot” is disabled, the TWRP tar file is loaded into AP. When I press Start, the progress bar above ID:COM goes green until it hits the end and abruptly turns red while flashing FAILED. Then, a red line across the phone screen reads, “Only official released binaries are allowed to be flashed(RECOVERY)”.
Are you able to help me out with this? I would not mind settling a fee for that so long as we can make it work.
Thanks, Dhananjay, and Happy New Year to you and your family.
Hi Peter. First off, you’re welcome.
This is odd, I guess. RMM/KG State should return back to normal/checking after the said time period. Have you tried reflashing the stock firmware from scratch and then wait for the given time? This is the only trick that comes to my mind given your situation and also because you seem to have tried everything.
Please try this and let me know.
And a fee is definitely not required. I do this voluntarily and free of any charges. But if you do want to support, you could whitelist my blog from the ad blocker (if you’re using one). That’s the only way I monetize this website and make a living.
And, a very happy new year to you and your family, Peter.
I saw other user uploaded to YouTube regarding initial installation of TWRP at the beginning “Do not swipe in Unmodified System Partition”. He said you need to tap “keep read only” but your method to swipe.
Here is the link to YouTube:
https://youtu.be/-Fx8sD8yqpw?t=433
On the ‘Unmodified System Partition’ screen, slide the ‘Swipe to Allow Modifications’ button.
I am bit confuse which method I should follow. I am guessing it depends on OS version 8, 9 or 10.
This option basically determines if you want TWRP to be able to mount and flash the /system partition of your phone. If it’s just want to flash systemless packages (like Magisk), then you can select ‘Keep Read Only’. But if you do plan on flashing ROMs, mods, etc, you will need to allow the modifications.
And no, it doesn’t depend on the Android version. Users were told to select ‘Keep Read Only’ while TWRP was in its initial stages of development.
Hi,
Bymistake i installed RMM & Encryption disabler on android 10, Samsung S9+ , due to which there is imei error can you tell me how to fix it?
Ashish, it would be best if you flash the stock firmware and start over again.
HELLO SIR,
after completed your all step by step, then i have issued with rooted phone which is was roted by your method.
problem in the my phone,,, IMEI Number and Sim Card Network not showing.
please sir fix it.
I request to you
waiting for your reply.
sajid!
Hi Sajid. May I know if you used SuperSU or Magisk for rooting?
i just trying to install MAGISK root
finally my phone is rooted..
Process of my rooted phone :
1. 7 days before my phone stuck on samsung logo after do everything..
2. then i was flash my phone with 4.7GB file firmware then it will be ok after flash
3. 7 days after i am again try to root… and its time
4. flash zip RAM Bypass file not flash in the twrp
5. Flash file just DM/Verify….!
6. after that magis.. install
7. reboot my phone its successfully done.
Anybody Have Problem reply here i will fix 😉
And Thanks for Dhananjay Your Article Helpful!
Hi Sajid, it’s good to know that it worked. However, please avoid flashing the RMM/KG bypass ZIP on Android 10. It’s only meant for Android Pie and Oreo.
thanks for your reply,,!
And if I will try to RMM/KG bypass Zip flash on android 10 , then what will be happned?
It’s will probably lead to a bootloop. The RMM ZIP only supports Android Pie and Oreo.
Hello Master!
with my little IT knowledge I got lost after reading the first few paragraphs but continued to scan through some of the replies there.
All I wanted to do was to recover some 3000 pics that my other half accidentally lost during a simple transfer from Phone to PC. (Samsung Galaxy S9) She used Cut and Paste instead of Copy and Paste! half way through and she lost some 3000 pics.
I used Kingo Root to no avail, it just keeps failing even after 100%.
What can be done? any hope?
Kind regards
Alex
Hi Alex. I wouldn’t suggest using Kingo Root or any other one-click root toolkits for rooting your S9 or any other modern Android phone/tablet.
These tools basically used exploits found in early Android versions to gain root permissions. However, thanks to Android’s new security measures in place, they will not work anymore.
The proper way to rooting is to use a custom recovery (like TWRP) and then flash the superuser flashable ZIP (Magisk) via it, as shown in the instructions.
Anyhow, on to the real problem now. I am not absolutely sure whether you’ll be able to actually recover the photos. But if those photos are important, I think it’s worth a try.
First thing that you should understand is that installing custom binaries (TWRP, Magisk, etc) will trip the KNOX counter of your phone. This is irreversible. With tripped KNOX, you will no more be able to use apps like Secure Folder, Samsung Pass, Samsung Pay, etc. That’s because these apps rely on KNOX’s integrity.
If you’re okay with that, you could surely try rooting via this method. But before that, I would also suggest you to explore other options (if any). Like taking a look at Samsung Cloud/Google Photos (if you had that installed) to check if the photos were automatically backed up there.
Please let me know if you have any further questions. I would be very happy to provide any help that I can.
Please let me know i am using android 9 on my galaxy s9 plus with magisk installed and rooted.
I am not able to login my samsung account and not able to use fingerprint and biometric login via samsung pass app. Plz guide me if i can use these thing on my rooted s9 or not. Your reply will be highly appreciated. And plz let me know if i want to update my rooted s9plus to android 10 what r the possible ways.
Hi Ismail. As far as things like Samsung Pass, Health, Secure Folder are concerned, they will not work once KNOX is tripped.
Now Samsung account is a different matter. Did you have your Samsung account logged in before you began the rooting process?
I tried searching on this and found a plausible solution. According to an XDA user:
To get rid of Samsung account request when the device is rooted, you need to freeze the system app "Samsung Experience Service". Useful to set lock screen bypassing samsung login. When finished, unfreeze it to avoid the bootloop at next reboot.This will allow you to setup biometrics by bypassing the Samsung account request. However, I believe you also want to log into your Samsung account for using Galaxy Store or other things, right?
Hello again, Dhananjay!
After successfully rooting my Galaxy Tab S4, I decided to update my Galaxy S9+ from Oreo to Pie, and following your clear, easy-to-follow instructions here, I was able to root firmware version G965FXXU7CSK1 with no difficulty.
Thank you once again for providing this valuable resource: your instructions are far simpler and clearer than anything else I have found, and if I decide to update further from Pie to Q at a later stage, I will let you know how I get on!
Hi Arthur. I am really happy that my tutorials have proved useful to you. Your kind words mean a lot to me, so thanks to you! I will surely give my best to help you should you need it.
Hi, I appreciate your time to help.
Can you please send me a link or description to restore the stock firmware and undo twrp etc.
I’m aware I need to replace twrp and not delete it.
But is it necessary to replace twrp to run stock firmware?
Also I can’t seem to download the latest firmware without paying for an account at sammobile. Can you verify that? Is the software open source?
I’ve followed your steps exactly and it all works but I wan’t to give my s9 with build qp1a 190711 020 n960f xxs5 dtb6 and android 10.
Hi Skive. Okay, so the steps you need to follow could be found in this guide. It’s quite easy IMO.
As for downloading the latest firmware, use the Frija Tool. It downloads the stock firmware file directly from Samsung’s firmware database.
Online databases like SamMobile are legit as well. However since they require a lot of server space to host the firmware for a long list of Galaxy devices, they make it up by limiting the free downloads with speed caps and charging for full speed downloads. Justified on their end.
I personally always use the Frija or SamFirm tool. You’ll get the fastest download speed possible.
Hi
My S9 has a build of
PPR1.180610.011.G960FXXU7CSJ1
Can you let me know which version of ElementalX i should be using?
Thanks very much!
Hi Gareth. CSJ1 is the October update. The EX kernel for the same is out, but only available via the EX Kernel Manager app for now. I suggest you wait a bit until the newer version of the kernel is uploaded here. Once it is, I will be updating this guide with links as well.
Hey mate running S9+ international exynos build number –
PPR1.180610.011.G965FXXS7CSJ3
I have the November security patch but was wondering if i was to purchase the EX kernel manager could i bypass waiting for it to be uploaded to that website?
Hi Chris. EX kernel for CSJ1 is already available through the EX Kernel Manager app. On the other hand, for CSJ3 (the one that you have installed) the kernel is not released yet, because Samsung is yet to push the kernel source code. The developer will post the CSJ3 build as soon as the source code is available.
And yes, if you purchase the app, you wouldn’t have to wait for the build to be uploaded on the website. Users with the app will straightforward get the latest build of the kernel when available.
wow was thinking of rooting my s9plus after reading every thing here not sure I would get all the steps right and all the button press in the right order?
may be I should not do it?
If I mess it up how hard is it to working again or back to stock
Hi. Although the process is quite easy, I can understand how hard it could be to perform if you’re new. This specific guide would look more complex/lengthy when compared to several others out there when you compare. However, there’s a reason for that. I took my time to write it all up in detail, split up the procedure into different sub headings so that it would be easier for users who are new to the scene.
“not sure I would get all the steps right and all the button press in the right order? may be I should not do it?” – You wouldn’t know until you try.
Here’s what I recommend:
1) Take a backup (Apps, messages, contacts, call logs, emails, and the complete internal storage)
2) Go through the instructions twice before performing them. Ensure that you understand exactly what exactly is going to happen.
3) Also, don’t forget to acknowledge that services like Samsung Pay, etc will not work after rooting. So, will Secure Folder, or any other Samsung service/app that relies on KNOX.
4) Finally start performing it.
In any case if you mess up, it’s quite easy to restore back to the stock firmware. But I am sure you’ll get through it easily.
Hi,
Great Post. I just rooted my S9 on Android 9 pie. After the reboot I am unable to use intelligent scan and any locking mechanism. As they all get stuck when setting them up. Any idea how to fix this? I followed the guide down to the T.
Also can you tell me how to fully remove root and put everything back to stock
Hi Jay! Thanks for the appreciation.
Below, I am quoting an explaination put up by the official maintainer of TWRP for the S9/S9+:
Samsung implemented security measures such as "Real-time Kernel Protection (RKP)" and "RKP Control Flow Protection".Those security measures are intended to block control flows such as privilege escalation, memory kernel code modification, etc which are not authorized by Samsung.
If those are not disabled, processes (such as daemon of root solutions) that violated those security rules will fall into deadlock.
Deadlocked processes will then consume large amount of resources (leads to performance issues, battery drains) and eventually crash the system.
Technically it is possible to disable those security measures by hex editing stock kernel but just simply flash a custom kernel is better in my opinion.
TL;DR: Flash custom kernel before root or be screw
A simple way to fix this issue is:
1) Download latest ElementalX kernel and Magisk 18.1 zip files
2) Reboot your S9/S9+ into TWRP
3) Flash EX kernel zip and then Magisk zip (In that order)
Finally, reboot your phone and it should start working again.
When I root and get back onto my phone and try to create a password or sign into my Samsung account it does not let me. Then when I reboot my phone it sends me into an infinite boot loop. How do I fix this? My model number is SM-G960F.
Hi Lewis. Have you flashed ElementalX kernel and then Magisk?
Yes I have, ive tried this multiple times and keep getting the same error.
Also when i try and download rmm state bypass v2 it redirects me back to the same page with no download
Hi Lewis. Instead of directly clicking on the link, try right-click and select ‘Save link as’ option. After selecting, you might have to wait up to 15 seconds for the file to start downloading. I have experienced the same and this seems to work for me.
does this root remove secured folder and samsung pay or do i still have all regular funtionality?
Hi Brent. It will prevent you from using features like that. But that’s where the beauty of Magisk lies. You can use Magisk Hide after rooting to hide root from such apps and they should work again without problems.
I followed the guide and everything went well; unfortunately, however, I went into the app Magisk and I updated (as he asked me), at which point the phone is no longer turned on (trying to restart but could not). At that point I entered the Twrp with the combination of keys, I made a format, at which point the phone turned on but Magisk was gone and I have problems with the Samsung account (I enter the password and nothing happens) . How can I solve the two problems? Thank you
Hi Sabrina. The best and most clear solution to this is to first flash the Samsung stock firmware using Odin. You can grab the latest firmware from websites like sammobile[dot]com. Once you have flashed that, you can start over with the rooting procedure.
Why if it boots into OS after twrp I cant flash? how do I know the Prenormal RMM State has been set???
Hi. You can boot into Download Mode, and you should see “RMM State: Prenormal” there. Another way to find this out is, you will not see the “OEM Unlock” toggle in Developer options.
In this case, you will have to keep your phone connected to the network and running for straight 7 days without a reboot to get the “Normal” RMM State back. Once it is back, you can continue flashing. Just ensure that you flash the RMM State bypass zip every time you flash custom stuff. It will prevent RMM State from appearing again.
Thanks for this great article!
I was looking for a rooting solution that would give me access to the system partition where I could install an anti-theft .apk. I have followed your instructions and I have used Magisk, but after reading some forums I am led to believe that the app won’t survive a factory reset in the system partition (Which was the whole point of me rooting my phone), but it would under SuperSU.
Is it a simple procedure to switch from Magisk to SuperSU or do I have to somehow undo everything first? I am not a developer just a regular guy that can follow instructions. Thank you for your time if you can help.
Hi Darren. Thanks for appreciating.
If an app is installed to the system partition, then it shouldn’t be removed upon a factory reset. Only if you specifically erase and reflash the system partition. A normal factory reset via the phone’s settings or stock recovery, or even a custom recovery won’t remove the app.
I am not even sure if SuperSU would be able to help you root the latest Samsung firmware. On the other hand, Magisk integrates all the specific patches for some Samsung-specific security features.
I hope this helps. If you have any more questions, please feel free to drop a comment.
Thanks Dhananjay for your time and help I really appreciate it. I am trying to protect my daughters new phone with an anti-thief app (Cerberus). I am using a ‘Terminal App Systemizer’ module in Magdisk to convert the app into a system app so that it won’t get wiped on a factory reset. When prompted I transfer it to ’../system/priv-ap’. Everything on the face of it appears to work ok and the Systemizer module recognises that it is transferred. My problem is it still disappears when I do a factory reset. Is there something I am missing?
PS. Following a Factory reset Magisk Manager is still there but when I open it, it prompts for confirmation to install. Is that normal?
Hi Darren. Instead of that, why don’t you just add a Google account (That will enable FRP on the phone). So even if someone resets it after stealing, he would not be able to log into the phone without the ID and password. A phone with FRP lock is useless and no one can open it.
Next, make sure “Enable OEM Unlock” is DISABLED inside developer options. This will prevent any outside flashing of firmware or other flashable images, to overwrite the firmware.
Third, use Android Device Manager (Now, “Find My Device”). This way, you will be able to locate your phone using your PC. Just make sure that mobile data is set to ON at all times for this to work.
Hey …how about rooting the snapdragon variant…???
Hi. It depends on what model you are using. The U variants are not unlockable, so cannot be rooted. However, you can install TWRP and root Galaxy S9 (SM-G9600) and Galaxy S9+ (SM-G9650) just fine.