A Beginner's Guide to Unlock Bootloader, Install TWRP Recovery, and Root OnePlus 8 (Pro) using Magisk
This is a comprehensive all-in-one guide through which you'll learn how to unlock the bootloader, install TWRP recovery, and simultaneously root OnePlus
On this page
This is a comprehensive all-in-one guide through which you’ll learn how to unlock the bootloader, install TWRP recovery, and simultaneously root OnePlus 8/OnePlus 8 Pro using Magisk. This guide and the included instructions are compatible with any OnePlus 8 or OnePlus 8 Pro running Android 11 (OxygenOS 11) and Android 10 (OxygenOS 10).
OnePlus phones are extremely development-friendly, primarily because the bootloader unlocking is easily possible through fastboot. Soon after the launch, stable builds of TWRP recovery for the OnePlus 8 and OnePlus 8 Pro were released, courtesy of XDA Recognized Developer mauronofrio.
Update: The development of TWRP for the OnePlus 8 and 8 Pro is now being handled by XDA Recognized Developer infected_. Here’s the link to the original XDA development thread.
His builds support Android 11 (OxygenOS 11). Support for Android 12 is still in works.
Although the recovery is currently labeled as ‘unofficial’, it’s quite stable for usage. According to the developer, the available builds of TWRP support decryption of the data partition/internal storage, and can be used for backing up/restoring NANDroid backups, and also to install flashable ZIPs like custom ROMs, kernels, etc.
With TWRP now available, you can use it to flash Magisk and easily root the OnePlus 8/8 Pro. Rooting via Magisk will not only allow you to use root applications but also install Magisk modules to modify your phone’s software systemless-ly. This, in turn, enables you to keep the critical partitions untouched which can be extremely beneficial for passing SafetyNet checks and also for installing OxygenOS OTA updates after rooting.
It does not matter if you’re just a beginner or a veteran in the field of software modding; the instructions in this guide will take you through the complete process in a step-by-step manner. So, by the time you’re finished reading this guide, you’ll be able to:
- Unlock the bootloader
- Install TWRP recovery
- and, root your OnePlus 8/OnePlus 8 Pro using Magisk.
Did you know? You can also root the OnePlus 8 series without TWRP. This is beneficial if you do not find a particular need for your use-case and also makes the OTA-on-rooted-phone process much easier.
Before You Begin
Before you start following the instructions, there are a few requirements that should be met. These are:
- A major part of this guide requires using a PC. So, you will need a Windows, Linux, or Mac PC.
- Take a backup of all your important data stored on your phone. Everything including the apps, contacts, messages, photos, videos, documents, and complete internal storage will be erased while performing this process. If you need a hand, you can refer to our very own and simple guide to take full backups.
- Second, charge your OnePlus 8 to a sufficient battery level (recommended: 60% or above). This shall prevent your phone from suddenly shutting down in the middle while you’re performing the steps.
- At various points during the instructions, we’d ask you to boot your phone into Fastboot and Recovery modes. It’s very important that you know how to do that and get comfortable doing it. Refer to the instructions on how to enter Fastboot/Recovery mode on OnePlus 8/8 Pro.
- You will often need to connect your OnePlus 8 to your PC while performing certain parts of the instructions. So, in order for the PC to properly recognize your phone, you will need to have the latest version of the OnePlus USB drivers installed.
Downloads
Below, you will find the links to download all the files you’ll need. You can download these to your PC beforehand, or when you’re asked to while performing the instructions.
It’s strongly recommended that you always download and use the latest version of TWRP and Magisk at the given point. The unofficial/beta version of the latest TWRP recovery image file for the OnePlus 8/8 Pro is available on Sourceforge and AndroidFileHost. The official version is available on the TWRP web portal. The latest version of Magisk could be download directly from the official GitHub release page.
Note: For documentation purposes, we have provided the download links for the latest versions of both TWRP and Magisk at the time of last updating this guide.
- TWRP for OnePlus 8/OnePlus 8 Pro
- TWRP 3.6.1-11: twrp-3.6.1_11-0-instantnoodle.img
- TWRP 3.6.0-11 Beta 11: twrp-op8-3.6.0_11-infected-b11.img
- TWRP 3.6.0-11 Beta 5: twrp-op8-3.6.0_11-infected-b5.img
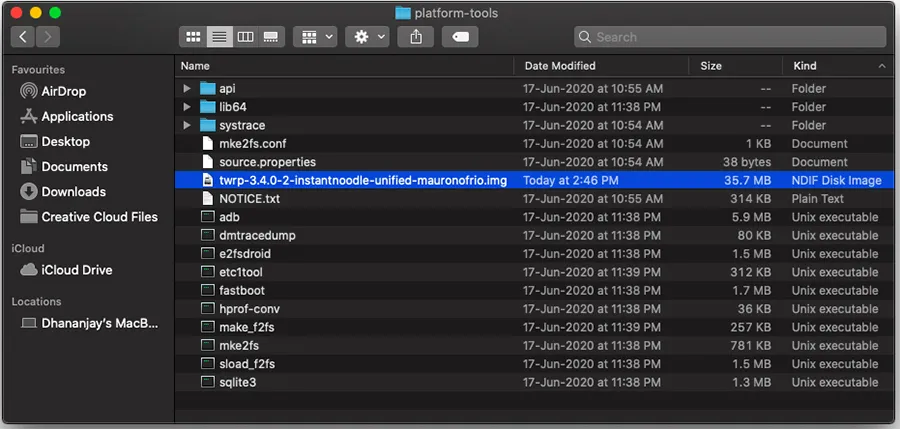
- TWRP 3.4.0-2: twrp-3.4.0-2-instantnoodle-unified-mauronofrio.img
- TWRP 3.4.0-1: twrp-3.4.0-1-instantnoodle-unified-mauronofrio.img
- TWRP 3.4.0-0: twrp-3.4.0-0-instantnoodle-unified-mauronofrio.img
- TWRP 3.3.1-test10: twrp-3.3.1-test10-instantnoodle-unified-mauronofrio.img
- TWRP 3.3.1-test8: twrp-3.3.1-test8-instantnoodle-unified-mauronofrio.img
- TWRP 3.3.1-test7: twrp-3.3.1-test7-instantnoodle-unified-mauronofrio.img
- TWRP 3.3.1-test4: twrp-3.3.1-test4-instantnoodle-unified-mauronofrio.img
- TWRP 3.3.1-test2: twrp-3.3.1-test2-instantnoodle-unified-mauronofrio.img
- TWRP 3.3.1-test1: twrp-3.3.1-test1-instantnoodle-unified-mauronofrio.img
- TWRP 3.3.1-0: twrp-3.3.1-0-instantnoodle-unified-mauronofrio.img
- Magisk Installer: Magisk-v23.0.apk
Instructions
Like any other modern-day Android device, rooting the OnePlus 8 (Pro) could be done in two different ways. First is through TWRP recovery, by using it to flash the Magisk root package. The second way to root is by flashing a Magisk patched boot image to your OnePlus phone via fastboot.
In this guide, we are focussing our attention on the former, that is, rooting the phone through TWRP recovery. In doing so, not only you’d learn how to root but also how to install TWRP on the OnePlus 8/8 Pro, which you can further utilize for flashing ROMs, kernels, taking backups, etc.
The process itself is quite straightforward. So without any ado, follow the steps below to unlock the bootloader, install TWRP, and root OnePlus 8/8 Pro using Magisk.
Step 1: Set up Android SDK Platform-tools on PC
The first step of the process is to install and set up the Android SDK Platform-tools on your PC. These platform-tools include the fastboot command-line tool that you’ll need for unlocking the bootloader, as well as for installing TWRP.
The quickest and easiest way to install the Android SDK Platform-tools is by doing it manually, which is exceptionally easy (believe me it is). To do this:
- First, download the latest version of the Android SDK platform-tools on your PC:
- Once you have downloaded the platform-tools ZIP file, extract its contents. Once extracted, move the ‘platform-tools’ to an easily accessible location on your PC. If you’re using Windows, we suggest moving the folder to the C:\ drive. On the other hand, if you’re using Linux/macOS, move the folder inside the ‘Documents’ folder.
- Now, you need to launch the command-line window inside the ‘platform-tools’ folder, where the fastboot tool/binary is present.
That’s it, you now have the Android SDK platform-tools set up and ready-to-use for the steps that follow. Make sure that you keep this command-line window open until you’re asked to close it. Although if you do accidentally close it, you can always launch it again.
Some notes about fastboot
- When entering fastboot or ADB commands while performing the instructions, make sure that you use the right syntax according to your PC. In Windows PowerShell, prepend the given command with a dot and backslash [
.\]. In Linux/Mac Terminal, prepend the commands with a dot and a forward slash [./]. - Users often confide in one-click ADB/Fastboot installers such as Minimal ADB and Fastboot. However, we would not recommend you to use such installers because most (if not all) of them contain outdated versions of the ADB and Fastboot tools.
- If you encounter unusual errors while using fastboot commands, then try using the USB 2.0 ports of your PC to connect your phone.
Step 2: Unlock OnePlus 8 Bootloader
Unlocking your OnePlus 8/OnePlus 8 Pro’s bootloader is the top-level requirement for installing TWRP, rooting, or making any other sort of modifications to the software.
Thankfully, the bootloader on OnePlus phones can easily be unlocked using a simple fastboot command. You wouldn’t need to acquire any unlock key or get a server-side approval from the manufacturer, which makes the process a whole lot easier and very less time-consuming.
To unlock the bootloader on the OnePlus 8/8 Pro:
-
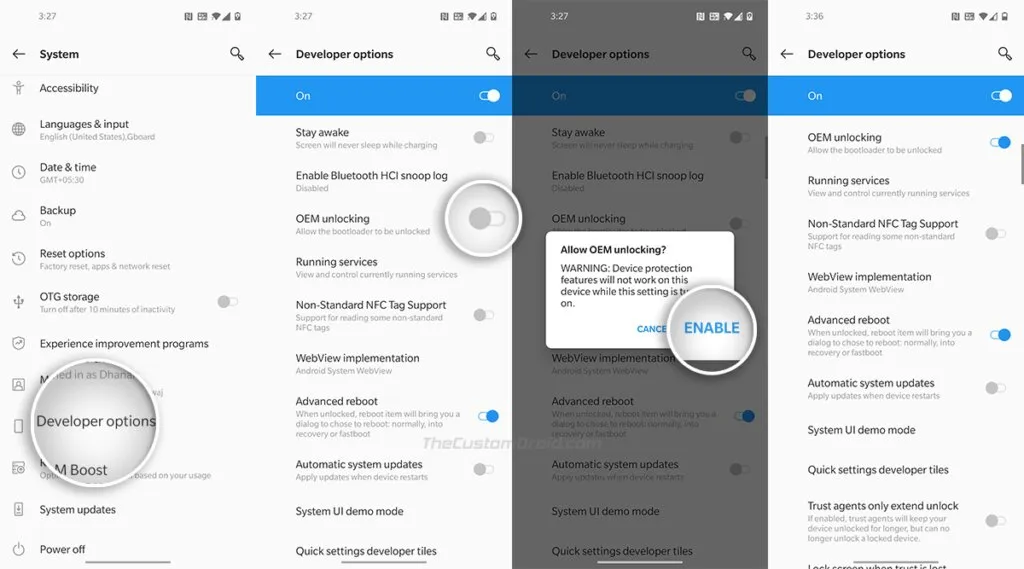
Then go to ‘Settings’ > ‘System’ > ‘Developer options’ and turn ON the ‘OEM Unlocking’ switch. Without enabling OEM Unlocking, your phone will not accept the bootloader unlocking command.
-
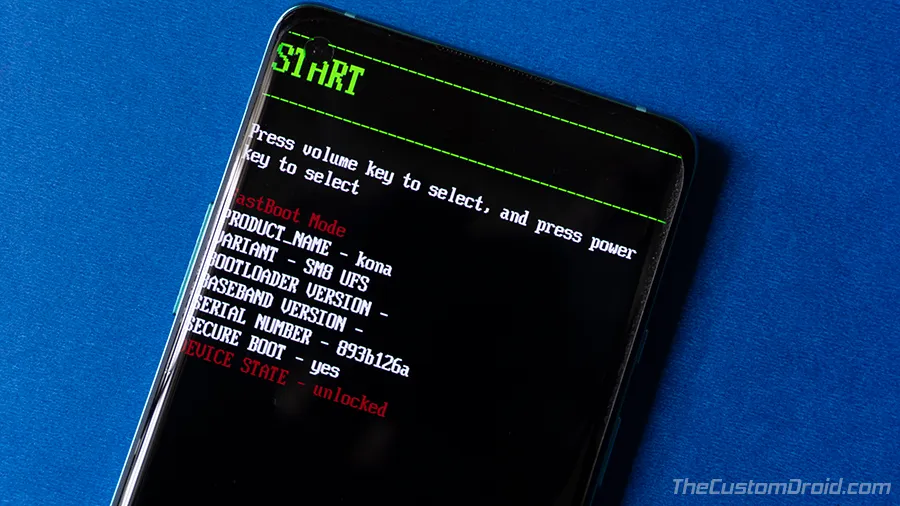
Now, power off your OnePlus 8 completely and boot it into Fastboot Mode.
-
Connect the phone to your PC over USB, while it’s in Fastboot Mode.
-
Enter the following command in the PowerShell/Terminal to ensure that the PC can recognize and communicate with your phone over the fastboot interface:
fastboot devices
-
The command should return your phone’s unique ID. If it doesn’t, then ensure that you have the proper OnePlus USB drivers installed and try using a USB 2.0 port on your PC.
-
Now, enter the following fastboot command to unlock the bootloader on your OnePlus 8/8 Pro:
fastboot flashing unlock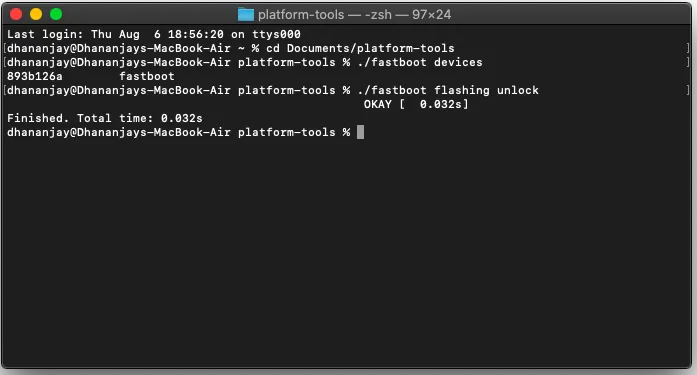
-
As soon as the command is entered, you will see a message on your phone’s screen, prompting you to confirm the unlock. Simply use the Volume keys to highlight “UNLOCK THE BOOTLOADER” and press the Power button to confirm.
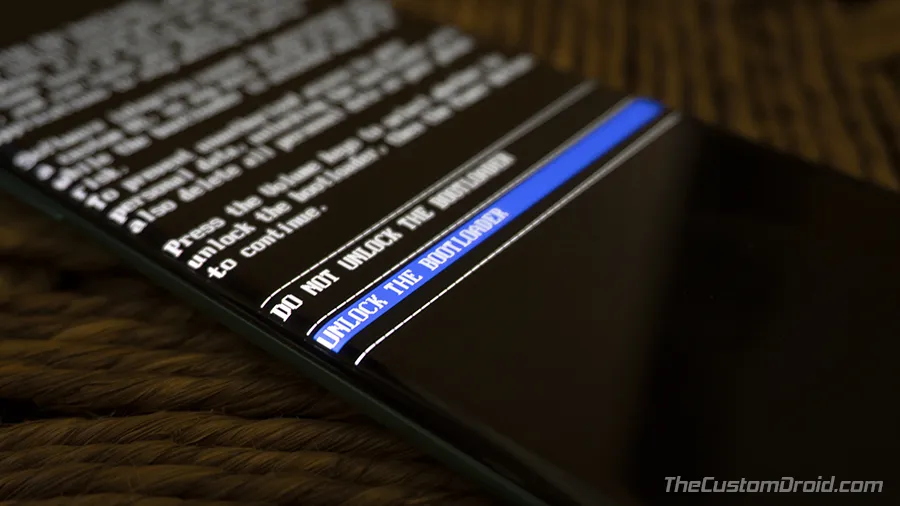
Your phone will automatically reboot into the system (OS). You will also see the unlocked bootloader warning message during the initial boot process. This is a mandatory warning and completely normal.
Do note that the only way to get rid of this warning message is by relocking the bootloader, which is NOT RECOMMENDED if you plan on installing TWRP, rooting, etc.

That’s it! Your OnePlus 8’s bootloader is now unlocked. From here on, you can head over to the next step to install TWRP recovery. Or, if you wish to root your OnePlus 8/8 Pro without TWRP, then directly skip to this tutorial.
Step 3: Install TWRP Recovery
With an unlocked bootloader, you can now install TWRP recovery on your OnePlus 8/8 Pro. According to the developer, OnePlus has re-introduced the /recovery partition. This means you will not need to temporarily boot TWRP image and then flash the TWRP installer ZIP for permanent installation anymore.
Instead, you can now simply flash the TWRP recovery image to the /recovery partition of your phone, as shown in the instructions below.
To install TWRP on the OnePlus 8/8 Pro:
-
First, download the latest TWRP recovery image to your PC.
-
Move the downloaded image file inside the ‘platform-tools’ folder and launch the PowerShell/Terminal window on the PC (refer to step #1).
-
Power off your phone completely and boot it into Fastboot Mode by holding the Volume Up, Volume Down, and Power buttons together.
-
Connect the phone to the PC using the USB cable.
-
Enter the following command to ensure that your PC can communicate with the phone over the fastboot interface:
fastboot devices -
Now, flash the recovery image to install TWRP on your OnePlus 8/8 Pro using the following command:
fastboot flash recovery twrp-image-filename.imgReplace “twrp-image-filename.img” with the full filename of the TWRP recovery image you’re flashing. For example, if you’re going to install TWRP 3.6.0-11 (unofficial/beta version), then the command should be:
fastboot flash recovery twrp-op8-3.6.0_11-infected-b11.img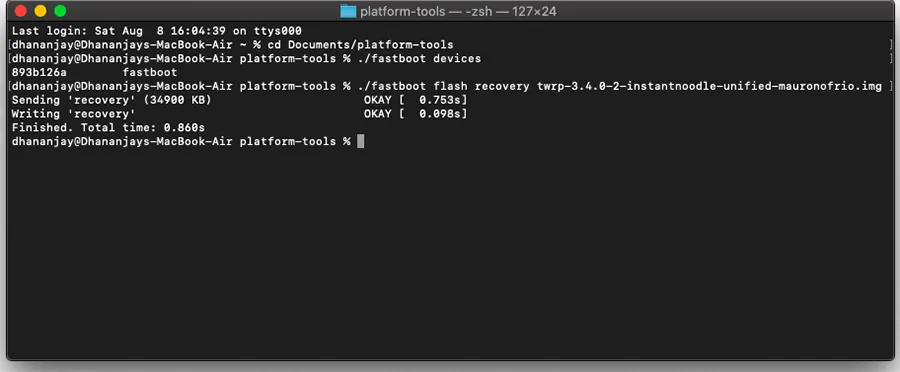
-
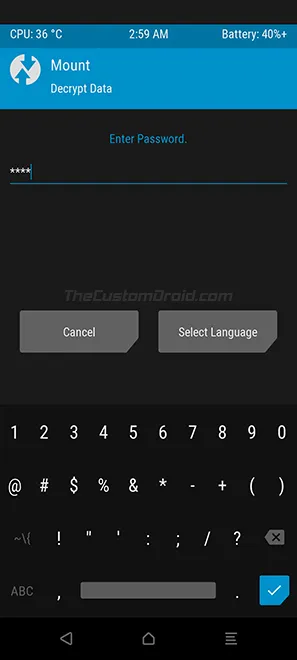
Boot your phone right into recovery mode now. To do this, tap the Volume keys until you see the “Recovery Mode” selection on the top of the fastboot screen. Then press the Power button to confirm and boot your OnePlus 8 into TWRP recovery mode.
-
Upon entering, TWRP will prompt you to enter the password to “Decrypt Data”. Simply input your phone’s lock screen password/PIN.
That’s it! Now with your phone in TWRP recovery mode, head over to the next and final step for rooting.
Step 4: Root OnePlus 8/8 Pro by Flashing Magisk
With TWRP installed, you can now flash the Magisk installer file to root your OnePlus 8/OnePlus 8 Pro. The instructions for this are as follows.
- First, download the latest Magisk installer file on your PC.
- Next, connect your OnePlus 8/8 Pro to the PC via USB. Your PC will recognize and automatically mount your phone’s internal storage over MTP. In case it doesn’t, go to the ‘Mount’ menu of TWRP and press the ‘Enable MTP’ button.
- Transfer the downloaded Magisk APK file to your phone’s internal storage.
- Disconnect the phone from the PC once the file has been transferred.
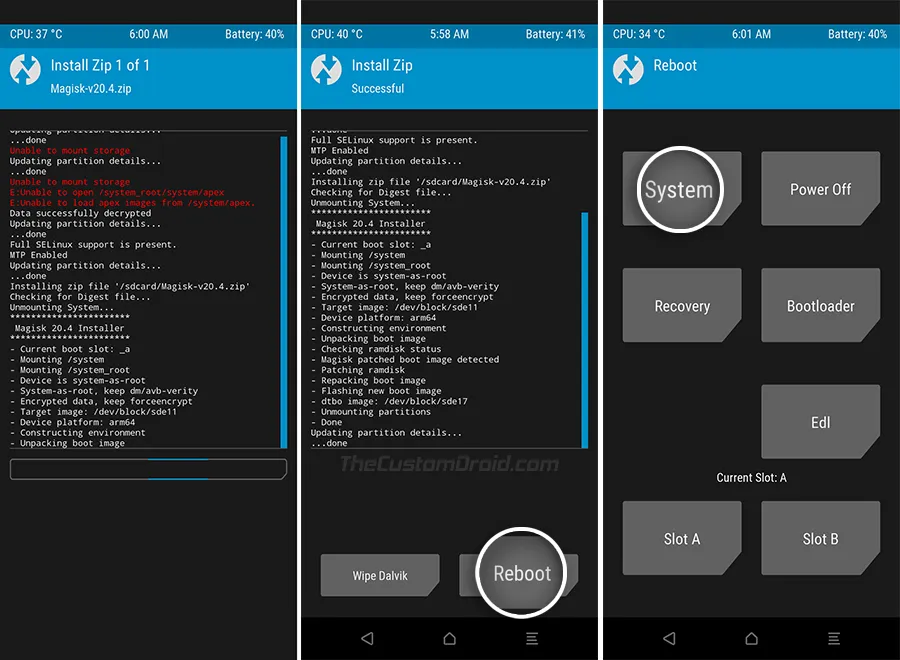
- Now go to the ‘Install’ menu from the TWRP main screen.
- Navigate through the phone’s internal storage (/sdcard) and select the Magisk installer file (e.g. Magisk-v24.3.apk) to add it to TWRP’s flashing queue.
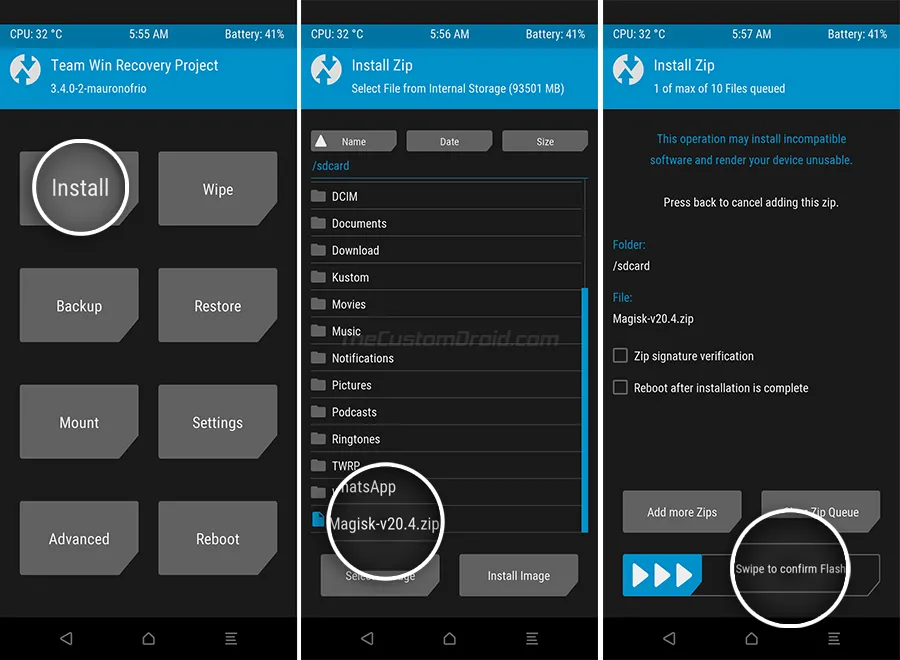
- Finally, swipe the button on the bottom of the screen to flash Magisk and root your OnePlus 8/OnePlus 8 Pro.
- Once the flashing process finishes, press the ‘Reboot’ button and select ‘System’.
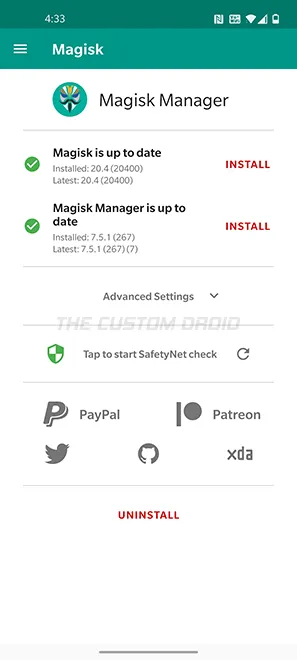
Your phone will now boot into the system (OS) and should be rooted via Magisk. To verify this, launch the “Magisk Manager” application and check Magisk’s installation status. It should look as shown in the figure below.
That’s it! Through this guide, you have learned how to unlock the bootloader, install TWRP, and root your OnePlus 8/8 Pro using Magisk. You can now use TWRP recovery to flash custom ROMs or kernels available on XDA, use root applications like Titanium Backup, and install Magisk Modules to apply modifications to your phone’s software systemless-ly. With root permissions, you can also install the ViPER4Android audio mod on the OnePlus 8 series.
Note: If you wish to unroot your phone at any point during the future, you can easily do so by using the ‘Uninstall’ option in Magisk Manager or flashing the Magsk Uninstaller ZIP file (Download here) using TWRP. Further, you can also follow this tutorial if you wish to revert your OnePls 8/8 Pro back to stock OxygenOS software.
More on OnePlus 8 series:
- How to Unbrick the OnePlus 8/8 Pro from a Hard-bricked State using MSMDownload Tool
- Google Camera Port for OnePlus 8/OnePlus 8 Pro – Comparison, APK Download, and Instructions
- OnePlus 8/8 Pro OxygenOS OTA Updates Repository
- Downgrade OnePlus 8/8 Pro from OxygenOS 11 (Android 11) to OxygenOS 10 (Android 10)
Have any questions or find yourself stuck anywhere while performing the instructions? Do let us know.
// TWRP source
Comments
Comments are moderated, and published only if they are relevant to the topic and add value in a constructive way. If you disagree with something, please be polite and respectful. We suggest you read our comment policy before commenting.