In this comprehensive guide, we will show you how to install Magisk Universal Systemless Interface to root Android devices. There are two different methods to install it – First, by flashing the latest Magisk installer zip using TWRP recovery, or two, by flashing the Magisk Patched Boot Image. The instructions for both the methods have been listed below in a step-by-step manner. For your convenience, we have also listed the steps to completely remove/uninstall Magisk to unroot, should you feel the need to do it.
Advertisement
The Android developer community is filled with a surfeit of modifications tools (Commonly known as ‘mods’) that allow you to customize the software on your Android devices. Many of these have gained immense popularity for their ability to efficiently and easily modify the phone’s software. These mods can help you draw various features on your Android phone, that the OEM doesn’t normally allow you to. Today, we will be taking one such mod/tweak in consideration that is being widely used for the past few years.
We’re here for “Magisk“, the ultimate interface to modify the software on Android devices systemless-ly. So if you’re looking ahead to root your phone or add third-party features to it, you should consider using it. The detailed instructions in this guide will allow you to install Magisk on almost any device running Android 4.2, to Android 10. If you’re new to the Android customization scene, take some time to read more about what it is and the features it offers.
Page Contents
What is Magisk?
Advertisement
Magisk is a very powerful tool that not only allows users to root their Android device easily but also apply modifications to the software systemless-ly. It is developed by XDA Recognized Developer topjohnwu and is also considered as a true successor to SuperSU, offering even more features and ways to efficiently root devices running the latest Android version.
In 2016, Magisk emerged as a tool to modify the software on Android devices using “Modules” just like the Xposed Framework, but in a more efficient manner. Well, unlike Xposed, Magisk allows users to customize the software without actually altering the /system partition. This means users could still pass Google’s SafetyNet tests and use apps that might rely on it
Progressing further, it gained several new features like “MagiskSU“, a part of the tool itself for effectively rooting Android devices. At the moment, you can install Magisk to root any Android device running Android 10, Pie, Oreo, Nougat, Marshmallow, and Lollipop.
“Magisk Hide” is another notable feature that allows users to hide root from apps that might not work if Root is detected, like Google Pay, Pokemon Go, banking apps, etc.
Advertisement
Below is a list of the major features that Magisk offers:
- Modify or alter the software without tampering the system (vendor) partitions
- Root any Android device with the open-source root solution
- Manage root permissions and use biometrics like fingerprint or Face Unlock to grant superuser permissions
- Pass Google’s SafetyNet tests even when the phone is rooted
- Use banking and security applications on rooted devices
- Remove kernel features like DM-Verity and ForceEncrypt
- Add third-party features using Magisk Modules
- Easily install OTA updates on your rooted Android device
So, if you’re at all interested in modifying the software of your Android device, then you must give a try to Magisk.
Prerequisites
- As always, we strongly suggest that you take a complete backup of all your personal data on the phone. You can follow our guide on how to backup Android devices.
- Your Android device’s bootloader must be unlocked. You can check for the instructions either on the official OEM portals or search for your device-specific tutorial from our archive.
- Download and install the latest USB drivers for your OEM Android device on the PC.
- For Method 1, you must have the latest TWRP recovery installed on your Android device.
- For Method 2:
- You must download the latest Android SDK platform-tools package and install it on your PC.
- When asked to launch the command-line window on the PC, do the following:
- On Windows: Go to the folder where the platform-tools have been installed (e.g. C:\platform-tools). Then hold the SHIFT key on the keyboard and right-click on any empty space inside this folder. Select the ‘Open PowerShell window here’ option.
- On macOS/Linux: Open the Terminal and change its directory (using ‘cd’ command) to the folder where the Android SDK platform-tools are installed (e.g. Documents/platform-tools).
cd Documents/platform-tools
- Also, for method 2, you must have the stock boot image from the stock firmware, matching the current firmware installed on your phone. There are a couple of ways to get it. You can either find it on firmware.mobi (database by SuperSU creator ‘Chainfire’) or visit your device-specific section on the XDA-Developers forum. You can also download the full OTA package of the installed software, and extract the Payload.bin file in it to get the stock boot image.
How to Install Magisk on Android
Now, as we mentioned in the beginning, there are two different ways/methods to install Magisk on Android. The first method is by flashing the latest Magisk installer ZIP file using TWRP, which is the easiest.
But if TWRP recovery is not yet available for your device or if you just want to root, then you can use the second method. It involves patching the stock boot image (kernel) using Magisk and then flashing the Magisk patched boot image to your Android phone via fastboot. This is also the recommended method since it will allow you to easily install OTA updates on your rooted Android phone.
Advertisement
We have covered instructions for both the methods below in a step-by-step manner.
Method 1: By Flashing Magisk Installer Zip using TWRP Recovery
- Download the latest Magisk installer zip: Download link
- Connect your phone to the PC using the USB cable and enable MTP/File Transfer mode.
- Copy the downloaded Magisk zip file (e.g. Magisk-v20.3.zip) to the device’s internal storage or SD card.
- Now, boot your Android device into TWRP recovery using the relevant key combination.
- Alternatively, you can also use the following ADB command while your device is connected with USB debugging enabled:
adb reboot recovery
- Tap on ‘Install’ in the TWRP main screen.
- Navigate to the phone’s internal/external storage and select the Magisk installer zip file (e.g. Magisk-v20.3.zip).
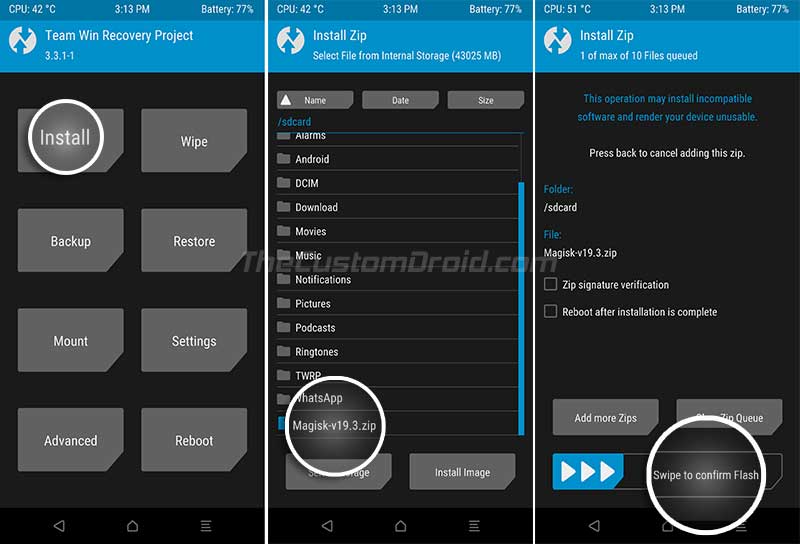
- The file will be added to the TWRP flashing queue.
- Finally, swipe the button on the bottom of the screen to flash the file and install Magisk on your Android device.
- When the flashing process is complete, hit the “Reboot System” button.
Alongside rooting, Magisk also simultaneously patches/disables any kernel-level security features (like DM-verity) that may prevent your phone from booting if the software is modified.
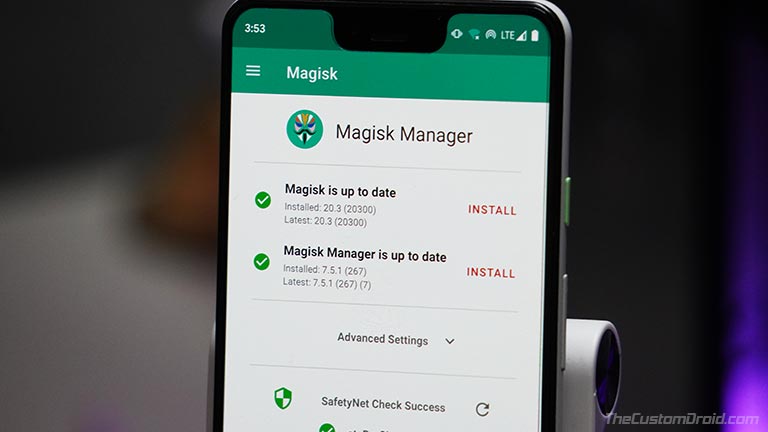
After your Android phone boots, you will see the latest Magisk Manager app present in the app drawer. Simply run it to verify that Magisk has been installed.
Method 2: By Flashing Magisk Patched Boot Image using Fastboot
If your device doesn’t support TWRP recovery or you don’t want to install it for some reason, then follow the steps below to install Magisk by flashing the Magisk Patched Boot image. This method also allows you to easily take OTA updates on your rooted Android device.
Advertisement
- First, get the stock boot image for the current firmware installed on your Android device.
- Transfer the boot image file to the phone’s internal or external storage.
- Download the latest Magisk Manager APK file from here and install it on your device.
- Now go to the app drawer and launch the ‘Magisk Manager’ app.
- Tap on the ‘Install’ button and choose ‘Install’ again.
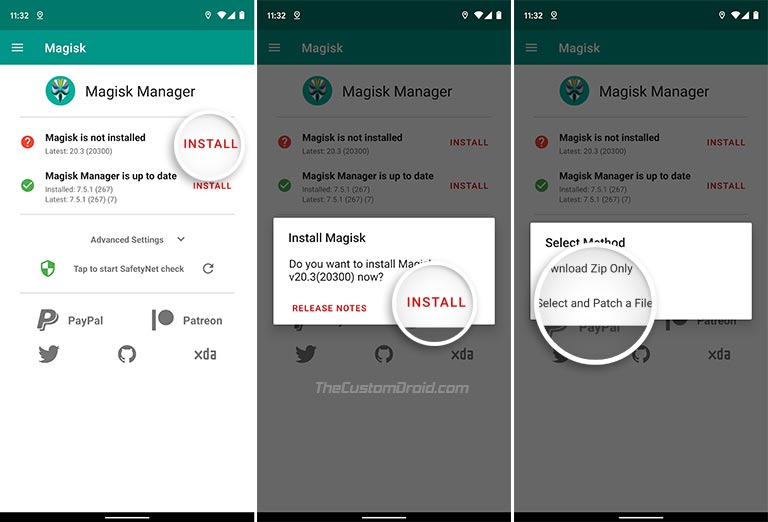
- Select the ‘Select and Patch a File’ option.
- Navigate to the storage and select the stock boot image file (e.g. boot.img) that you transferred earlier.
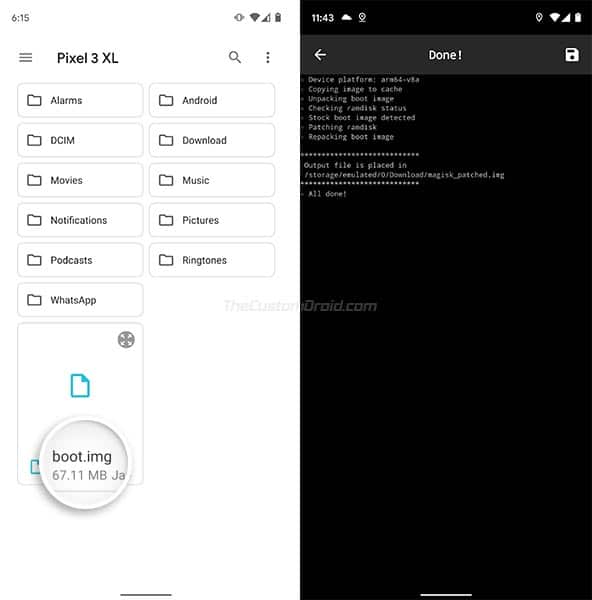
- Magisk Manager will now patch the stock boot image with the latest version of Magisk.
- Once patched, the patched boot image (magisk_patched.img) file will be stored in the ‘Download’ folder of your phone’s internal storage.
- Transfer the resultant file from the phone’s storage to the folder on the PC where the Android platform-tools are installed.

- Boot your Android device into Bootloader/Fastboot mode and connect it to the PC using the USB cable.
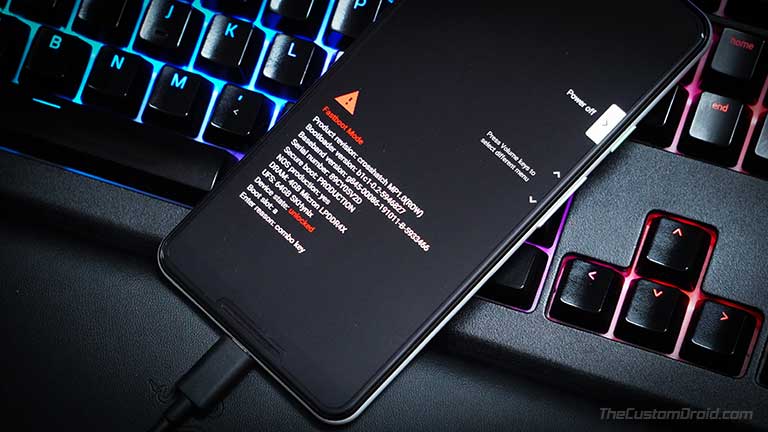
- Now, launch the command-line window (PowerShell in Windows or Terminal in macOS/Linux) on your PC.
- Enter the following command in the PowerShell window to ensure that your Android device is being detected properly by fastboot:
fastboot devices
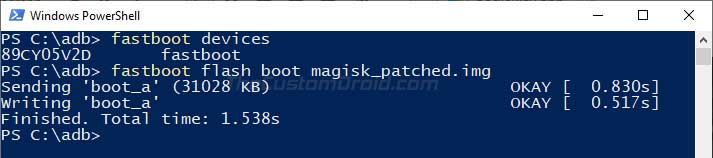
- Finally, enter the following command to flash the patched boot image and install Magisk on your Android device:
fastboot flash boot magisk_patched.img
- Note: The Magisk Patched Boot image will be flashed to your phone’s current active slot.
- Once done, reboot your phone using:
fastboot reboot
When your phone boots, open the Magisk Manager to verify the installation. You may further download various modules from the official repository or from here. The official documentation is a good way to start with the basics and also to know what Magisk is capable of.
How to Completely Uninstall Magisk and Unroot your Android Device?
Now, if you wish to uninstall Magisk for any reason, the steps below will assist you in doing so. The most direct way to do this is via the Magisk Manager app itself. Before you uninstall Magisk, make sure to disable and remove all the modules first. Once you have done that, follow the instructions below.
- Launch the ‘Magisk Manager’ app on your Android device.
- Tap on the ‘Uninstall’ option in the app’s main screen.
- The Uninstall prompt should show up on the phone’s screen.
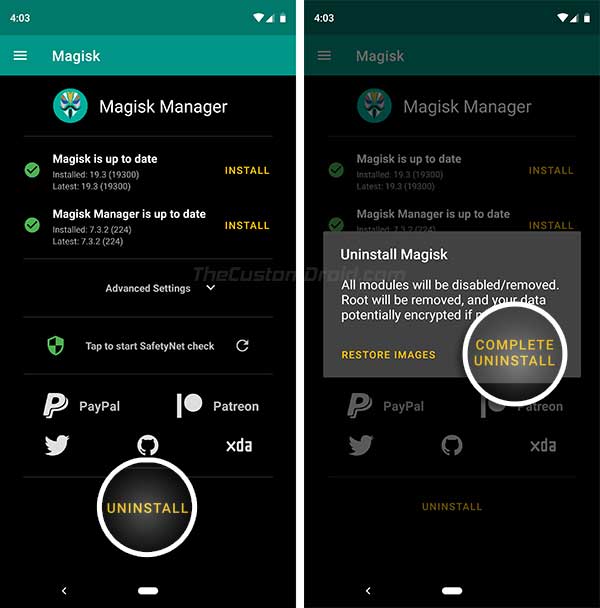
- Finally, select ‘COMPLETE UNINSTALL’ to uninstall Magisk and restore the stock boot image.
- When the process finishes, reboot your phone.
Once the phone boots, you can safely uninstall/remove the Magisk Manager app as well.
An alternative to the above method is to flash the Magisk Uninstaller zip using TWRP Recovery or by simply restoring the stock boot image if you used Method 2.
Magisk gives you the ability to perform various tasks in order to customize the software. For starters, you can use any root-enabled app on your phone. “Magisk Hide” allows you to hide root from apps like Pokemon Go, and so on. You can also install modules to add third-party features to the software. The possibilities are endless, so don’t stop exploring.
So this was our guide on how to install Magisk on Android and root it. If you have any questions, kindly leave them in the comments.
Comments 33 Comments
Comments are moderated, and published only if they are relevant to the topic and add value in a constructive way. If you disagree with something, please be polite and respectful. We suggest you read our comment policy before commenting.
Hi Dhananjay,
When trying to flash the magisk image on my pixel 4a i get the below mentioned error can you guide where i am getting it wrong and root my pixel 4a.
target reported max download size of 268435456 bytes
sending ‘boot’ (65536 KB)…
OKAY [ 1.542s]
writing ‘boot’…
FAILED (remote: Failed to write to partition Not Found)
finished. total time: 2.546s
Kamal, are you sure that you’re using the latest version of the Android SDK platform-tools provided by Google on this page?
Since the command was sent to the “boot” partition, I wouldn’t expect there to be any syntax/filename errors.
Hi Dhananjay,
I am using the latest file from the link you shared and i have downloaded the boot file also from the google site only i have downloaded the full file than copied only the boot.img to phone and patched it with magisk as mentioned. than i copied the file back to platform tools folder and run the command prompt still getting the same error kindly guide.
That’s odd. Could you please share the exact command you’re inputting?
And have you tried switching between the USB ports of your computer? Certain new-gen USB 3.x ports could sometimes cause connection issues.
And just to confirm, your phone’s bootloader is unlocked, am I right?
Hi,
I am using “fastboot flash boot magisk_patched_QoTvQ.img”
yes i have tried using different USB ports
my bootloader is unlocked.
can it be because i used img file from google site ?
let me know how to resolve the issue.
thanks
Then everything is in order. And no, not because of that. That’s the actual source of getting the untouched/stock boot images.
How did you set up SDK platform-tools exactly? Did you add the platform-tools folder to the Windows path or are you launching the PowerShell window inside the platform-tools folder by right-clicking?
I tried researching and I could only find the issue is related to the tool setup.
HI Dhananjay,
earlier i was using SDK tools using command mode than i installed android studio.
I was still getting the same error while using the command – “fastboot flash boot magisk_patched_QoTvQ.img”
than i tried with the command – “fastboot boot magisk_patched_QoTvQ.img”
somehow it worked and not my phone is rooted. but when i restart it my root access goes away.
Is that regular if you switch off your phone magisk loose the root access. I am new to android eco system.
Earlier was using jailbreaked iphone still using one. i know in iphone if phone got switch off you loose the jailbreak is this same in android case too kindly confirm.
and thank you for your prompt reply always.
Hi again, Kamal. The tools you used are the same ones that are bundled with the Android Studio. So, that shouldn’t be the culprit.
The literal difference between the two commands is that the first one actually flashes the boot image, while the other one just boots it temporarily. Thus, you lost root access after the reboot.
Once you successfully flash the patched boot image, the root stays persistent across reboots, factory resets, etc. It can only be undone by either restoring the stock boot image alone or the complete stock firmware (by flashing the factory image).
I did a bit more digging since the last reply and a few users reported that re-flashing the factory image fixed the issue for them. So, I would ask you to do exactly the same.
Do you know how to flash the factory image?
Hi
So as per you the root access I got is temporary?
But even after installing the Android studio the flash command is not working don’t know why
Flashing factory image I guess you saying to flash through Google site if I am not wrong if yes than let me know will do that.
Do I need to redo the whole process again of rooting or the root will stay if I flash factory image.
I want to check one more thing I have enabled adaptive audio as mentioned in your other topic but I don’t know why some times I see that in settings and some time it’s not visible is this fine or there is some problem
Thanks
Hi again, Kamal.
Yes, the root access would be temporary if your use the
fastboot boot commandinstead of thefastboot flash bootcommand.Yes, you first need to download the latest factory image for your Pixel 4a through the official database. The instructions could be found on the very same page at the top. Or, you could follow my step-by-step instructions in this tutorial (follow Method #3).
Note: Installing the factory image will erase all the data including that on the internal storage. The tutorial I linked above includes a nifty little trick of modifying the factory image flash script to prevent the data from being wiped.
You will need to reform the patching process after installing the factory image. You can simply extract the stock boot.img from the downloaded factory image itself.
As for the Adaptive Audio feature, it’s more of a workaround. If you do not see it in the Settings, just force-close the settings menu and try accessing again. Once you have rooted, you can use the module instead, which works better than the temporary ADB workaround IMO.
Hi Dhananjay,
Today when i checked and restarted my phone twice i was surprised to see that even after restarting or switching it off and turning it on I am not loosing my root.
I have not done any thing just two package install adaptive audio setting enabler and one systemless hosts.
I have not downloaded systemless hosts i hope thats a pre installed in magisk kindly guide
let me know if its all fine to install more packages.
thank you for all your support so that i can start a smooth android journey with rooting as its pretty new to me.
Wow, that’s really surprising. Logically, this can’t happen if the patched boot image wasn’t flashed. If Root stays persistent, I think the image was flashed correctly when you attempted the first time but showed an error because of a possible glitch in the fastboot tool.
Anyways, good to know that it worked.
Yes, when you press the “Systemless Hosts” option in the Magisk Manager settings menu, it automatically adds the Systemless Hosts modules to your device. After which, you just have to reboot your phone for the module to take effect. Once that is done, you should be able to use Ad blockers that require systemless hosts.
You can go ahead and play with it, install modules, use root apps, etc. In addition, also enable “Magisk Hide” from the MM settings to make sure that apps that detect root (like banking and security apps) work without issues.
Also, perform the SafetyNet check from the Magisk Manager app to make sure that your phone passes it.
I am very happy to help. If you need to learn more, you can always drop a comment and I will try my best to explain/answer.
Hi Dhananjay,
Thanks for advicing, when i am doing safety net, it says attestation failed – it tick basiscintigrity but ctsprofile i think its not working evaltype is written hardwar.
can you guide what is this.
Pls. let me know where i can find good modules for instagram, facebook, youtube and other popular apps like you have in cydia.
also i am unable to use my jio and hdfc app even after magisk hide can you guide how i can use those in jailbreak we use to have so many tweaks to hide jailbreak can we have similar stuff on magisk too.
I will be very thank full to you if you can guide and help.
Okay, that’s because of the new hardware-backed SafetyNet attestation. Go through the linked article and you will learn more about it.
Then, use the Universal SafetyNet Fix module to try and fix the issue.
For modules, the best place is to get them through the official Magisk repository. You can access it by going to Magisk Manager and then pressing the icon on the extreme right of the bottom navbar.
There are a tons of other modules available in this section of XDA-Developers, some of which have not been merged into the official repo.
As for getting JIO and HDFC apps to work, it depends. Depends on what? How the app checks the integrity of the phone. Some apps just try and detect root, while others use more extreme measures like SafetyNet attestation (basic, ctsProfile, or both).
The first thing to try is to hide root access from these apps. To do this, go to Magisk Manager, press the shield-like icon, and select “Magisk Hide”. Then browse through the list of apps and check the boxes corresponding to the Jio and HDFC apps. Then restart the phone and verify if the apps work.
When it says “Copy the downloaded Magisk zip file the device’s internal storage or SD card.”
Where am I supposed to copy it to? When copy it from windows using the USB connection, the places I see to copy it, I can never find in twrp.
Hi Joe, you can copy it anywhere on the internal storage.
Once you go to the ‘Install’ menu in TWRP, you will see the root directory of your phone, including folders like system, vendor, data, etc.
Scroll through those folders and find the one that says ‘sdcard’. The internal storage on Android devices is mounted as /sdcard, so do not confuse it with an actual SD card (external storage).
Hi Dhananjay, Im not sure if TWRP has support for a Samsung galaxy SM-A505F. If you familiar with this device please advise how to root this device. Would the adb method be the best option? And lastly, would the A50 not be stuck in bootloop flashing a patched boot image via adb, how does adb know where to flash a boot image to a certain partition without affecting other system partitions and/or without factory resetting involved? Please advise, thanks in advance bud 😉
Hi Leon. The second method can be done, however, not by patching the boot.img, but the AP file extracted from the firmware version installed on your phone.
On the other hand, TWRP is available for the Galaxy A50 and rooting via that seems easier to me. If you want, I can start writing a full guide for it, from unlocking the bootloader, to installing TWRP, and rooting.
One more thing, both the method will require you to unlock the bootloader, which means that the phone will be completely formatted, apps, contacts, photos, videos, music, everything on the internal storage, etc.
xiaomi rn4 miui11.0.2 global stable. unlocked bootloader with mi unlock (not enabled oem unock) and flashed twrp and no-verity-opt-encrypt. should i do method 1 or 2? what exactly are the ota update advantages of 2?
Hi Romper. Before I begin, I would recommend keeping the OEM unlocking toggle on when modifying the phone.
Method 2 is a great option when it comes to A/B devices. But since the Redmi Note 4 doesn’t support seamless updates (AB partitions), it really doesn’t matter in that scenario.
Since you have TWRP installed, I think flashing Magisk zip (Method 1) should be the easiest.
Thanks for replying Jay. my plan was to backup boot, root with magisk(patching boot img), then backup with Migrate. save all backups to PC, restore boot, wipe system, install LineageOS for microG. format userdata and reboot. for rooting install addonsu-16.0-arm64-signed.zip. I want to pass safetynet for bank, payment, netflix,etc. any suggestions?
Okay, I get it. However, please note that passing SafetyNet may not be possible now as Google has recently implemented hardware-based attestation for CTS profile.
Plus restoring backups from Migrate will require you to have TWRP, wouldn’t it?
Since you’re going to install custom ROM, I would suggest going for the easier route, this is, to install TWRP first on your Redmi Note 4. I think we already have a guide for this on the blog, however, it may be outdated.
If you want, I can rewrite the complete guide and then you may follow it.
updated plan: backup boot, flash magisk_patched.img, backup w migrate, save to PC. wipe system, flash los microG. format userdata. install Magisk Manager apk. boot twrp, flash migrate backup. suggestions, condsidering everything else discussed?
have twrp already. so no need to write the blog for me, maybe for others. thanks very kind of you to offer.
due to timezone i’m asking all Qs at once.
1) how do i update ota los for microG if i flash magisk zip? thecustomdroid.com/install-ota-update-rooted-android-device-guide/#What-is-an-OTA-Update i should follow this article but what do i do for ‘install to inactive slot’?
2) is it a good idea to root w magisk now that hardware based safetynet recently? can magisk-hide pass saftynt by renaming itself? how will addonsu help with this?
3) if i don’t root will sftynt test fail as bootloader unlocked and twrp installed?
4) should i adb sideload los for microG zip, if i choose not to root? will microg trip sn?
I understand if you can’t reply all, but please please reply to as many as you can. thanks a lot.
Hi Romper. I will try and answer all your questions, no problem.
1) No, you won’t be able to use that guide for updating the ROM. It has to be done via TWRP. Many custom ROMs like LineageOS have in-built updaters that will update to the latest version with/without root. You will have to check with your specific build if the developer has added support for LineageOS OTA updates.
2) Rooting with Magisk is the best! No root solution can bypass the hardware-based attestation universally. And renaming Magisk or hiding root will no longer be helpful. Magisk Hide’s scope is now limited to hiding root from apps, like it has always done. And as for Addon SU by LOS, it’s just a rooting package like Magisk. You can’t have both of them installed at once.
3) Yes, SafetyNet will still fail.
4) As far as I know, SafetyNet should be tripped right after you install TWRP, root, or a custom ROM like LOS.
My advice: Don’t bother about SafetyNet anymore as nothing could be done in that matter now.
1)sorry didn’t understand. los for microG has ota updates but root doesn’t persist right? hence i’m for method 2. step 4 was for those who used method 1. so if i do method 1 then can i use that guide? ik of> ota update los mG, lose root, flash magisk again from twrp, but want a quicker method (hence 2; hectic setup but easy ota).
3)i meant on miui+twrp not los. bank, pay, broker, netflix, prime video still working…
4)well it hasn’t tripped for twrp, hopefully not for los either. root passing SN is a lost cause then?
thank you so so much for taking the time to answer all my questions.
1) In case of A partition devices, re-flashing Magisk is the quickest way and wouldn’t require you to patch the boot image every time you want to root. Since your phone is A-only, you will need to patch the stock boot every time.
2 & 3) Don’t get confused between SafetyNet not passing and MagiskHide. If the apps rely only on checking root (not safetynet), you can just use MagiskHide to hide root from them and use them. But if an app relies on SafetyNet attestation, it wouldn’t run because no matter you have MIUI installed or LOS.
4) Yes, SafetyNet is finally lost. Unless Google decides to revert its decision, which is highly unlikely.
You’re welcome Romper. I am happy to help any way I can.
i was told w method 2 you know for sure it won’t modify /vendor and you know how to undo (restoring boot.emmc.win). another benefit it even works in case TWRP has problems with decryption, and you have better control about Advanced settings (encryption, AVB)
Magisk installs the same way with both the methods, no difference at all.
Encryption and AVB are something that is also automatically dealt with in both cases.
Hello, thanks for your detailed guide. However, i am facing an issue whereby i have did an advanced wipe with twrp and then install magisk zip but after rebooting i will be stuck at samsung logo screen. What could be the problem?
Hi Lee. Thanks for reaching out.
Could you please let me know the name of the Samsung device you’re using along with the model number? Also, which partitions under the ‘Advanced Wipe’ menu in TWRP did you erase/format?
I strongly believe that you wiped out the “system” which is the WHOLE phone operating system, including all apps and menu..that’s why phone cannot pass the Samsung logo..it has NO system,no menu, nothing.. you need to first flash it using stock rom (official System from manufacturer, download at samfrew.com) in Odin flash tool.. (or flash a custom room using TWRP)..
Then reinstall TWRP and don’t wipe “system” again.
Make sure your download stock rom according to your EXACT region, Samsung Rom is region specific.
Hi Charles. Thank you so much for dropping by and helping others. It means a lot to me.
And Lee, follow his advice. It’s really exactly what I would have said.