Released all the way back in 2015, the Nexus 6P was the last device from Google’s Nexus lineup. And like any of its predecessors, the Nexus 6P is very flexible when it comes to software modifications, primarily because the bootloader is easily unlockable. The phone also received official support for TWRP soon after its launch. This means you can also easily root it.
Advertisement
Installing a custom recovery such as TWRP and rooting your Nexus 6P can open the gateway to tons of possibilities when it comes to software modifications. You can install custom ROMs to update your Nexus 6P past the officially released Android version, use custom kernels to boost the battery life and performance, install mods like ViPER4Android to enhance your phone’s audio experience, use applications that require root/superuser access, and much more.
The process of rooting the Nexus 6P is straightforward:
- You will start by unlocking the phone’s bootloader, which is essential for flashing the partitions.
- The next step will be installing the custom recovery such as TWRP, which is done by flashing the TWRP recovery image to the phone’s
/recoverypartition via fastboot. - Then comes the step where you will be disabling forced-encryption, optionally. Optional, why? Disabling encryption has been known to give quite noticeable performance gains when it comes to the Nexus 6P because it does not utilize hardware accelerated encryption. So, you have the option to either gain performance improvement by disabling encryption or stay encrypted to maximize security of the data on your phone.
- And finally, the last step is flashing the Magisk root package via TWRP and rooting your Nexus 6P.
FYI:
It’s possible to root the Nexus 6P using the good ol’ SuperSU too. But it’s not recommended anymore because, for starters, SuperSU will only work if your phone is running Android 8.0 Oreo or lower.
And more importantly, we have a modern and much improved systemless root solution in the form of Magisk. It allows you to root and modify your phone’s software without altering the /system partition, hide root access from apps and bypass SafetyNet attestation (fair warning; it’s a bit of struggle to do that now, but doable).
With all that information laid out, now let us begin with the instructions.
Advertisement
Page Contents
Before You Begin
- Backup your data: At two points during this guide, all the data on your phone will be erased. The first time is when you unlock the bootloader, which is done by design to prevent unauthorized access to your data. And the second time is when and if you disable forced-encryption.
The only time your data will not be erased is if you already have your Nexus 6P’s bootloader unlocked and do not want to disable encryption. Any time else, it will be. So, make sure that you backup the data on your phone completely before proceeding. - Charge your phone: Having a sufficient charge in your phone’s battery will prevent it from accidentally shutting down in middle of the process. So ensure that your Nexus 6P is charged to at least 60% battery level.
- Install USB drivers: If you’re using a Windows PC, download and install the latest Google Android USB drivers. Linux and macOS users do not need any sort of drivers.
- Set up Android Platform-tools: Download the platform tools (ADB and fastboot) package and install it on your PC using the instructions here.
- Launch command-line on computer: During the instructions, you will be asked to enter commands on your computer’s command-line shell (PowerShell/Windows Terminal on Windows PC and Terminal on Linux and macOS). In order for these commands to work, you will need to open the command-line window inside the directory/folder where the Android Platform-tools are installed. You can follow follow our quick-guide on how to do that and keep the window opened till you finish the steps.
Downloads
- Nexus 6P TWRP Recovery: twrp-3.3.1-0-angler.img
- Rooting Packages:
- Magisk: Magisk-v20.4.zip
- SuperSU: UPDATE-SuperSU-v2.82-20170528234214.zip
Instructions
Step 1: Unlock the Bootloader
Installing a custom recovery, rooting, or performing any sorts of modifications to the software requires flashing/writing the device partitions. The bootloader is locked to prevent this, so you must first unlock it.
Unlocking the bootloader on the Nexus 6P is really simple, all you have to do is boot your phone into fastboot mode, connect it to the computer, and send a fastboot command. I have already covered the complete process in a detailed guide:
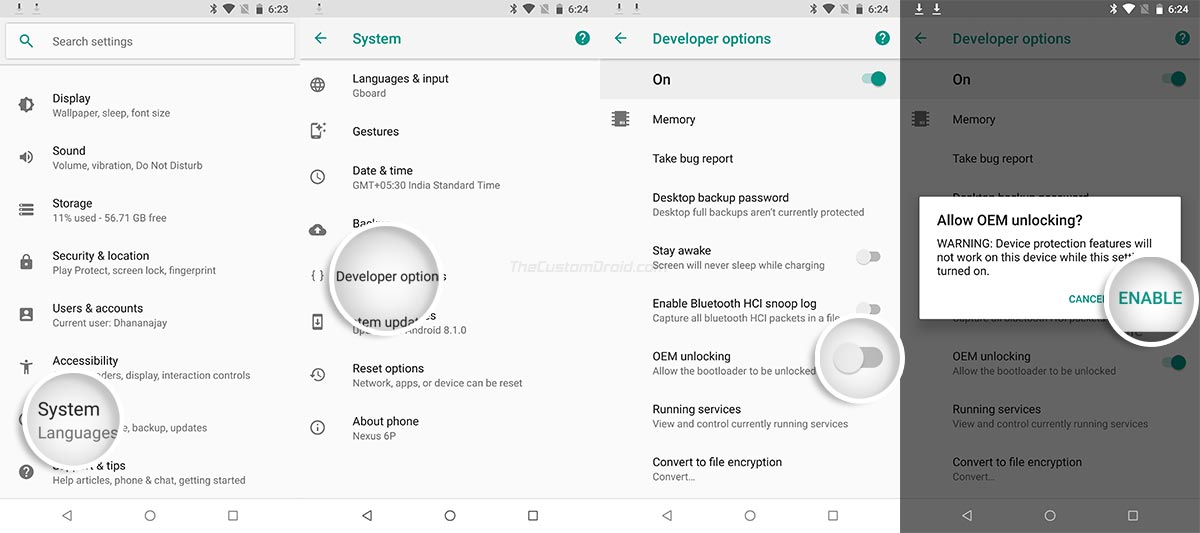
Step 1: First, go to ‘Settings’ > ‘System’ > ‘About phone’ on your phone. Then scroll down and find the ‘Build number’ section. Tap continuously on it for five (5) times until you see the ‘You’re now a developer!’ message. You have just enabled the hidden Developer options on your phone.
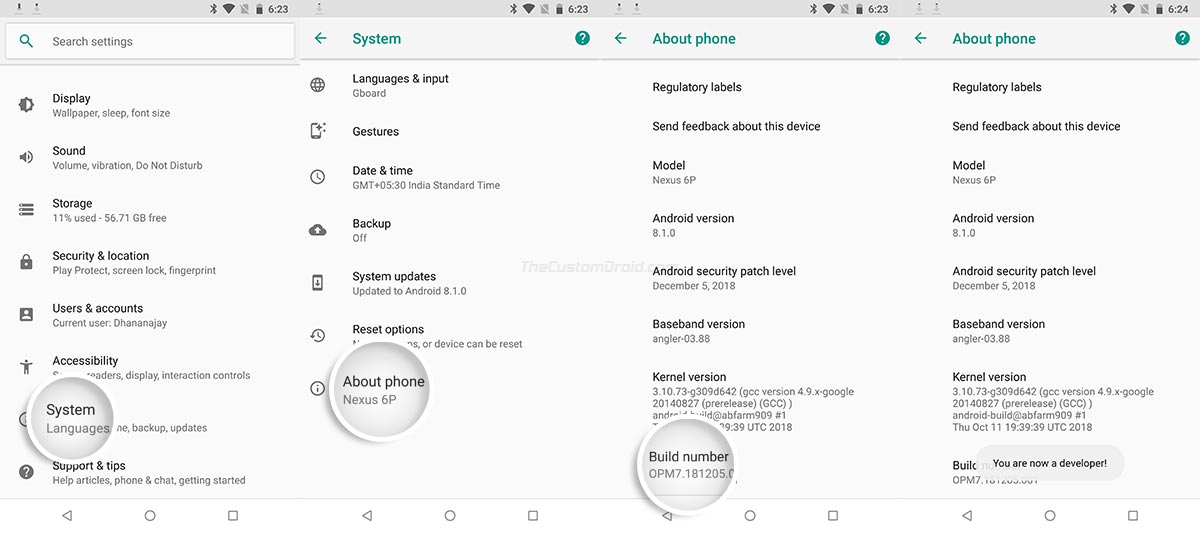
Step 2: Now, go to ‘Settings’ > ‘System’ > ‘Developer options’ and turn on the ‘OEM unlocking’ toggle. Select ‘ENABLE’ when prompted to finally enable OEM unlocking on your Nexus 6P.
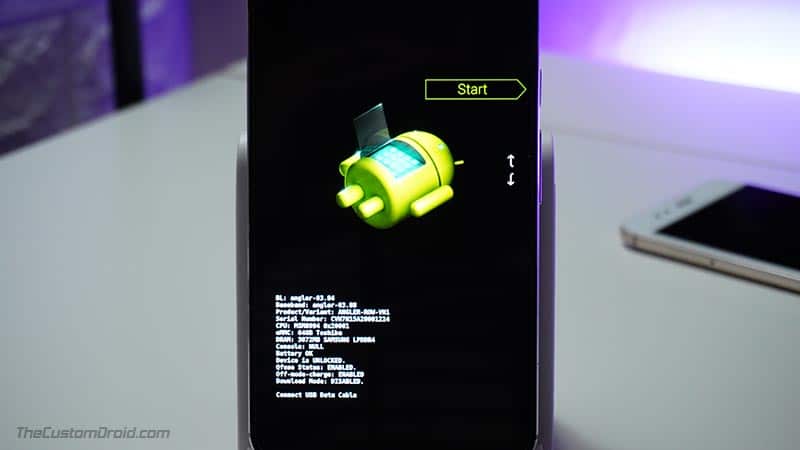
Step 3: With OEM unlocking enabled, you can now unlock the bootloader via fastboot. To do this, power off your phone completely. Then boot it into Bootloader Mode by holding the Volume Down and Power buttons together. Once your Nexus 6P is in Bootloader Mode, connect it to the PC via a USB cable.
Step 4: Now launch the command-line window on your PC and execute the following command to ensure that your PC can recognize your Nexus 6P over fastboot:
fastboot devices
The command should return your device’s unique ID. If it doesn’t, then make sure that you have installed the proper USB drivers on your PC (Check the ‘Prerequisites’ section’ above).
Step 5: To finally unlock the bootloader on your Nexus 6P, enter the following fastboot command:
Advertisement
fastboot flashing unlock

As soon as you enter the command, you will be prompted by a confirmation message on your phone’s screen. Use the Volume keys of your phone to move the selector to ‘YES’ and then press the power button to confirm the selection.

Your phone’s bootloader should be unlocked now. From now onwards, you should see the bootloader unlocked warning message on the screen whenever you reboot the phone. Do not worry, this is completely normal and you can safely ignore it.
Step 2: Install TWRP Recovery on the Nexus 6P
Now that the bootloader is unlocked, you can flash the partitions and install TWRP recovery on your Nexus 6P.
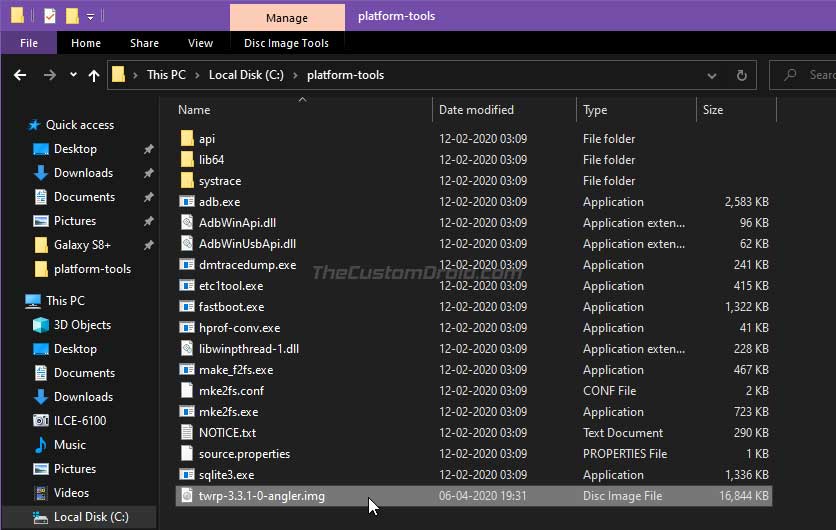
Step 1: First, download the TWRP recovery image for the Nexus 6P from the ‘Downloads’ section. Copy the download .img file to the folder where the Android platform-tools are installed (e.g. ‘C:\platform-tools’ on Windows or ‘Documents/platform-tools’ on macOS/Linux).
Advertisement
Step 2: Connect your phone to the PC while it is in Bootloader Mode.
Step 3: Now launch the command-line window on your PC and enter the following command to verify the device-PC connection over fastboot:
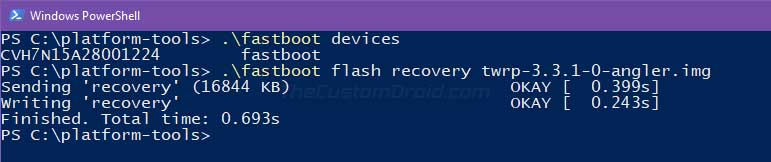
fastboot devices
Step 4: Now, flash the TWRP recovery image to your Nexus 6P by entering the command mention below.
fastboot flash recovery twrp-3.3.1-0-angler.img
Step 5: TWRP has now been installed on your phone. For carrying on the rooting procedure, you will need to boot your Nexus 6P into TWRP recovery mode. To do this, simply tap either of the Volume buttons until ‘Recovery Mode’ shows up on the bootloader screen. Then press the power button to confirm.
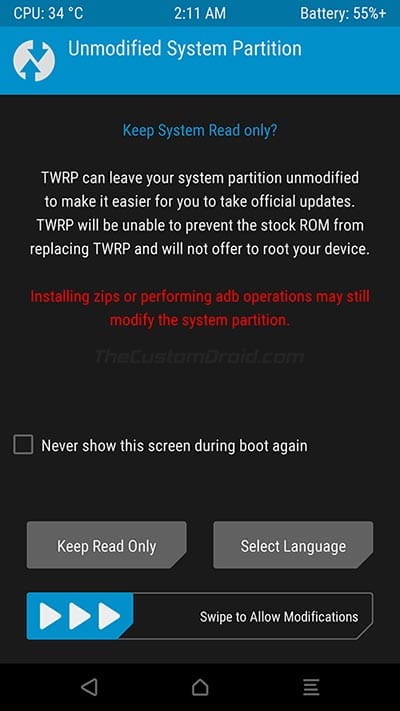
When your phone boots into TWRP for the first time, it should prompt you with the ‘Unmodified System Partition’ screen prompting you whether to allow modifications or keep the /system partition read-only.
Advertisement
Step 3: Decrypt the Data Partition via TWRP
Earlier, TWRP didn’t support proper decryption of the /data partition, which means that it couldn’t mount the internal storage. This was a problem only with older builds of TWRP. But since you’ve installed and are using TWRP v3.3, this shouldn’t be a problem. However, if you plan on flashing custom ROMs, you might want to consider decrypting your phone’s data partition.
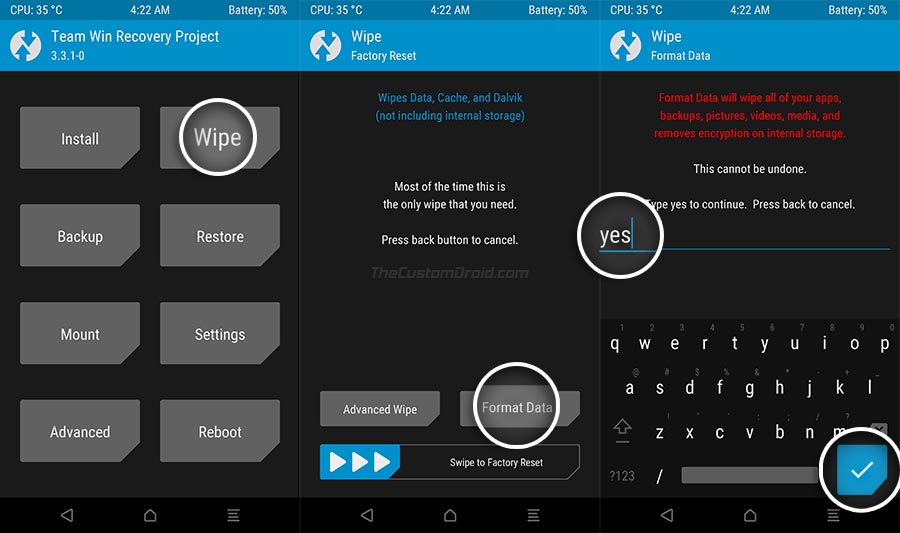
This is actually very simple. Simply, go to the ‘Wipe‘ menu of TWRP recovery and press ‘Format Data‘. Input ‘yes‘ in the provided field and press the enter button of the keyboard. The recovery will completely format the data partition and decrypt it.
Once the formatting finishes, go to ‘Reboot’ and press the ‘Recovery’ button. This will reboot your phone back into TWRP.
Step 4: Flash Magisk/SuperSU to Root Huawei Nexus 6P
Till now, you have unlocked the bootloader, install TWRP custom recovery, and decrypted the data partition on your phone. Well now, you’re now at the part that requires the least amount of effort, that is, flashing the root package via TWRP to root your Nexus 6P.
- First, download the root package of your choice from the ‘Downloads’ section, on your PC. Although you can still use SuperSU, I would personally recommend using Magisk, since it is more efficient, works on the latest Android version, and is still under active development.
- Once you have downloaded the zip package, connect your Nexus 6P to the PC while it is in TWRP recovery. Your PC should recognize your phone instantly and mount its internal storage. If it doesn’t do that automatically, go to the ‘Mount’ menu in TWRP and verify that MTP is enabled.
- Now transfer the downloaded root zip package (let’s say Magisk-v20.4.zip) to your Nexus 6P’s internal storage. Once transferred, disconnect the phone from the PC.
- Then go to the TWRP main screen and press the ‘Install’ button. Navigate to your phone’s internal storage and select the root package (e.g. Magisk-v20.4.zip). Finally, swipe the button on the screen to flash the file and root your Nexus 6P.
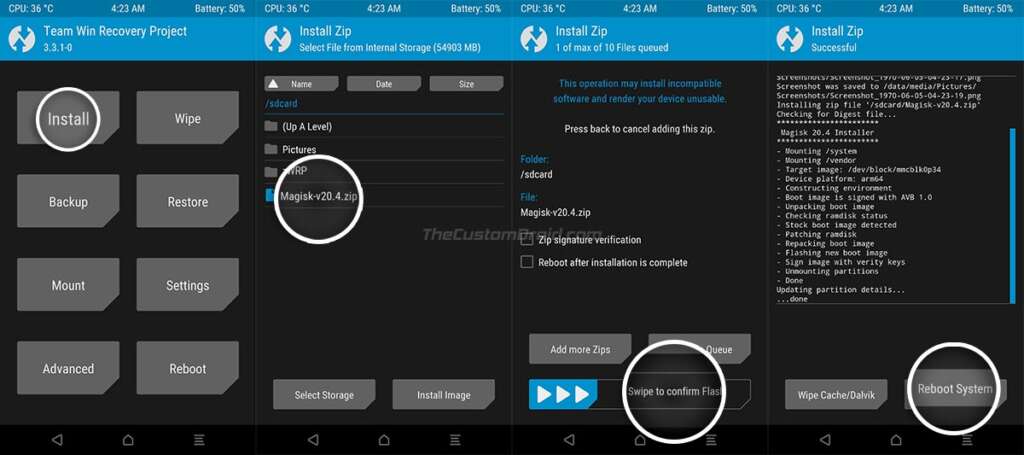
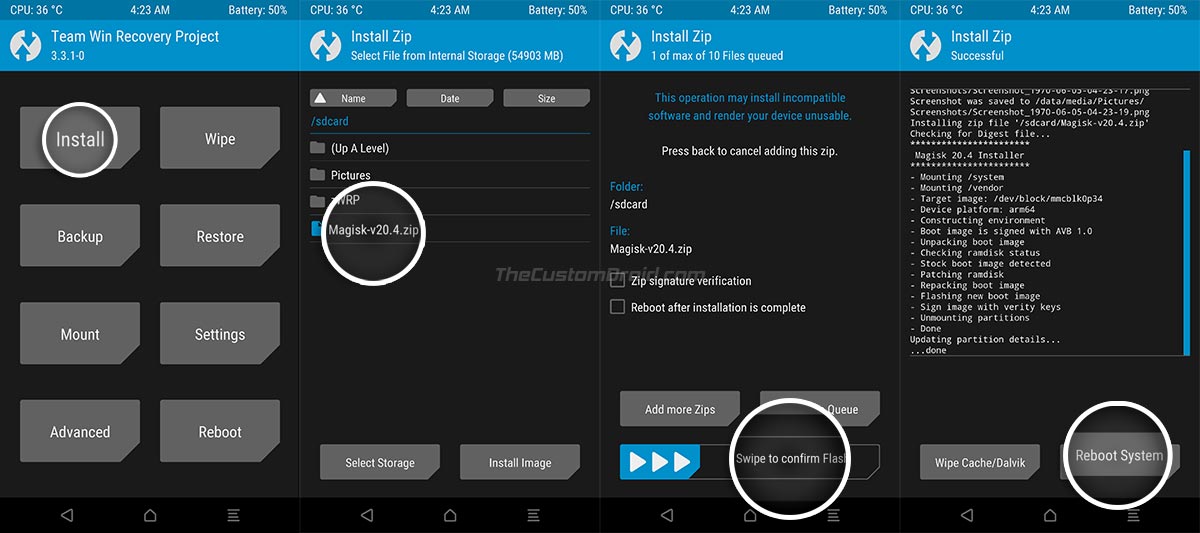
When the flashing process finishes, hit the ‘Reboot System’ button to boot your phone into the system (OS).
Your phone should now be rooted. To verify, go to the app drawer and launch the Magisk Manager or SuperSU application (depending on what you flashed). You also now have TWRP recovery installed on your Nexus 6P. Which means you can use it flash custom ROMs, kernels, and even mods. You can also use it to take NANDroid backups of the complete OS, which can really be helpful especially when switching ROMs.
That’s it! If you have any questions regarding the instructions mentioned here or feel stuck at any point, feel free to let me know.