Finally, root for Samsung Galaxy S9/S9+/Note 9 phones equipped with Qualcomm’s Snapdragon SoC is now available via the “Extreme Syndicate” root method. In this guide, I will show you how to root Snapdragon Galaxy S9, Galaxy S9+, and Galaxy Note 9 easily.
Advertisement
Since the release of the Galaxy S7 in 2016, Samsung’s flagship devices sold in the US and mainland China are equipped with a Snapdragon processor, instead of the OEM’s own Exynos chipset (Why? Read this). And this practice is carried over to every new generation Galaxy devices as well, like the S9, S9+ and Note 9 in today’s case.
When it comes to rooting or install custom binaries, an unlocked bootloader is essential. And that’s why users of the Exynos and Snapdragon (sold in China/Hong Kong) variants can easily install a custom recovery and root their phones. But things are very difficult for the Snapdragon variants of Galaxy S9/S9+/Note 9 sold in the US. That’s because these devices come with non-unlockable bootloaders.
In the past, we have seen successful rooting procedures for Galaxy S8/S8+ and Galaxy Note 8 Snapdragon variants using the EDL method. And now, in a similar way, you can root Snapdragon Galaxy S9/S9+/Note 9. This has been made possible by a group of developers over at XDA.
Advertisement
Page Contents
Rooting Galaxy S9/S9+/Note 9 Snapdragon Variants using Extreme Syndicate
The root method is known as “Extreme Syndicate”. XDA Recognized Developer elliwigy is the one who actually found the exploit and root method. Further, major contributions were made by XDA Recognized Contributor jrkruse (who released S8 and Note 8 Snapdragon root) and senior members GSM CHEN, klabit87, and me2151.
Now, before you head over to the instructions, there are some important bits and pieces of this root method that you should be acquainted with. These are as follows:
- First of all, you can use this method on any Snapdragon Galaxy S9/S9 and Note 9 running Android Oreo, Android 9 Pie, and even Android 10 (One UI 2.0). But to gain root, you will need to flash the combination firmware which is based on Android 8.1 Oreo. So, your phone will ultimately end up with the Android 8.1 Oreo OS with Samsung Experience. This means, no more One UI features or latest security patches.
- Secondly, rooting is only possible with Chainfire’s SuperSU system-root, instead of Magisk. So you will not be able to pass Google’s SafetyNet tests and will not be able to use apps like Pokemon Go, Google Pay, etc.
- Also, this root method involves flashing the combination firmware on your Galaxy device. This will curb your phone’s battery charge to 80%. Although there’s a possible fix (Check this XDA thread), it hasn’t been tested yet for the S9/Note 9.
- Lastly, the developers have mentioned that the MTP connection, biometric security like Fingerprint and Face Unlock and front (selfie) camera will not work. These issues are currently being worked on and might be fixed in a future release.
The benefit of using this method for rooting is that the KNOX counter will not be tripped. This means that you will not lose the warranty (If it’s still any left) and apps like Secure Folder and Samsung Pay may still work.
Now, let us get to the actual procedure and show you how to root Snapdragon Galaxy S9, Galaxy S9+, and Galaxy Note 9.

Supported Devices
Now, the following is the list of devices that are supported by this root method, along with their corresponding model numbers. To check for the model number, go to ‘Settings’ > ‘About phone’ on your Galaxy smartphone. Make sure that your phone’s model number is enlisted before you proceed.
- Samsung Galaxy S9: Model numbers SM-G960U, SM-G960U1, and SM-G960W are supported
- Samsung Galaxy S9+: Model numbers SM-G965U, SM-G965U1, and SM-G965W are supported
- Samsung Galaxy Note 9: Model numbers SM-N960U, SM-N960U1, and SM-N960W are supported
Prerequisites
Ensure that you fulfill all the requirements listed below before you go any further.
Advertisement
- The rooting instructions will erase all the data stored on your Galaxy smartphone. This includes apps and their data, contacts, emails, call logs and even the complete internal storage. So, make sure that you take a full backup of all your important data first hand. Should you need, we also have a guide to backup.
- Charge your phone to a sufficient battery level so that it doesn’t shut down abruptly during the rooting process.
- Make sure that you have the latest version of the Samsung USB drivers installed on your PC.
- Download Modded Odin 3.13.1 by Raymonf from here and extract the downloaded zip file to a suitable location on the PC.
Instructions to Root Snapdragon Samsung Galaxy S9/S9+/Note 9
So, how do you root Snapdragon variants of Galaxy S9, Galaxy S9+, and Note9? Well, the process isn’t the easiest one out there. But we have tried to simplify it as much as possible in the instructions below.
In brief: The first step is to flash the corresponding combination firmware (used by Samsung in their factory for testing) on your Galaxy smartphone. Then once the phone boots up into the combination OS, the second step is to run the provided Root Installer batch file on the PC. Next, you have to flash the ‘bootswap.tar.m5’ file using the Odin Tool to swap the boot and recovery partitions of the phone. The third step is to install the required firmware files using the FlashFire app. Finally, you have to use a specific buttons combination to boot your Snapdragon Galaxy S9/S9+/Note 9 into rooted Android 8.1 Oreo OS.
For your convenience and better understanding, we have split the instructions into three (3) major steps. We strongly suggest that you go through the instructions to understand the whole rooting procedure before you actually perform it.
Step 1: Flash Combination Firmware on Snapdragon Galaxy S9/S9+/Note 9
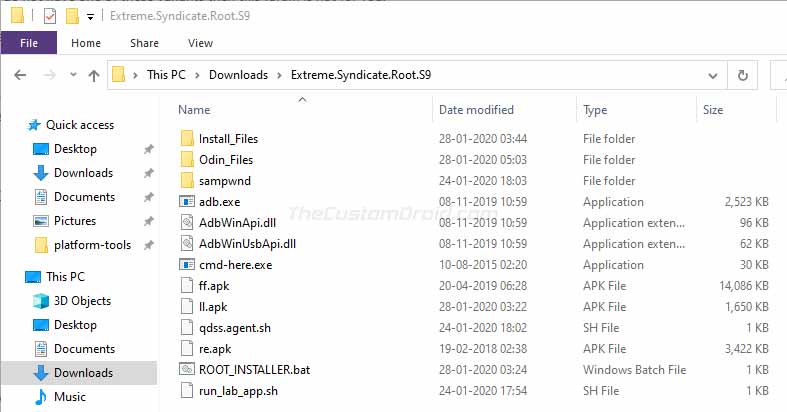
- Download Extreme Syndicate root package:
- For Galaxy S9 (SM-G96OU/U1/W): Extreme.Syndicate.Root.S9.rar
- For Galaxy S9+ (SM-G965U/U1/W): Extreme.Syndicate.S9p.zip
- For Galaxy Note 9 (SM-N96OU/U1/W):Extreme.Syndicate.Root.N9.zip
- Once the package has been downloaded, extract it on the PC using an archive tool like WinRAR or 7Zip.
- You should now have a folder (e.g. Extreme.Syndicate.Root.S9) containing all the files needed for the rooting procedure.
Extract Snapdragon Galaxy S9/S9+/Note 9 Root Package on the PC - Launch the Odin Flash Tool by double-clicking on the “Modded Odin v3.13.1 Raymonf.exe” file.
- Now power off your Galaxy S9/S9+/Note 9 completely.
- While holding the Volume Down and Bixby buttons together, connect the phone to the PC using the USB cable. Keep holding the buttons until you see a warning message on the screen.
- Press the Volume Up button of your phone to enter Download Mode.

- In the Odin tool window, click on the ‘AP’ button and select the combination firmware file (e.g. COMBINATION_FAC_FA80_G960USQU7ASK1.tar.md5) from the folder you extracted earlier.
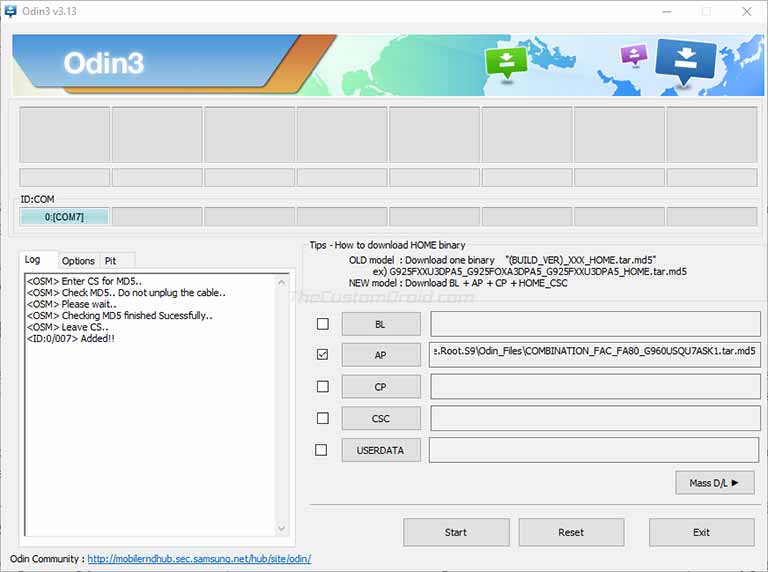
- Now click on the ‘Start’ button in Odin to flash the combination firmware on your Snapdragon Galaxy S9/S9+/Note 9.
The flashing process could take a few minutes to finish. Once it does, your phone will reboot into the Combination OS. You can now close the Odin window (for now).
Advertisement
Step 2: Run ‘Root_Installer.bat’ and Flash ‘BootSwap.tar.md5’ file using Odin Tool
- After your Galaxy phone boots into the combination OS,
- Now, connect the phone to the PC using the USB cable.
- Open the extract root package folder (e.g. Extreme.Syndicate.Root.S9) and double-click on the ‘Root_Installer.bat’ file to run it.
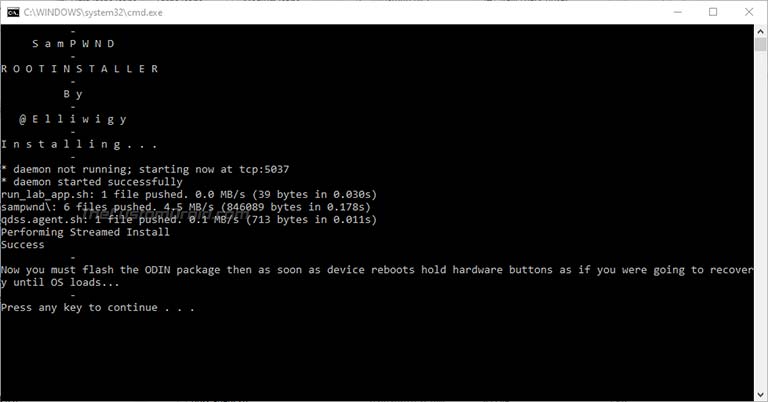
- The installer will perform the necessary procedure automatically. When it’s finished, your Galaxy S9/S9+/Note 9 will automatically boot into Download Mode.
- Now, you have to flash the Boot Swap tar.md5 file using Odin. This file will swap the /boot and /recovery partitions (The sole reason why root is possible) of the phone so that the /system partition can be mounted as rewritable.
- Again, launch the Modded Odin Tool on your PC.
- Make sure that ‘Auto Reboot’ in Odin’s Options menu is unchecked/turned off.
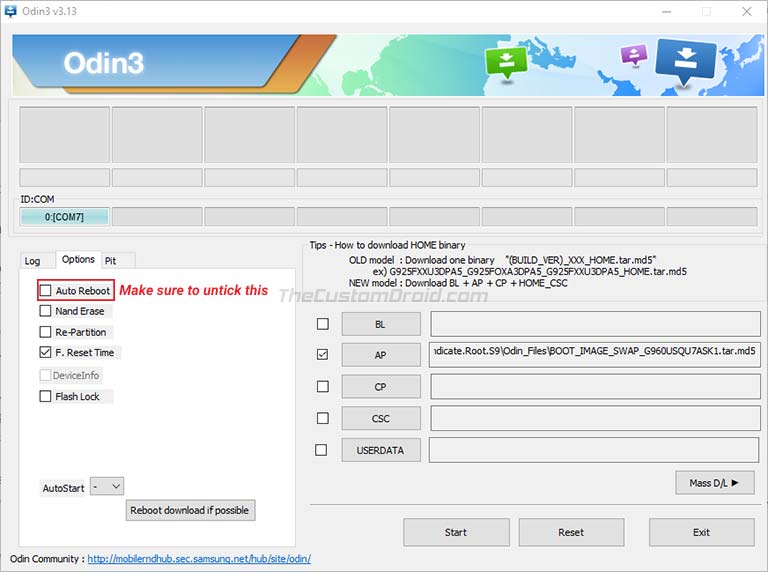
- Click on the ‘AP’ button in Odin and select the Boot Swap file (e.g. BOOT_IMAGE_SWAP_G960USQU7ASK1.tar.md5 for the S9).
- Click on ‘Start’ to flash the files and swap the boot and recovery partitions of your Galaxy S9/S9+/Note 9.
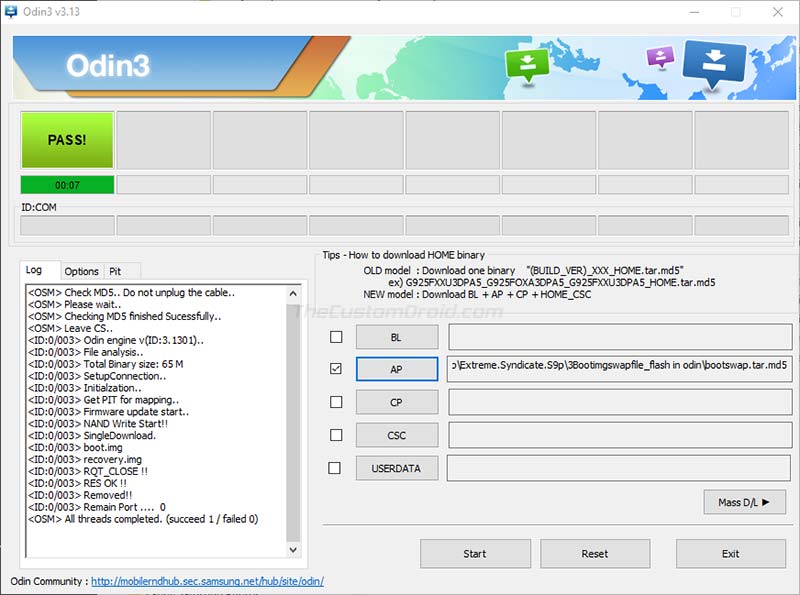
- Important: Now it is important that as soon as the flashing process finishes, you boot the phone by using the key combination used to get into recovery mode. That’s because the boot and recovery partitions have been swapped. So, after the flashing completes, hold the Volume Down and Power buttons. As soon as the screen turns off, quickly hold the Volume Up, Bixby, and Power buttons together.
Now, your Galaxy phone should enter the OS with the FlashFire app installed. Note that the first boot after this step can take some time, maybe even a few minutes.
Step 3: Install ‘ODM_Root.zip’, ‘System.img’, and ‘Vendor.img’ using FlashFire
At this point, you have to use FlashFire to install the Android 8.1 Oreo ROM (System.img and Vendor.img) and ‘ODM_Root.zip’ file to finally root Snapdragon Galaxy S9/S9+/Note 9.
Note: While using FlashFire (now, and also in the future), make sure to turn on Airplane Mode on your phone. This is important!
- Connect your phone to the PC using a USB cable and transfer the ‘system.img’, ‘vendor.img’, and ‘ODM_Root.zip’ files to the phone’s internal storage. Once transferred, disconnect the phone from the PC.
- Make sure that Airplane Mode is turned on. Then, go to the app drawer and launch the FlashFire app.
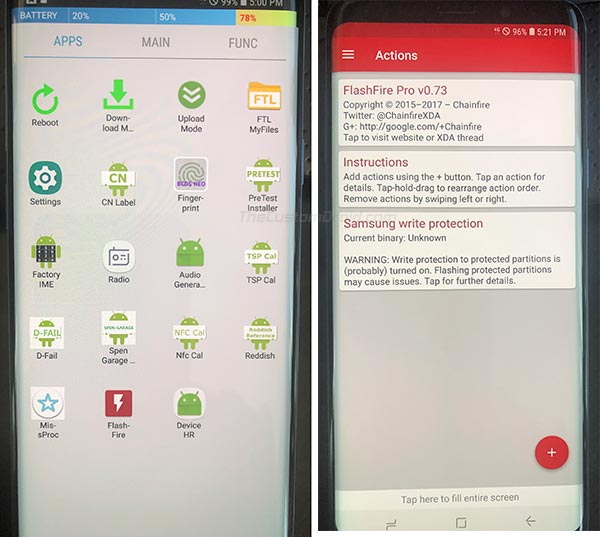
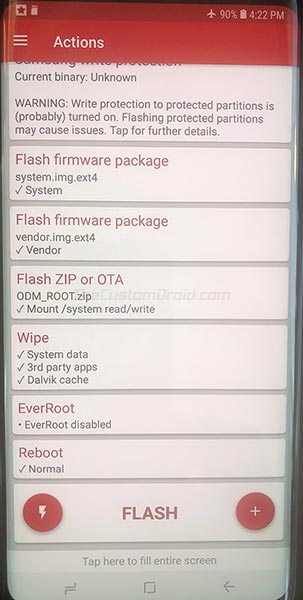
- In the ‘Actions‘ menu, press the ‘+‘ icon to expand the list of available actions.
- Now, we have to add the Android 8.1 Oreo system image and vendor image files to the flashing queue. To do this, press ‘Flash firmware package‘ and select the ‘system.img.ext4‘ file you transferred earlier. Then select ‘Flash firmware package‘ again, and select the ‘vendor.img.ext4‘ file this time.
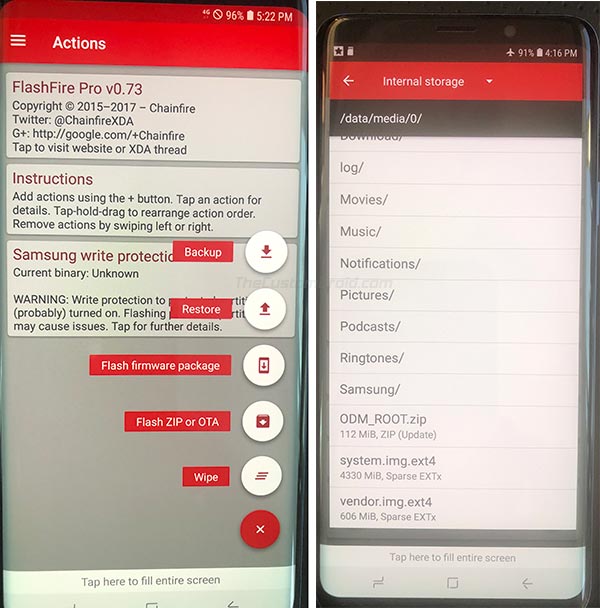
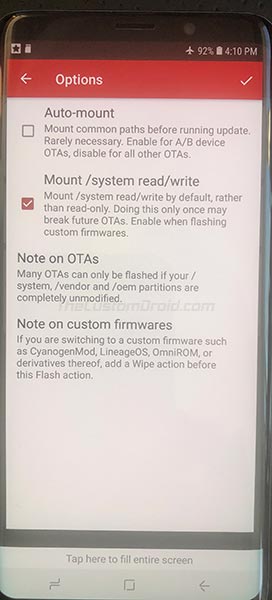
- Press the ‘+‘ icon and select ‘Flash ZIP or OTA‘. Navigate to the phone’s storage and select the ‘ODM_Root.zip‘ file. When prompted by the ‘Options‘ menu, make sure that the ‘Mount /system read/write‘ is checked.
- Now, select ‘Wipe’ from FlashFire’s action screen and make sure the ‘System data‘, ‘3rd party apps‘, and ‘Dalvik cache‘ options are checked.
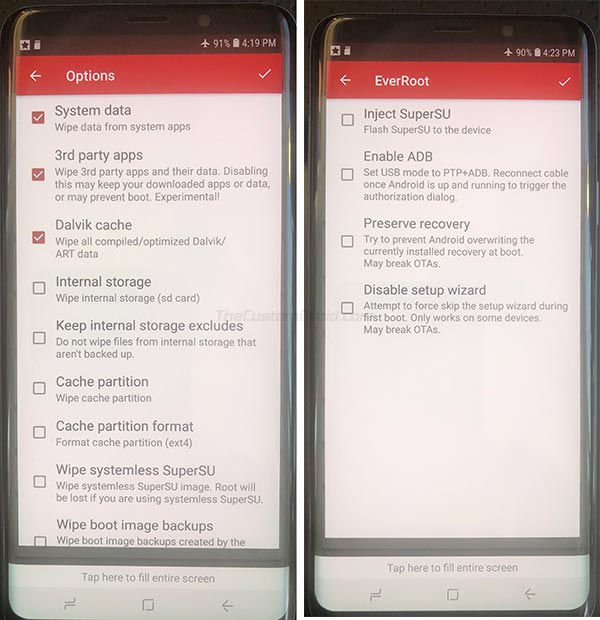
- Tap on ‘EverRoot’ and ensure that the ‘Inject SuperSU‘ option is unchecked.
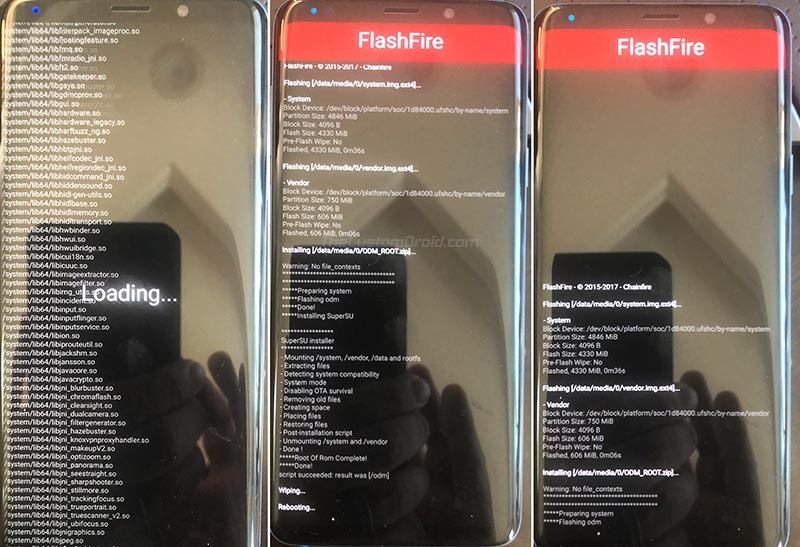
- Finally, press the ‘Flash’ button to flash all the required files and root your Snapdragon Galaxy S9/S9+/Note 9.
Your phone will automatically reboot and actions that you have set in the FlashFire app will be applied. This could take a couple of minutes to finish. Once it does, the phone will reboot.
Advertisement
Important Note: Since the boot and recovery partitions have been swapped, you will need to press the Volume Up, Bixby, and Power buttons together to boot the phone into the OS. This has to be done every time you boot your phone.
Your Phone is now Rooted!
That’s it! With your Snapdragon Galaxy S9/S9+/Note 9 rooted, you can do a lot of stuff with the software. First and most obvious, you can download and use apps that require root permissions. For customizing the phone’s software or for adding more features to it, you can install Xposed Framework.
You can easily get rid of the bloatware (pre-installed system apps) using apps like Titanium Backup, SD Maid, etc. You can also install audio mods like ViPER4Android on it for a more fine-tuned audio experience.
Now, do note that the Extreme Syndicate root method has just been released. And as we pointed before, there are several issues that still need fixing. If you are using your phone as a primary, take note of these things beforehand. Or, if you’re not comfortable using it, then you can easily restore your phone back to the stock firmware using the instructions in this guide.
So, this was our guide on how to root Snapdragon Galaxy S9, Galaxy S9+, and Galaxy Note 9 using the Extreme Syndicate root method. If you face any issues during the instructions, you can check the original XDA thread for your S9 here, S9+ here, and Note 9 here. Or, you can just leave a comment below and we will try our best to quickly answer your queries.
This method was first brought to light by the XDA-Developers portal. Kudos to them!
Comments 36 Comments
Comments are moderated, and published only if they are relevant to the topic and add value in a constructive way. If you disagree with something, please be polite and respectful. We suggest you read our comment policy before commenting.
Hi, step 1 isn’t working for me (flashing this file(e.g. COMBINATION_FAC_FA80_G960USQU7ASK1.tar.md5) I double checked and I dont think I’m doing anything wrong, could it be my device?
Lucky, the developers of this method now advise users to use the UNSAMLOCK service to properly unlock the bootloader (if your phone’s Bootloader revision is compatible) and then root your Snapdragon Galaxy S9, just like one would do on a Exynos variant.
Please refer to the original thread at XDA for more information.
I have sm-n960u1 and it fails when flashing the combo_3asj1.tar via modded Odin v3.13.1 raymonf.exe
The process gets to abl.elf then says:
FAIL! (Auth)Steven, if you’re already using the modded version of Odin, I believe the error is caused because your Note 9 has been updated with a revision 8 bootloader. The combination firmware and boot swap files provided by the developer only work up until revision 7 bootloader.
Hi, so I completed the root and was in recovery mode, I tried to reboot into phone but it did not work. Somehow I am stuck in SS RDX boot screen. help.
Hold the Power button for 10-12 seconds to force power off the phone. As soon as the screen goes off, hold the Volume Up + Bixby + Power buttons until you see the boot animation.
Try this and let me know if it boots.
OMG thank you so much!! I finally rooted my phone…however, I have one last question; how do I get out of recovery mode? `reboot system now“ does not work
That’s great! How did you get past the error? Please do share.
As for booting, remember that you have swapped the boot and recovery partitions. So, from now onwards every time you boot/restart the phone, you have to press the VOL UP + BIXBY + POWER button combo to boot your phone into the OS.
As you were suggesting, I was not using the Modded version of Odin, after I fixed that everything worked smoothly.
I tried doing what you said, and I got a bluescreen to pop up with ‘no command’ and a dead-looking android character. Also, I don’t know if this is relevant, but at the bottom of the screen, it says ‘warning; no file_contexts’ ‘no data on recovery_caused’ and ‘reboot recovery cause is unknown’
That’s great. The screen you’re seeing is the initiation of the stock recovery. On the ‘No command’ screen, simply hold the Power button and press the Volume Up button once. This will boot the phone into the stock recovery screen (Similar to the figure below).
Simply use the Volume keys to move the selector to “Reboot system now” and press the Power button to select and confirm. Again, as soon as the screen goes off, use the VOL UP + BIXBY + POWER buttons combo until you see the boot animation.
Last time when you did this, you might have missed the time frame for pressing the correct combination of buttons. From here on, a normal boot would take your phone into the stock recovery. And the VOL UP + BIXBY + POWER buttons combo will take your phone into the OS.
Alright, thank you so much again! I didn’t know I had to be so quick to reboot it. I can finally access my now rooted phone back
You’re welcome! There are two important things you should note now:
1) Every time you reboot/power on the phone, you have to use the VOL UP + BIXBY + POWER button combo to get into the OS (otherwise it will boot into the stock recovery)
2) Whenever you use FlashFire to flash anything, like mods, make sure to turn ON airplane mode first.
Good luck, Justine!
Hi, it is me again. Thanks for your help, I was able to move on to the next step! I am sorry for still bothering you, but now flashing the bootwap.tar.md5 keeps failing, any idea to what might be causing it to do so?
Also, I can’t seem to find this exact file: BOOT_IMAGE_SWAP_G960USQU7ASK1.tar.md5
I only have the one bootswap.tar.md5
Hi Justine. Yes, bootswap.tar.md5 is the file you need. “BOOT_IMAGE_SWAP_G960USQU7ASK1.tar.md5” that I mentioned is specifically for the G960U (Galaxy S9). The filename could be different for the S9+ and Note 9. For the S9+ in your case, this is the “bootswap.tar.md5”.
That’s great! May I know what error does Odin show when flashing the file?
Odin shows a big red FAIL and ‘all threads completed. (succeed 0/Fail 1)’
It is also taking so long that I get stuck at the ‘setting up connection’.
Did you flash it via the Modded Odin version?
If you did and it still doesn’t work, then try force-rebooting the phone again into Download Mode and try again.
If even that fails, then reboot the PC and try using a different port.
The bootswap TAR shouldn’t have a problem flashing as long as you have the correct bootswap for your model and use the Odin tool modded by Raymonf.
Yes, I was flashing it with the Modded version
Okay, now I am trying to restart, but the ROOT_INSTALLER tells me that my device is offline, while it is actually online.
I’m stuck on the screen shown on the image at the end of step 1. I could not do the root installer and now I want to go back on my phone. What should I do?
Hi Justine. Could you provide more details like what’s the device name and exact model number, as well as the firmware CSC? Also, which file did you exactly download and use?
Hello, I downloaded the file you provided in the article for Samsung Galaxy S9+.
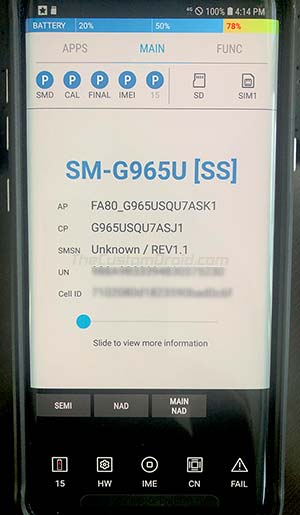
My model number is SM-6965U [SS], I can’t find CSC on the screen I’m stuck on, but my CP is G965US1U7ASJ1 and AP is FA80_G965USQU7ASK1. Basically, the same info as shown in the picture. I got stuck after downloading with Odin the combination firmware file, root installer bat is not working.
Thanks for providing the info. By stuck do you mean on the screen as shown in the figure below?
Yes, I am stuck on this and since I am unable to proceed with the root, I would like to be able to use my phone again.
Okay. So, to restore back to stock, first, download the latest stock firmware for your phone using the Frija tool. Once you have the firmware downloaded on your PC, you can use the Odin Flash tool to flash the firmware file on your S9+. The instructions for the same could be found here.
As for not being able to proceed with the ‘ROOT_INSTALLER.bat’, I believe you would be seeing the “adb is not recognized as an internal or external command” error message in the black command-line windows, is it correct?
The error simply means that the script file you’re running cannot detect ADB on your computer (set system-wide) or within the same folder (where the ROOT_INSTALLER.bat is present).
If you still want to try: Move all the files from the ‘adb_files_if_you_dont_already_have_tem’ folder (includes adb.exe, fastboot.exe, AdbWinApi.dll, etc) to the ‘2AfterFullComboFlash’ folder. Once the files have been moved/copied, re-run the ‘ROOT_INSTALLER.bat’ file. It should work this time.
Thanks for putting this tutorial together. I’m getting stuck after step two. When I reboot using the recovery mode keys, I get a message stating “SS RDX Unknow Error”. Any idea what might be causing this? And how to fix it?
Hi Brian. Could you please try rebooting again? This time, try it by holding the Volume Up + Bixby + Power buttons together.
That worked. I was able to complete the remaining steps and the phone is now rooted. I’m trying to recover some deleted pictures. When I use dr.fone I get the message that “root access is not obtained”. The phone shows that dr.fone has root access under SuperSU though. I’m kind of stuck now. Your tutorial helped me get the phone rooted at least. Thanks for that. I’ll reach out to dr.fone to see if they can help me figure out the issue with connecting their software.
Hi Brian. First off, I am really sorry since you got stuck because I failed to mention the right buttons combination to get into the system after performing step #2. I will correct that right away.
As for dr.fone, have you tried removing the superuser access of dr.fone from SuperSU and granting it again when prompted? It’s worth a try I think.
Yes, and please do keep me posted on how it goes further.
I tried removing the superuser access and granting it again. I still get the same error message from dr.fone though.
I have been in touch with dr.fone tech support and they are having an engineer look into the issue. I’ll report back with what I learn. If anyone reads this and wants to recommend another program from locating and extracting the deleted files, I’m open to recommendations.
Sure. As for recovering deleted files, try Undeleter from this page. I am not sure to what extent it works, but it was quite popular among the users.
Can you post some mirrors such as google drive links? Androidfilehost is going to 0b/s every few seconds after transferring some data. It will takes days at this rate to get it downloaded.
Hi Jack. I am sorry, but you’ll have to do with the AFH links. These files were uploaded and published on XDA by the developers themselves. Mirroring them without permission would be wrong IMO.
I managed to get it downloaded quickly using JDownloader. You might wanna give it a go.
Any update when root for S9 plus Exynos android 10 Q will be available.
Hi Aditya. Root for the Exynos S9+ on Android 10 is already possible. Please visit this page for the instructions.