This step-by-step guide will instruct you on how to root Galaxy S8 Snapdragon with V7 bootloader, using the new Extreme Syndicate root method. The method is compatible with SM-G950U and SM-G950U1 models sold in the US.
Advertisement
Samsung has been consistently releasing its flagship devices in two different variants – Exynos and Snapdragon since the S7 era. The trend continued with the Galaxy S8/Note 8 series and is still persistent with the latest Galaxy devices. I already have a tutorial covered on this website to root Galaxy S8/S8+ with Exynos SoC and it is based on the standard rooting method that involves installing TWRP and then flashing SuperSU/Magisk via it.
But things tend to get a bit complicated when it comes to Snapdragon-equipped Samsung devices and rooting. That’s because, unlike the Exynos variants, the bootloaders on the Snapdragon variants sold in the US are not unlock-able. And hence, the generic method of flashing TWRP via ODIN and then rooting through Magisk would fail rigorously.
Page Contents
- Rooting Galaxy S8 Snapdragon using Extreme Syndicate Method
- Supported Devices
- Prerequisites
- Downloads
- How to Root Galaxy S8 Snapdragon?
- Step 1: Perform Factory Reset and Enter Download Mode on Galaxy S8
- Step 2: Flash Combination Firmware using Odin Flash Tool
- Step 3: Run ‘APPS_INSTALLER.bat’ and Reboot the Phone
- Step 4: Grant Read, Write, and Execute Permissions for ‘Persist’ Partition
- Step 5: Run ‘ROOT_INSTALLER.bat’ to root Galaxy S8 Snapdragon
- Step 6: Install the ROM
Rooting Galaxy S8 Snapdragon using Extreme Syndicate Method
This guide has been updated multiple times in the past with new root methods that were discovered for the Galaxy S8 snapdragon. The last one that worked, and on which this guide was based on till now, was the ‘EDL method’. But that was limited to phones with V5 and V6 bootloader version. With the most recent software updates from Samsung, the bootloader version was bumped up to V7 and that process didn’t work anymore.
Advertisement
But thanks to the Extreme Syndicate team, you can now root your Galaxy S8 Snapdragon variant. This new method and the involved exploit was found by team member and XDA Recognized Developer elliwigy for the Galaxy S9, S9+, and Note 9 equipped with the Snapdragon SoC initially. Another team member and XDA RC jrkruse, who is also responsible for the previous root solutions for this device, ported the new method for the Galaxy S8.
I have already covered a guide to root Galaxy Note 8 Snapdragon using this same method. The only difference between both the guides is the files used during the process.
The Extreme Syndicate root method basically uses an exploit found in the Android Nougat combination firmware (A low-level test OS) to root the phone. From there on, you can either install the pre-rooted Nougat ROM or the Android Pie ROM with Safestrap recovery. Now before you go ahead and follow the instructions, take a look at some of the important information about this new root process.
- This method supports any Snapdragon Galaxy S8 sold in the US with V7 bootloader version.
- You can use this method despite the Android version installed on your phone. However, in order to gain root permissions, you will need to install a pre-rooted Nougat ROM. The supplied Nougat ROM is pre-rooted with SuperSU and has Flashfire and Safestrap recovery pre-installed.
- If you’d strictly want to stick with Android Pie, you can opt for the Android Pie ROM and use the Safestrap recovery to apply modifications to the software.
With that information at hand, head over to the instructions to root Galaxy S8 Snapdragon.

Supported Devices
The following Galaxy S8 model numbers are supported. If your device has a model number other than the ones mentioned below, then this method will not work on it.
- SM-G950U
- SM-G950U1
This process will work regardless if your Galaxy S8 is running Android 9 Pie, Android 8.0 Oreo or Android 7.1.1 Nougat. What’s important is that your Bootloader version/revision must be V7
To find out your phone’s bootloader version, go to Settings → About phone → Software information and check the information under the ‘Baseband version‘ section. For example, if it says “G950USQS7DTB3”. The “S7” here denotes the bootloader version, which is V7.
A word of caution & disclaimer
Make sure that you go through the instructions beforehand and understand what they exactly tell you to do. Do not deviate from them at any point or disconnect/power off your phone during the process until you’re asked to do so.
Rooting is a risky process and TheCustomDroid.com, or any of its members shall not be held responsible for any damage caused to your device during or after following the process.
Prerequisites
- Your device’s internal storage and all data will be wiped (Possibly more than a few times) during this process. So make sure that you take a complete backup of all your data stored on the phone. We suggest you follow our guide on how to backup Android phones.
- Charge your Galaxy S8’s battery to a sufficient battery level. The whole process is a bit long and you wouldn’t want your device to suddenly switch off during it.
- Install the latest Samsung Mobile USB drivers on your PC.
- Lastly, download Modded Odin3 3.13.1 by Raymonf from here and extract it on the PC. Do not use the normal version of the Odin tool for this method!
Downloads
When asked to download a file during the instructions, come back here.
Extreme Syndicate Root Package
Pre-rooted Android Nougat ROM
- System Image: Rooted_G950USQS2BRB1.rar
- V7 Bootloader (Includes Fingerprint and Face Unlock Fix): BL_G950_NOUGAT_V7.tar.7z
- Safestrap Recovery for Nougat: Safestrap-4.10-B03-DREAMQLTE-NOUGAT.zip
Android Pie Safestrp ROM
How to Root Galaxy S8 Snapdragon?
For your convenience and better understanding, I have split the instructions into six (6) major steps. Make sure that you follow each and every step in the mentioned order and do not deviate from them at any point.
Step 1: Perform Factory Reset and Enter Download Mode on Galaxy S8
The first step in order to root is to perform a factory reset via the stock recovery and then boot your Snapdragon Galaxy S8 into Download Mode. To do so, power off your phone first. Then hold the Volume Up, Bixby, and Power buttons simultaneously to boot your phone into the stock recovery mode.
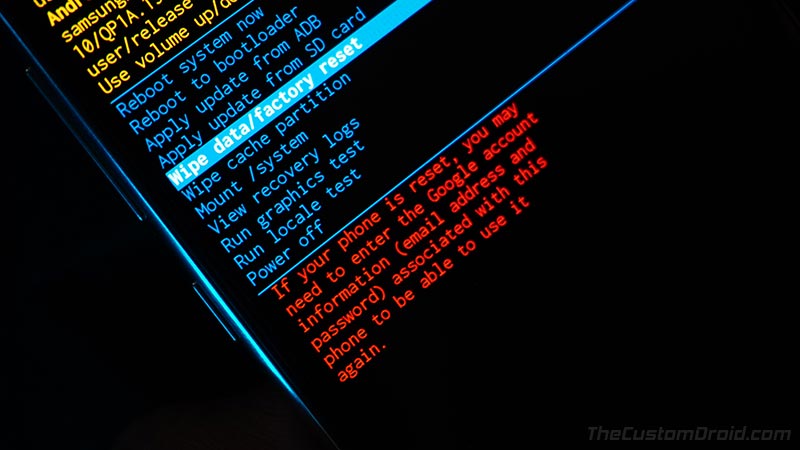
In recovery mode, use the Volume buttons to select the ‘Wipe data/factory reset’ and press the power button to confirm the selection. When prompted, select ‘Factory data reset’ to confirm and perform a factory reset. Once done, select the ‘Reboot to Bootloader’ option in the stock recovery to enter Download Mode on your Galaxy S8.
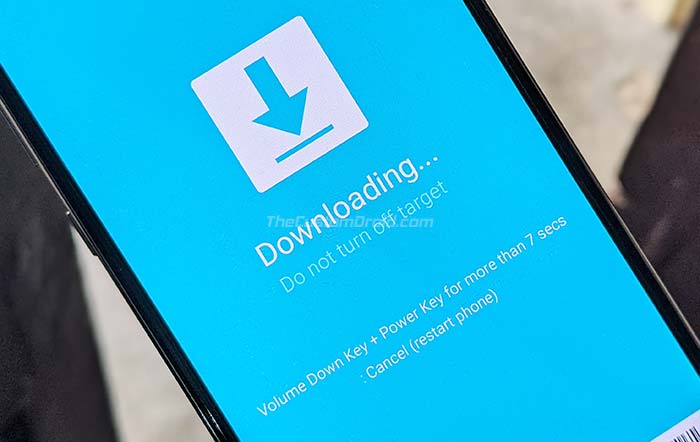
With your phone in Download Mode, it is now ready to be flashed with the combination firmware. So, head over to step #2.
Step 2: Flash Combination Firmware using Odin Flash Tool
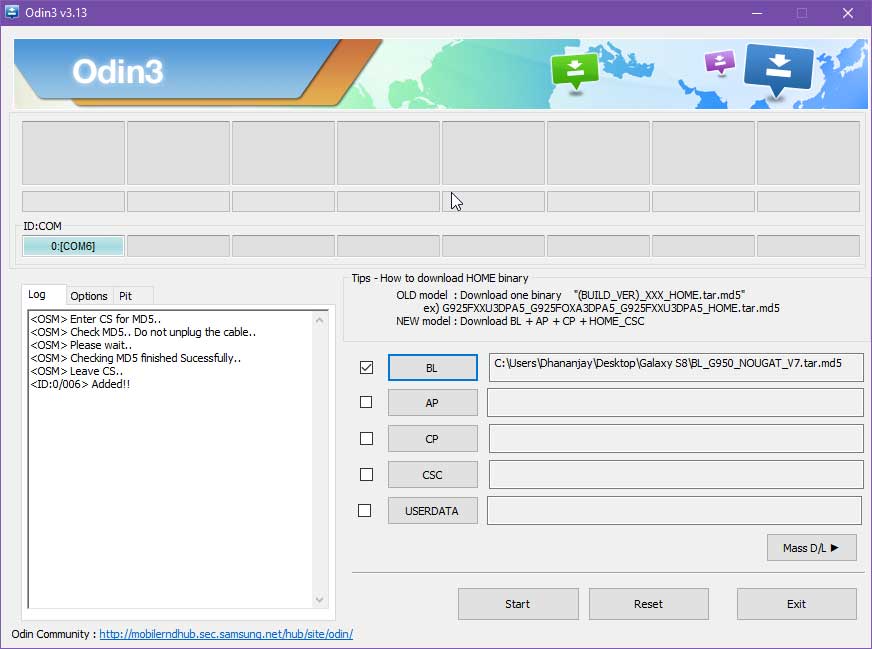
Download the combination firmware package (COMBINATION_FA70_G950USQU7ASK1.tar.7z) for your Galaxy S8 from the ‘Downloads’ section above. Once downloaded, extract the file (using 7Zip, or any other archive utility) to a suitable location on your PC. You should now have the combination firmware file for your phone in .tar.md5 format. This is the file that needs to be flashed.
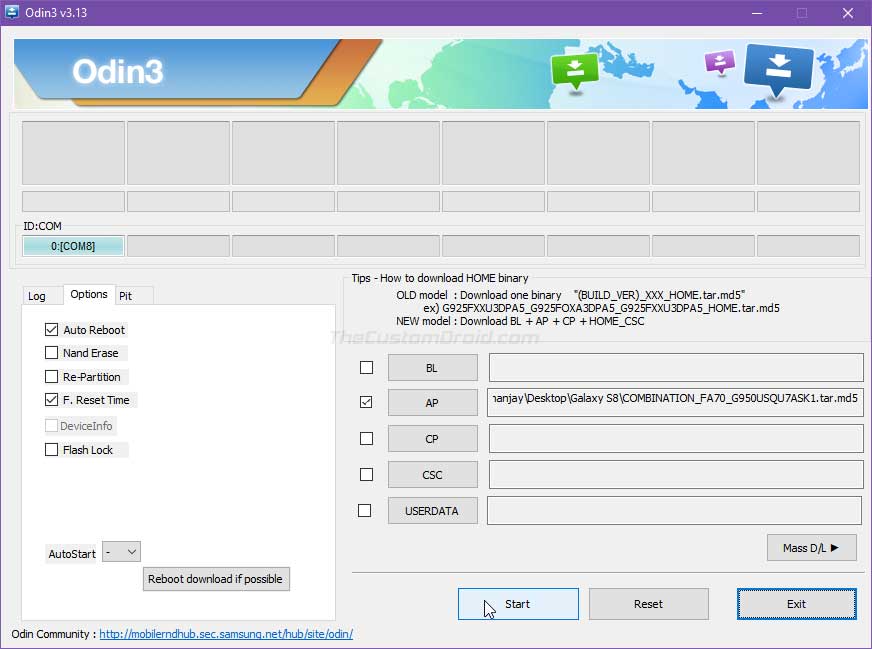
So now, connect your phone to the PC while it’s in Download Mode using a USB cable. Then launch the modded Odin tool by double-clicking the ‘Modded Odin v3.13.1 Raymonf.exe‘ file. The Odin tool GUI should now be shown on your PC’s screen and it should display the COM port to which your phone is connected. Click on the ‘AP‘ button and select the combination firmware file (i.e. COMBINATION_FA70_G950USQU7ASK1.tar.md5) that you extracted earlier.
Advertisement
Now, you’re ready to flash your phone. Just make sure that the ‘F.Reset Time‘ and ‘Auto Reboot‘ options are checked in the Odin tool. Finally, hit the ‘Start‘ button in Odin to flash the combination firmware on your Snapdragon Galaxy S8.
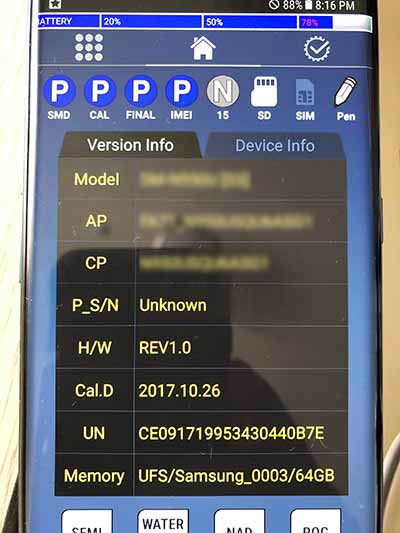
Once the flashing process finishes, you should see a ‘PASS!‘ message in the Odin tool and your phone will reboot automatically into the combination OS. Since this is a low-level testing firmware used by Samsung internally, the UI will differ. It should look similar to the one shown in the image below.
Step 3: Run ‘APPS_INSTALLER.bat’ and Reboot the Phone
Now, in this step, you have to run a batch file on your PC which will sideload some apps that are required to go ahead with the rooting procedure.
So, with your Galaxy S8 now in the combination OS, connect it to the PC via a USB cable. Then download the ‘S8_ROOT.7z’ file from the ‘Downloads’ section and extract the file on your PC. The extract files should contain the ADB binaries, a bunch of APK files, and two Windows batch files namely ‘APPS_INSTALLER.bat’ and ‘ROOT_INSTALLER.bat’.
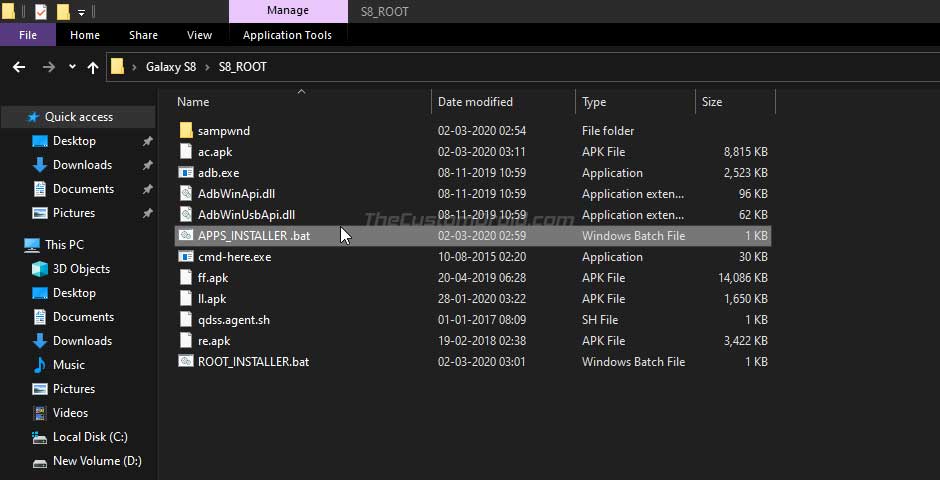
Simply double-click the ‘APPS_INSTALLER.bat’ file to run it. It will sideload/install the required APK files on your Galaxy S8. Once finished, reboot your phone.
Step 4: Grant Read, Write, and Execute Permissions for ‘Persist’ Partition
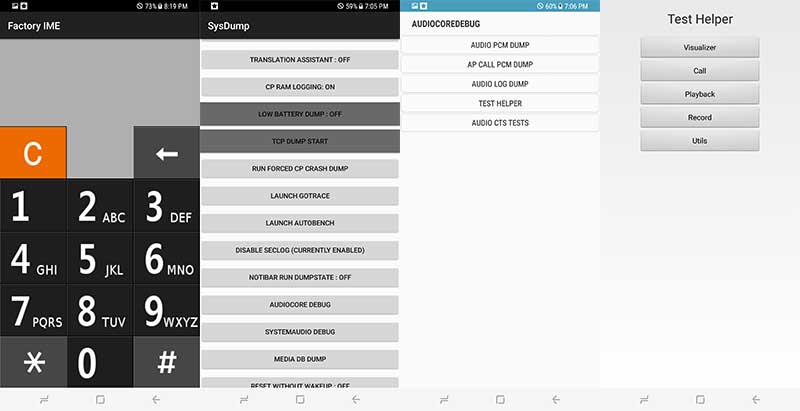
When your phone boots, it should prompt you to select the default launcher application. Choose ‘Pixel Launcher’ as it would make easier for you to find the installed apps.
Now go to the app drawer, launch the ‘Factory IME‘ application, and enter *#9900# in the dialer. This should open the ‘SysDump‘ screen that will show a lot of different debugging tests. Scroll down, select ‘AUDIOCORE DEBUG‘, then ‘TEST HELPER‘, and finally ‘Utils‘.
Advertisement
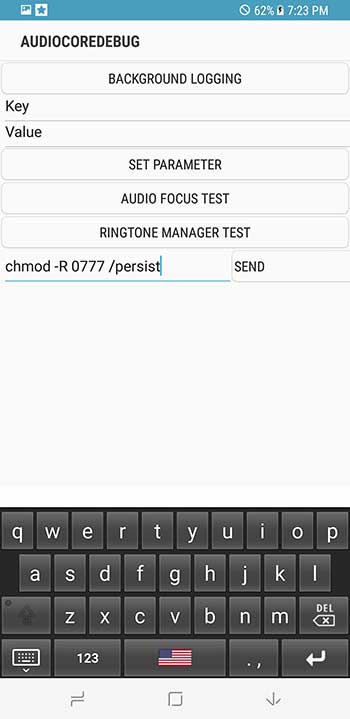
You should now see the ‘AUDIOCOREDEBUG‘ screen with a couple of options. Tap on the box that says ‘ADB Commands‘, type in ‘chmod -R 0777 /persist‘ and press the ‘SEND‘ button. The command will basically grant read/write/execute permissions to the ‘Persist’ partition of your Galaxy S8.
Step 5: Run ‘ROOT_INSTALLER.bat’ to root Galaxy S8 Snapdragon
Now, in order to root your Snapdragon Galaxy S8, you have to run the ‘ROOT_INSTALLER.bat’ file on your PC. To do this, simply connect your phone to the PC via a USB cable and double-click on the ‘ROOT_INSTALLER.bat’ file that you previously extracted during step #3.
The batch file will copy all the required root binaries and reboot your phone. When your Galaxy S8 reboots, it should be rooted via SuperSU and you can confirm this by launching the ‘FlashFire’ application. At this point, you will also have the SafeStrap Recovery installed on your phone.
Note: If the script fails to work and shows an error, please try this trick posted by one of our readers (Thanks ApexMcCaprino!)
Step 6: Install the ROM
The process isn’t over yet. As you may notice, the phone is still running the combination OS. From here on, you have two choices – (1) Install Pre-Rooted Nougat ROM or (2) Install Android Pie Safestrap ROM.
Step 6.1: Install Pre-rooted Nougat ROM
- Download the pre-rooted Nougat ROM system image and Nougat-compatible Safestrap recovery files from the ‘Downloads’ section of this post.
- Extract the “system.img” file from the downloaded “Rooted_G950USQS2BRB1.rar” file using an archive utility (like 7Zip, WinRAR, etc).
- Transfer the extracted “system.img” and “Safestrap-4.10-B03-DREAMQLTE-NOUGAT.zip” files to your phone’s storage.
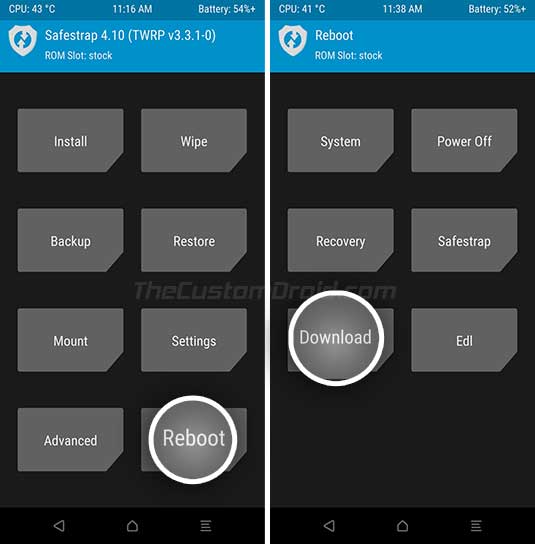
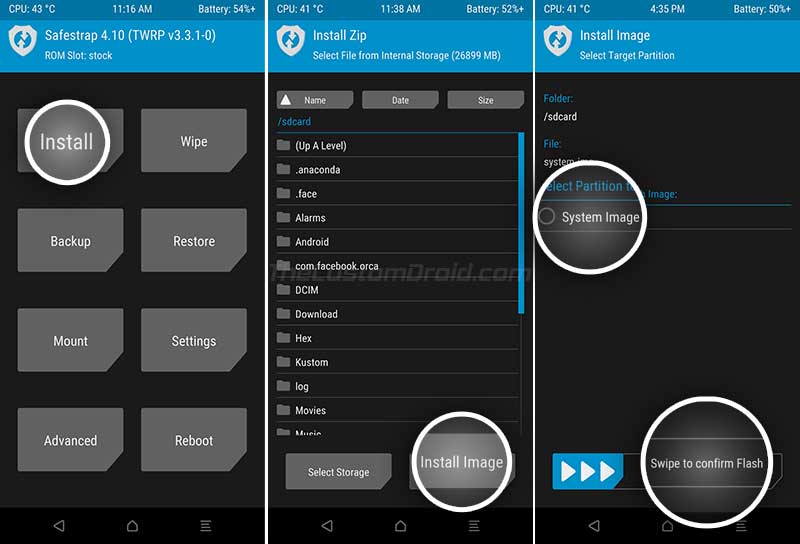
- Now reboot your phone and press the ‘Recovery’ button when you see the Safestrap splash screen.
- In Safestrap, tap on the “Install” button and then on “Install Image”.

- Navigate to your phone’s internal storage and select the “system.img” file. When prompted to select the partition, select “System Image”.
- Swipe the button on the bottom to flash the pre-rooted Nougat System Image on your Snapdragon Galaxy S8.
- Now go back to the recovery’s main menu and press the “Install” button again.
- Select the “Safestrap-4.10-B03-GREATQLTE-NOUGAT.zip” file and flash it.
- Once done, go to the “Reboot” menu in Safestrap and tap on “DOWNLOAD”. Your phone should now reboot and enter the Download Mode.
- Connect your phone to the PC while it is in Download Mode.
- Download the V7 bootloader file (BL_G950_NOUGAT_V7.tar.7z) on the PC and extract it.
- Launch the modded Odin tool by Raymonf and select the “BL_G950_NOUGAT_V7.tar.md5” file in the “BL” slot.
- Finally, click on the “Start” button to flash the file.
Once the flashing process finishes, your Galaxy S8 will reboot into the pre-root Nougat OS with Safestrap recovery installed. You can now download and install root applications of your choice or mods like ViPER4Android to enhance the audio on your phone.
Further, according to the developer, it is important to flash the Nougat-compatible Safestrap Recovery (Safestrap-4.10-B03-DREAMQLTE-NOUGAT.zip) via the Safestrap itself to fix constant booting into Safestrap.
Step 6.2: Install Android Pie Safestrap ROM
Download the Android Pie Safestrap ROM package from the ‘Downloads’ section. Extract the downloaded ‘G950USQS7DTA6_SAFESTRAP.rar’ to a new folder. The extract files should contain the Android Pie system image, BL, and CSC files.

Transfer the ‘DTA5_SYSTEM.img’ file to your Galaxy S8’s internal storage. Once done, reboot your phone into Safestrap recovery mode. To do this, power off the phone and turn it on. When you see the Safestrap splash screen, simply press ‘Recovery’.
In Safestrap recovery, go to ‘Install’ and press the ‘Install Image’ button on the bottom. Navigate to your phone’s internal storage and select the ‘DTA5_SYSTEM.img’ file that you transferred earlier. When prompted to select the partition, select ‘System Image’ and swipe the button to flash the file and install the Android Pie ROM on your Snapdragon Galaxy S8.
Advertisement
Now, the other files that you need to flash are the Android Pie BL and CSC files through Odin. To do this, boot your Galaxy S8 into Download Mode by going to the ‘Reboot’ menu in Safestrap and tap on ‘Download’. Next, connect the phone to the PC while it’s in Download Mode.
Launch the modded Odin tool by double-clicking the ‘Modded Odin v3.13.1 Raymonf.exe’ file. The COM port for your connected phone should appear on the top-left of the Odin screen.
Now, click on the ‘BL’ button and select the ‘BL_G950USQU7DTA6.tar.md5’ file to load it. Next, click on the ‘CSC’ button and select the ‘HOME_CSC_OYN_G950U_CACHE.tar.md5’ file. Once both the files have been loaded, click on ‘Start’ to begin the flashing process.
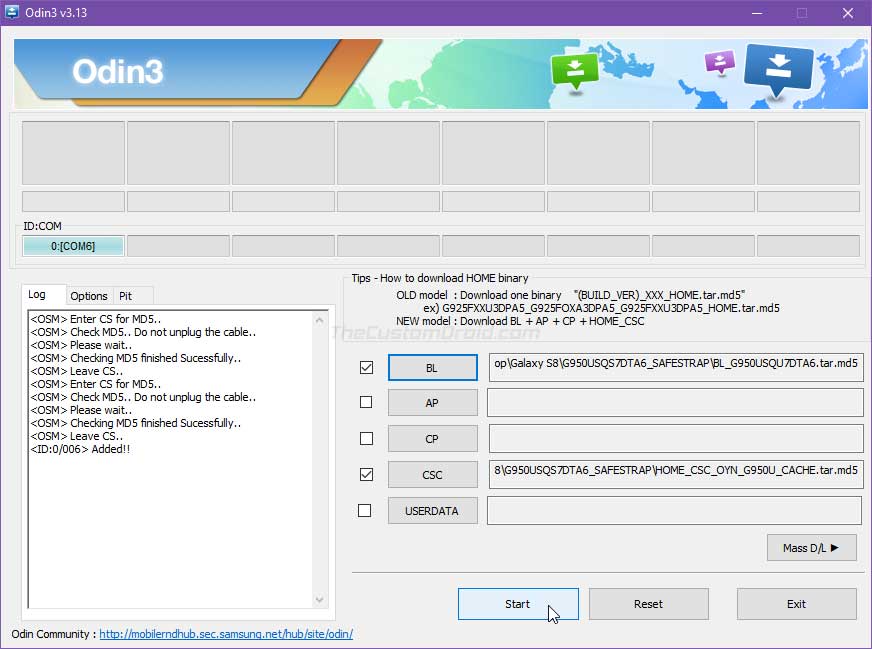
After the flashing process finishes, you should see the ‘PASS!’ message in Odin, and the phone should reboot automatically. You now have Android Pie ROM installed on your phone, along with pre-loaded SafeStrap recovery.
From here on, you can use Safestrap to flash compatible mods on your rooted Snapdragon S8. You can look up for such mods on the XDA forums or consult the developer by visiting the original XDA thread. The link for the same could be found at the bottom of this post.
So, this was our guide on how to root Galaxy S8 Snapdragon running V7 bootloader, using the new Extreme Syndicate root method. If you come across any roadblocks during the process, drop a comment below, and I will be more than happy to help you out.
I couldn’t end this post without thanking XDA RC jrkruse, the complete Extreme Syndicate team, and everyone who contributed towards this successful root solution.
Comments 41 Comments
Comments are moderated, and published only if they are relevant to the topic and add value in a constructive way. If you disagree with something, please be polite and respectful. We suggest you read our comment policy before commenting.
I’m trying to recover files on S8 internal memory which all recovery programs say I need to root my phone.
I have tried several methods and found that S8 is impossible to root.
I ran into this thread but my baseband version # is different then the one listed.
Samsung Android 9 S8 SM-G950U
Baseband Version – G950USQU8DUA2
I have search and found nothing specific to my phone. Will this root process work with mine? Also, if I backup my data will I still be able to recover file from internal memory if I factory reset?
Kevin, while this method will work on your Galaxy S8, there are a two things that I would like to point out:
1) Root access does not guarantee full recovery of lost/deleted data. I have gone through the same situation in the past, even tried some paid solutions, but all I could recover at the end were some photographs. Overall, I was only about to recover merely 5-10% of the data I lost. If those files are extremely important, you could try and this brings us to the second thing.
2) This method of gaining root access is completely different than the one that’s followed and used for Galaxy S8 models that support bootloader unlocking. This method uses an exploit found in an older firmware to attain root. It is also more complicated and susceptible to more errors than the traditional method of unlocking the bootloader & then rooting.
I also haven’t had the time to update this guide with more up-to-date files and instructions. From the software version info you have shared, your Galaxy S8 has a V8 bootloader. I suggest you take a look at the original XDA thread for the latest files and instructions provided directly by the developer.
For the S8+, refer to this tutorial.
If your phone has v8 bootloader revision, I suggest you visit the source XDA thread for the latest files.
This process goes perfectly until after step 6.2 once 6.2 is completed the phone reboots no root (expected this is not the pre-rooted ROM) but it also does not contain the custom recovery of Safestrap but instead, stock recovery opens when prompted. Got any suggestions?
Hi Jack. I believe I failed to mention and explain that.
What you need to do is:
1) Boot your phone into Download Mode and connect it to the PC
2) Flash the “BL_ENTER_SAFESTRAP_G950UDTA6_V7.tar.md5” file through the ‘BL’ slot of Odin.
3) Your phone should enter Safestrap.
4) To exit Safestrap, go to the “Reboot” menu and press “Download”.
Then after that flash DTA6_SYSTEM.img and the CSC and BL files?
Yes, that’s correct.
Is there a way for me to fix the phone it’s really important I get it fixed
Yes. First of all, download the latest stock firmware for your phone using this tool.
Once you have downloaded it, follow the instructions on this page to flash it.
After this, you will have your phone restored to the stock firmware and you can retry the rooting instructions again.
I’ve been trying to root my S8 G950U. But it keeps staying at “Setup Connection” in Odin. Already reinstalled drivers, changed Odin version, opened as administrator, and somethings more.
I know that this and more modes don’t work on my model. So if someone has anyway which with I can root my phone, I’ll aprecciate it.
Hi Ricardo. Did you try using the Modded Odin version by Raymonf? You can try the one provided with the “S8_ROOT.7z” package or download it individually from here.
ok i retraced my steps and ran it thru a couple more times. the problem is where i do the chmod -R step. apparently when i press send nothing happens. it doesnt add the write permission to persist so the rest of the process falls apart in the end i guess cuz theres nothing being saved. how can i solve this? ive gone through it a couple times through and made sure i took care to type the command exactly as is. im glad i located the problem tho cuz i thought i was dreaming. ty for any help, tim
Hey,
I’ve been in the same situation here.
Here’s the trick I used :
– Execute the first bat, then chmod even if it does nothing.
– Execute the second bat.
You should see the error :
“chmod – […] no such fil or directory”
It’s okay if i’ts the only one you get but the files got pushed on the phone.
Reboot to safestrap and then open adb from here ( on your computer, you should be abl to adb shell while you are on safestrap )
adb shell
> su
# chmod -R 777 /persist
and that should do the trick.
you can then proceed to flash your custom rom
hope this helps !
Thanks ApexMcCaprino! I have added a link to your comment right under step #5. So if anyone faces the same problem, they could use your observation and expertise. Thanks again.
i install nugot rom how can i get it to stop booting up with the safe strap
Hi. Every time you boot your phone, you have to keep the VOLUME UP + BIXBY + POWER keys pressed together until the Samsung splash screen shows up. This will boot your phone into the rooted Nougat OS.
Hi Paul. Did you use the provided files on an S8+? This post is only for the S8 (G950U/U1). For the S8+, please refer to this post. The steps for the S8+ are much shorter and easier.
Sorry yes, i did use the post for the S8+ after I submitted the post I realized I was on the s8 instead. But once the process completes successfully and loads up without an issue I notice I cannot connect to my wifi in settings it keeps crashing or no data service available.
Hi again Paul. Did you just root or installed the Android Pie Safestrap ROM further?
No im using the nougat pre-rooted method
Im currently on Pie when i try safestrap with pie safestrap don’t seem to work, but the issue I’m having is with the pre-rooted nougat method
Currently, in using a stock version of Pie TMB I followed the instruction on how to pre-root s8+ with the nougat firmware. So I followed the guide for the s8+ and it was successful. Once the pre-rooted nougat loads up to the point where I need to connect to my wifi in settings the phone would freeze then settings would crash and prompt to reload. So I’m unable to connect to wifi or my mobile data using the pre-rooted nougat that was posted for s8+ model.
Hi again, Paul. Could you tell me the software build number of the Android Pie firmware that’s currently installed on your S8+? You can find this info by going to ‘Settings’ > ‘About phone’ > ‘Software information’.
Android Pie Build Number: PPR1.180610.011.G955USQS7DTB3
Okay. So, in brief, you did the following:
1) Performed a factory reset
2) Flashed the BL V7 Safestrap file via Odin
3) Force-rebooted the phone into Download Mode
4) Flashed the AP Rescue System Image (tar.md5) via Odin which resulted in the ‘FAIL!’ message
5) And finally, re-flashed the BL V7 Safestrap file
Did you do anything differently or exactly the same? I would suggest reperforming the steps from the start and see if it makes a difference. I performed the same thing on my friend’s S8+ (SM-G955U1) and fortunately didn’t face any issue with WiFi.
Let me know how it goes.
Hi I am stuck with trying to get the S8_Root.7z file I have tried each one and get it either been deleted for a virus or it cant be opened. I have turned my virus protection off tried different apps to extract it even tried to get file from XDA Forum and still nothing, can you please tell me what exactly am I doing wrong?
Thank you in advance
Hi Dom, do you have third-party antivirus software installed? If so, then you have to disable real-time virus protection in both the antivirus software and Windows Security.
I have done the same and it worked for me.
I’m planning to try this with the SM-G9500, which is a phone from Hong Kong….
If it works, I’ll post.
Meanwhile, has anyone already failed or succeeded with this model? It’s a snapdragon.
Hi Jim. Please don’t try the method on the SM-G9500. Although it’s a Snapdragon variant, but it does support bootloader unlocking.
TWRP for the device is already available here. But I am not entirely sure if it’s possible to flash Magisk to gain root.
Hi, I’m trying to get some kind of stock, that will allow my phone to be credited by my carrier. I have an S8+ BASEBAND is G955USQU5CRK1. I followed these steps to get Nougat 7.0 and root access. My S8+ is tied to AT&T, but with the bootloader Version 5, is there any stock of Oreo or Pie that I can put on my phone? I haven’t been able to find an AT&T US firmware Version 5 that I can install. Any help would be greatly appreciated. Thanks in advance, and keep up the great work!
Hi. I think you should be able to flash the Pie firmware from S8+ G955U (USC). But to just be sure, I want to verify the CSC of the firmware installed currently on your phone. Please open the dialer app, enter *#1234# and let me know what it shows on the screen.
We’ll have to go another route to confirm my firmware Version because the *#1234# gives me an error. What other information would you need. Currently I’m on USA AT&T Carrier. I rooted my phone using method from this post. Android Nougat 7.0 security patch Feb 1, 2018. Samsung experience 8.1, Baseband G955USQU5CRK1, Build G955USQS2BRB1 Service provider SW version. SAOMC_SM-G955U_OYN_ATT_017998899a45444c55455a ATT/ATT/ATT
Device Status Custom. My phone is rooted, but not unlocked. I purchased it directly from AT&T and still owe about 7 months of payments on the phone. If you need any additional information please let me know. Thanks again for all of your help. I really appreciate it.
Hi again. Just for a bit more confirmation, download and install the PHONE INFO app on your phone and share a screenshot of the ‘FIRMWARE’ tab in it.
Bootloader Version FA70_G955USQU5ARH8
PDA Version G955USQS2BRB1
CSC VersionG955UOYN2BRB1
BASEBAND Version G955USQU5CRK1
Latest Firmware N/A
Firmware Status Official
Kernel Version 4.4.16-12542406
dpi@21HH1D17 #1 64-bit
Java Virtual Machine i couldn’t figure out how to import the screenshot but this is all the information that was on the screenshot. Thanks again.
Okay. I think it’s safe to flash the latest Pie firmware from the USC region. You can download it from here or use SamFirm Tool. For latter, enter the model as “SM-G955U” and region as “USC”.
Hello,
Hey your advice worked like a charm, for reverting my phone back to stock V9 Pie. I have no further questions, I just really want to thank you for all of your help and hard work. You’re AMAZING!!! Anyone reading this, let me say this guy is the “REAL DEAL” a genius, and extremely knowledgeable. He will not steer you in the wrong direction! Thanks again for all you’ve have done for me. You’re the BEST!!!
Hi again. I am glad that this worked for you.
I can’t tell how happy I am reading your last comment. For the first time, I don’t have “words”. Couldn’t thank you enough for it. But I would like to let you know that it made my day! Thanks and hope to see you around.
Hi, is there a way to make it work on G955W ( Canadian carriers ) ?
Yes, it should work. The CSC stays the same, only the system and bootloader partitions are modified.
Also, since my phone is already running BL revision 2, won’t the SamFAIL PartCyborgRom method work for it? That method will work for the Snapdragon G955u running Android 8.0 and running BL revisions 1 & 2. I just don’t know if my security patch level from March 1st, 2018 possibly patched that exploit method? As far as I know, that root method was implemented December of 2017, but I don’t know if it was patched with the March 2018 security update or in a later security update. Or do you think I should try to update my phone and hopefully get BL revision 4 or 5 and then try this method here you have given?
Hi again Tom, there’s something that I would point out here.
Your S8+ is running Android Oreo and unfortunately, there’s no way to root it. The only root methods available, be it PartCyborgROM or this one, these are only for Nougat firmware.
Since your phone is on V2, I suggest you opt for PartCyborgROM that supports V2 BL, but then it will take your phone back to Nougat.