In this guide, we will show you how to root the OnePlus 8T using Magisk, without having to install TWRP recovery at all. Further, we will also show you how to install OxygenOS OTA updates on your rooted phone. These instructions will work on any OnePlus 8T running Android 11 (OxygenOS 11) software.
Advertisement
Rooting your phone with Magisk not only allows you to use root applications but also enables you to apply modifications to your phone’s software systemless-ly. That is without actually mounting or altering the system partition. While TWRP for the OnePlus 8T isn’t available at the moment, it should be out any day.
But if you do not plan on flashing custom ROMs and just want to root your phone, then installing TWRP isn’t even necessary. Moreover, you can always boot TWRP temporarily (using the fastboot boot command) and use it to flash custom ROMs, mods, take NANDroid backups, etc.
For those who do not know – it is possible to install Magisk and root your OnePlus 8T without installing TWRP at all. This could be done using what we call the “Magisk Patched Boot method“. This alternate method of installing Magisk and rooting involves patching the phone’s stock boot image file through Magisk Manager and then flashing the resultant patched boot image to the phone via Fastboot.
Advertisement
This simply makes the whole rooting process much more straightforward, less time-consuming, and also enables you to easily take OTA updates on your OnePlus 8T after rooting.
Page Contents
- Before You Begin
- How to Root OnePlus 8T using Magisk
- Step 1: Install Android SDK Platform-Tools on your Computer
- Step 2: Launch the Command-line Inside ‘platform-tools’ Folder
- Step 3: Download the Stock Boot Image
- Step 4: Patch the Stock Boot Image via Magisk Manager
- Step 5: Boot your OnePlus 8T into Fastboot Mode
- Step 6: Flash the Patched Boot Image to root OnePlus 8T
- Installing OxygenOS OTA Updates on Rooted OnePlus 8T
Before You Begin
Let’s start with a couple of things you should do first before performing the instructions below.
1. Take a Complete Backup: Rooting your OnePlus 8T using the instructions provided here will not erase any data. However, it’s a good practice to take a complete backup of all your important data beforehand. This will create a failsafe and safeguard your data in case it’s lost due to corruption or a bad flash.
If you want, you could also take a look at our in-depth tutorial on backing up Android devices.
2. Install OnePlus USB Drivers: If you’re operating on a Windows computer, it will generally install the required USB drivers for your phone automatically. But that’s not always the case, and especially when working with ADB and Fastboot. So, it’s best that you install the latest OnePlus USB drivers on your computer.
If you’re operating on a macOS or Linux computer, you will not need any additional drivers at all.
3. Charge your Phone: Make sure that your OnePlus 8T has a sufficient battery charge so that it doesn’t turn off accidentally while performing the instructions. We suggest having at least 40% battery charge before you begin.
4. Unlock your OnePlus 8T’s Bootloader: In order to root, or flash the device partitions, you must first unlock your OnePlus 8T’s bootloader. This is extremely simple and could be done by issuing a fastboot command from your computer.
- More info: How to Unlock the Bootloader on OnePlus 8T
How to Root OnePlus 8T using Magisk
The steps below will take you through the process of rooting the OnePlus 8T using Magisk, without having to install or use TWRP at all. We have split the instructions into six steps so that’s it’s easier for you to understand the whole process.
Requirements:
The only things you’ll need to perform these instructions are:
- Your OnePlus 8T with an unlocked bootloader
- A Windows, Linux, or Mac computer
- And, a compatible USB Type-C cable (preferably the one that came in the box)
Step 1: Install Android SDK Platform-Tools on your Computer
The rooting process involves using the fastboot tool to flash the patched boot image. So, the first step is to download the Android SDK platform-tools (which includes fastboot) and install them on your computer.
To do this, download the latest version of the tools according to your PC’s operating system:
Once the platform-tools package has been downloaded, extract its contents on your computer using the in-built archive utility or 7-Zip. The extracted ‘platform-tools’ folder should contain the ADB, Fastboot, and other tool binaries.
For easier access, we suggest that you move the ‘platform-tools’ folder to the C:\ drive on your Windows computer, or to the ‘Documents’ directory on a Linux/Mac machine.
Step 2: Launch the Command-line Inside ‘platform-tools’ Folder
With the required tools now installed, you need to launch the PowerShell/Terminal window on your PC inside the working directory (i.e. the ‘platform-tools’ folder). If you’re experienced with using the command-line, you could alternatively add the platform-tools to your computer’s PATH.
To do this:
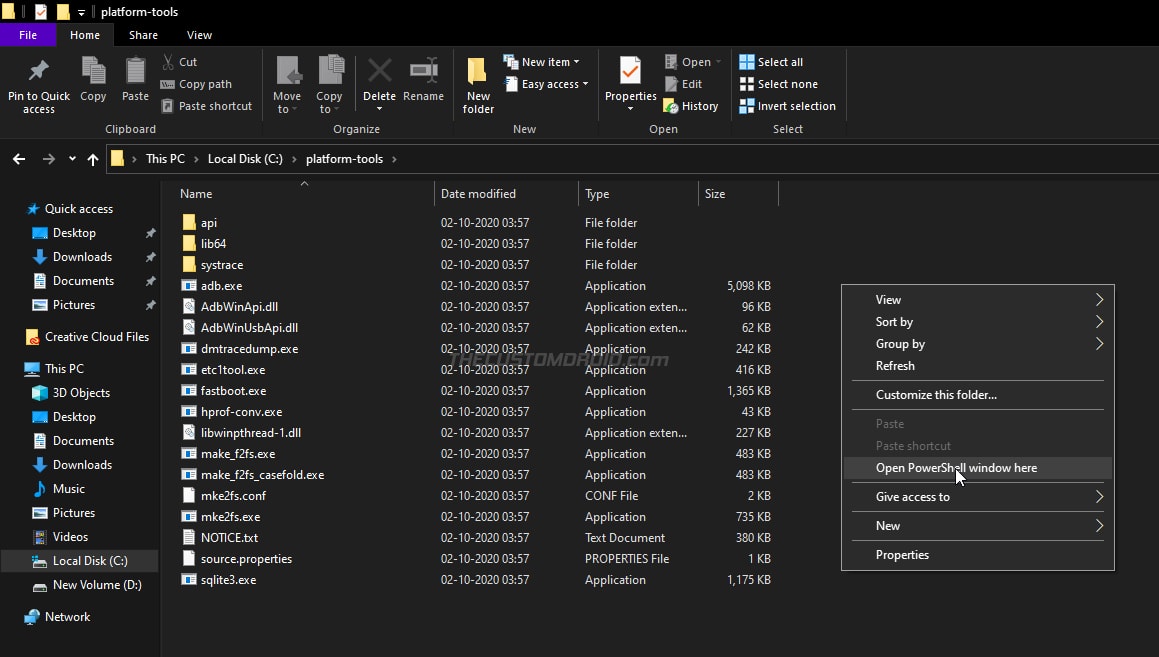
- On Windows: Go to C:\platform-tools. Hold the SHIFT key on the keyboard and right-click on any empty space inside the folder. Then select the ‘Open PowerShell window here’ option.
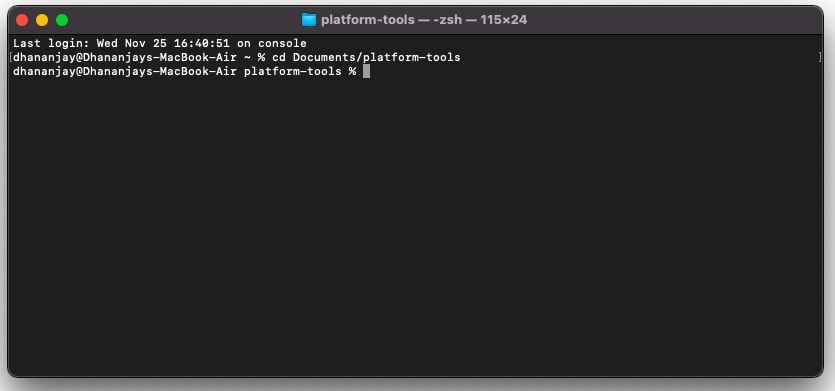
- On Linux/Mac: Launch the Terminal and use the cd command to change its directory to the ‘platform-tools’ folder. For example: If you moved the folder inside the ‘Documents’ directory, then the command should be:
cd Document/platform-tools
At this point, you have everything ready and set up on your computer for carrying out the flashing later during the steps. Keep the PowerShell/Terminal window open as you’ll need it later during the instructions.
Command-line Usage: When entering the mentioned Fastboot commands, make sure to prepend them with a dot and backslash [.\] in Windows PowerShell or a dot and forward slash [./] on Mac/Linux Terminal.
Step 3: Download the Stock Boot Image
Now, you have to download the stock boot image for the OxygenOS version currently installed on your OnePlus 8T. You can download boot images for all models and OxygenOS versions from this repository.
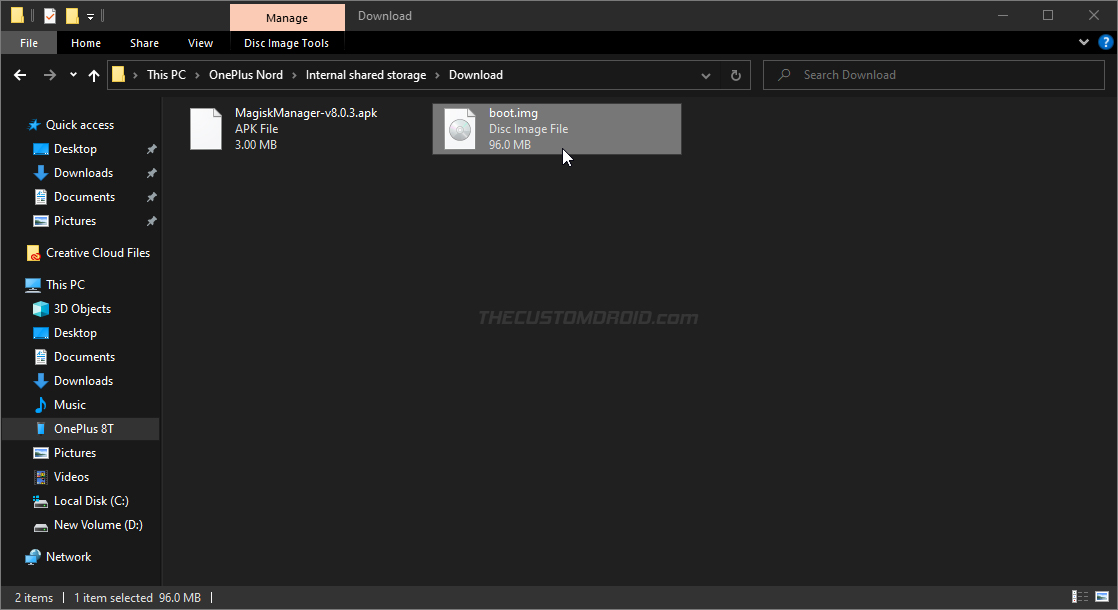
Each boot image is packed inside a compressed ZIP package. So, make sure that you extract the ZIP to get the boot image file. Once extracted, copy the boot.img file inside the “Download” folder of your phone’s internal storage. Although you can place the file anywhere on the internal storage, we prefer the Download folder so that it’s easier to locate.
Advertisement
Important notes:
- It is very important that you use the boot image that matches the OxygenOS version installed on your phone. Using and flashing a mismatching boot will result in a boot loop or cause errors like WiFi/mobile network not working.
- It’s best to avoid using pre-patched boot images provided by others. When you self-patch the boot image in Magisk Manager, it takes and stores a backup of the stock boot, which is necessary for both uninstalling Magisk (unrooting), as well as for installing OTA updates after rooting. If you use a pre-patched boot, Magisk Manager won’t be able to store a backup.
- Do not patch your OnePlus 8T’s boot image on a different device. This is because Magisk Manager defines configs based on the device it’s running on (Here’s the full explanation by John Wu).
Step 4: Patch the Stock Boot Image via Magisk Manager
With the boot image now transferred to your phone, it’s time to patch it via Magisk Manager.
So, download the APK file of the latest Magisk Manager from the official Github page. Once downloaded, install the APK on your phone (Not sure how? See: How to Install an APK file).
Next, go to the app drawer and launch the Magisk Manager application on your OnePlus 8T. Then press the settings icon (cogwheel) on the top-right of the app’s window and press the ‘Update channel‘ option. Select ‘Beta‘ from the list and go back to the app’s main screen. Not needed anymore as Magisk v21 is now available on the Stable channel as well.
Now press the “Install” button in Magisk Manager and select “Select and Patch a File” from the list of available installation methods. This should instantly open the file selection window for you to choose the file you want to patch with Magisk. So, navigate to the location where you transferred the boot image (‘Download’ folder) and select it.
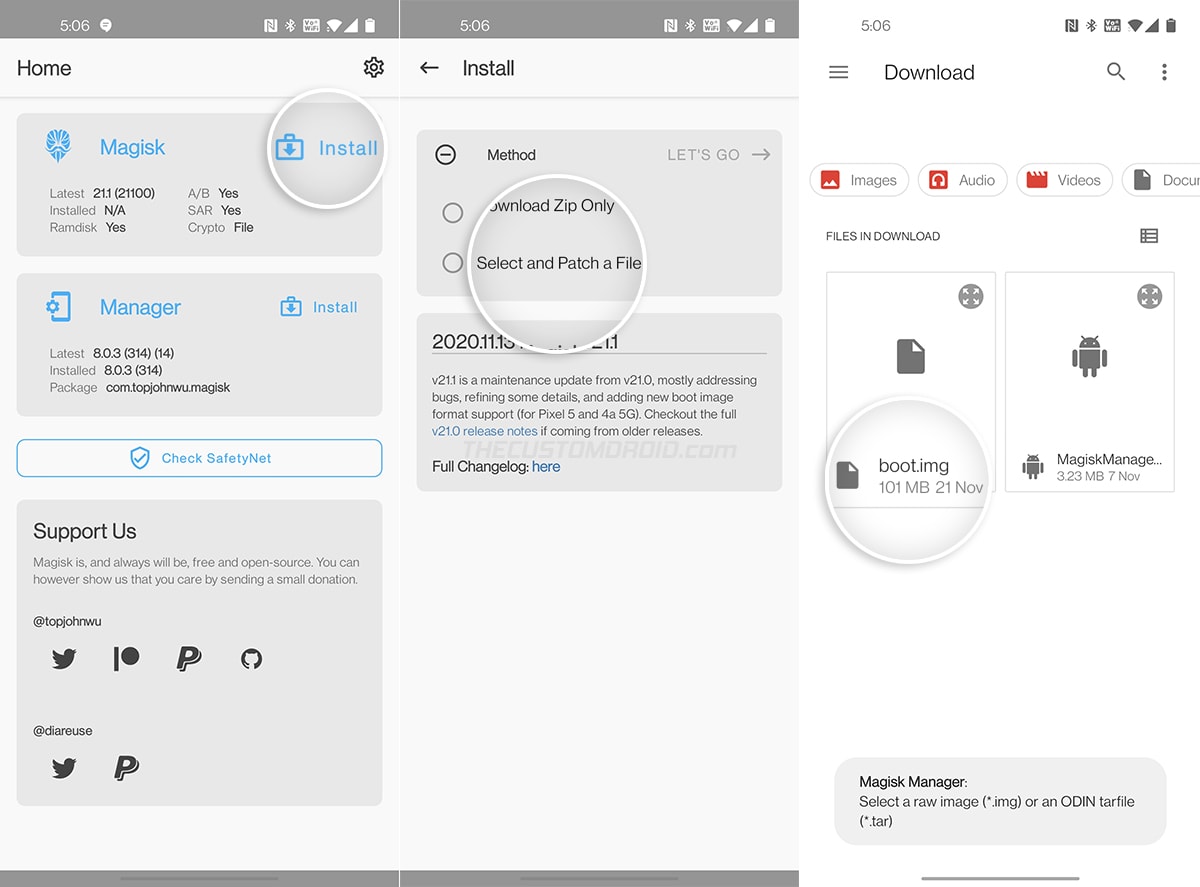
Once the file has been selected, press “LET’S GO!” to patch the file. Magisk Manager will download the latest version of Magisk and patch the boot image with it.
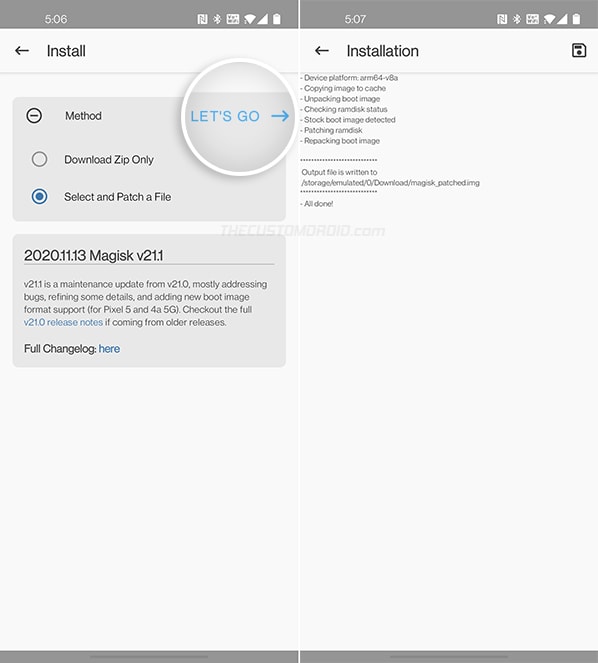
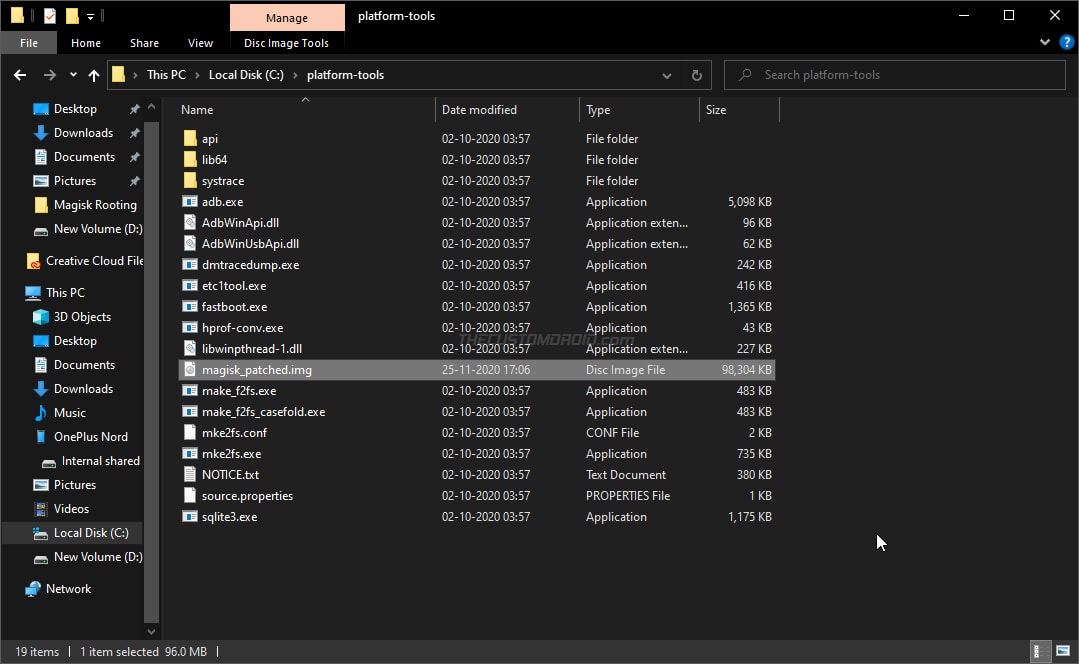
After the process finishes, the patched boot image (magisk_patched.img) will be stored inside the ‘Download‘ folder of your phone’s internal storage. Connect your OnePlus 8T to the computer and copy the patched boot image inside the ‘platform-tools‘ folder.
Step 5: Boot your OnePlus 8T into Fastboot Mode
In order for fastboot to recognize your OnePlus 8T and flash the patched boot image, it must be booted into Fastboot Mode.
Advertisement
To do this, hold the Power key of your phone to bring up the Power menu and select ‘Power off’. Once the phone is completely turned off, hold the Volume Up, Volume Down, and Power keys together until you see the Fastboot screen.
See detailed instructions on how to enter Fastboot and Recovery modes on OnePlus 8T
Here’s what it will look like:
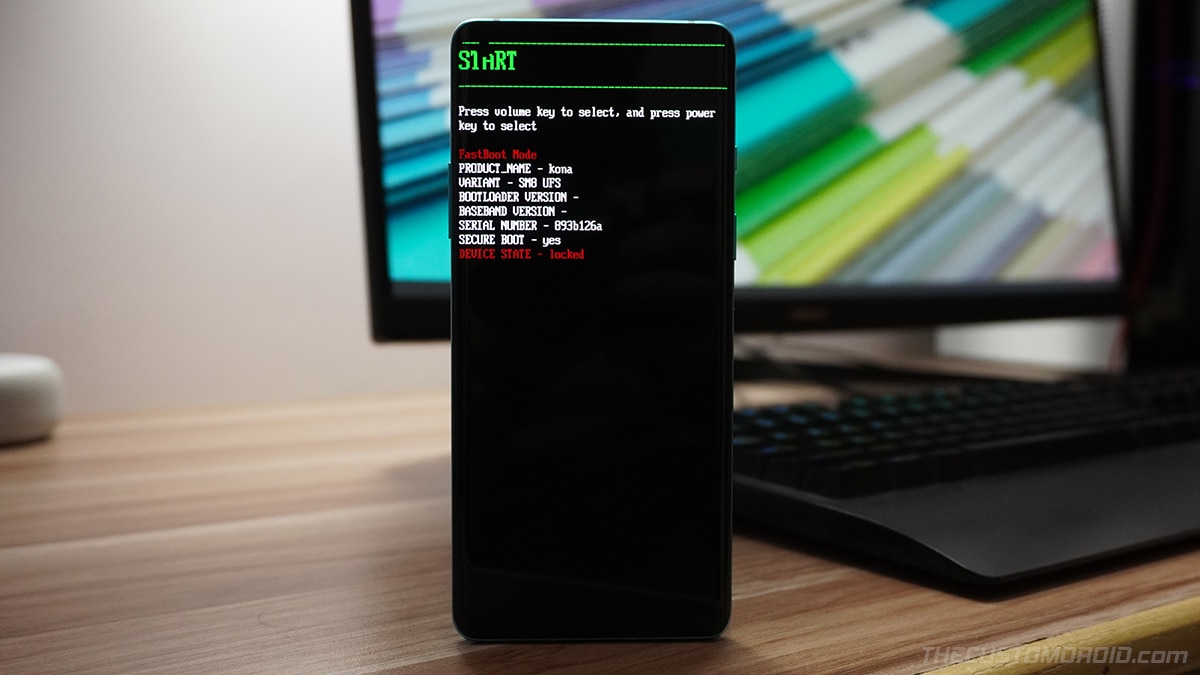
With your OnePlus 8T in Fastboot Mode, connect it to the computer using the USB cable.
Step 6: Flash the Patched Boot Image to root OnePlus 8T
With everything now ready, it’s time to flash the patched boot image and root your OnePlus 8T with Magisk.
First, enter the following command in the PowerShell/Terminal window to ensure that your PC can communicate with the phone over the fastboot interface.
fastboot devices
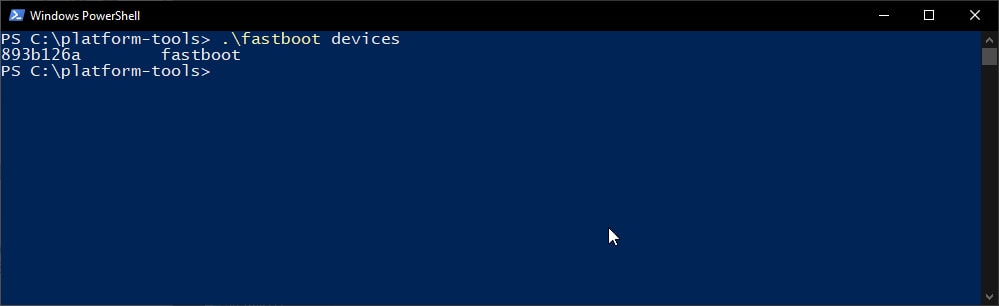
The command should return your phone’s unique ID. In case it doesn’t, then make sure that you have the required USB drivers installed and restart your PC.
Finally, enter the following fastboot command to flash the Magisk patched boot image and root your OnePlus 8T.
fastboot flash boot magisk_patched.img
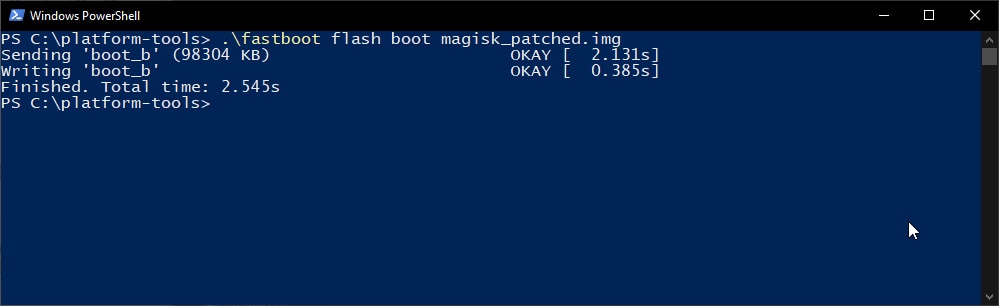
Once the file has been flashed, reboot the phone back into the system (OS) using the following command.
Advertisement
fastboot reboot
That’s it! Your phone is now rooted with Magisk. To verify this, simply launch the ‘Magisk Manager’ app and check the installation status. You can further check if your rooted OnePlus 8T passes SafetyNet by pressing the ‘Check SafetyNet’ button in Magisk Manager.
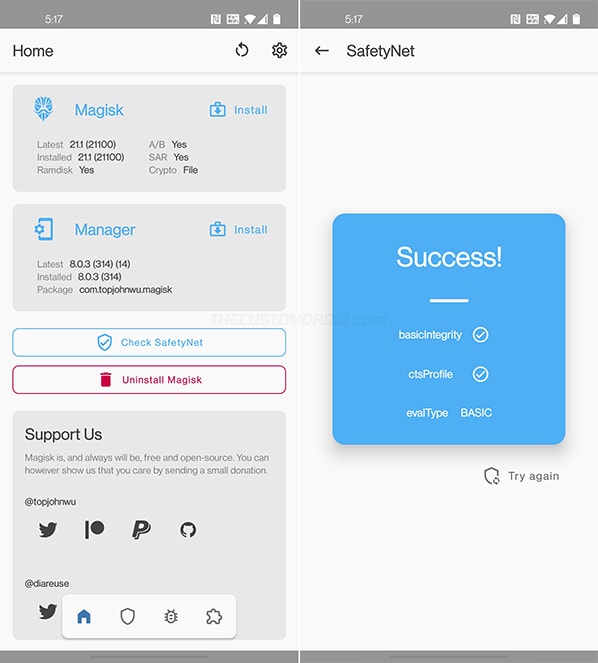
SafetyNet fails and shows ‘Hardware’ evalType? It means that Google’s new hardware-backed attestation is now in effect on your phone. If so, here’s how to fix SafetyNet on devices with hardware attestation.
Now go ahead and start using root applications like Titanium Backup. You could also hide root from banking and security apps that might generally not work on a rooted device. From Magisk v20.4 onwards, Magisk Hide is turned off by default on new installations. So, you will need to turn it ON manually by going to Magisk Manager settings.
You could install some famous mods like ViPER4Android, EdXposed Framework, and more. With Magisk, you also have the ability to apply modifications to the software systemless-ly using modules, like OnePlus Sans Font, FOSSAPPS, etc.
Installing OxygenOS OTA Updates on Rooted OnePlus 8T
Now that we are done with the rooting part, let’s talk about something that’s a major concern for every user after rooting their phone, i.e. OTA updates. On a traditional A-only device, installing OTA updates would require completely unrooting first.
However, with the new A/B partition system, it is possible to easily install OxygenOS OTA updates on your OnePlus 8T after rooting it, using Magisk. This also allows your phone to stay rooted even after installing the update so you wouldn’t need to go through the trouble of rooting your phone again. A more detailed explanation could be found on this page.
To install OTA updates on your rooted OnePlus 8T:
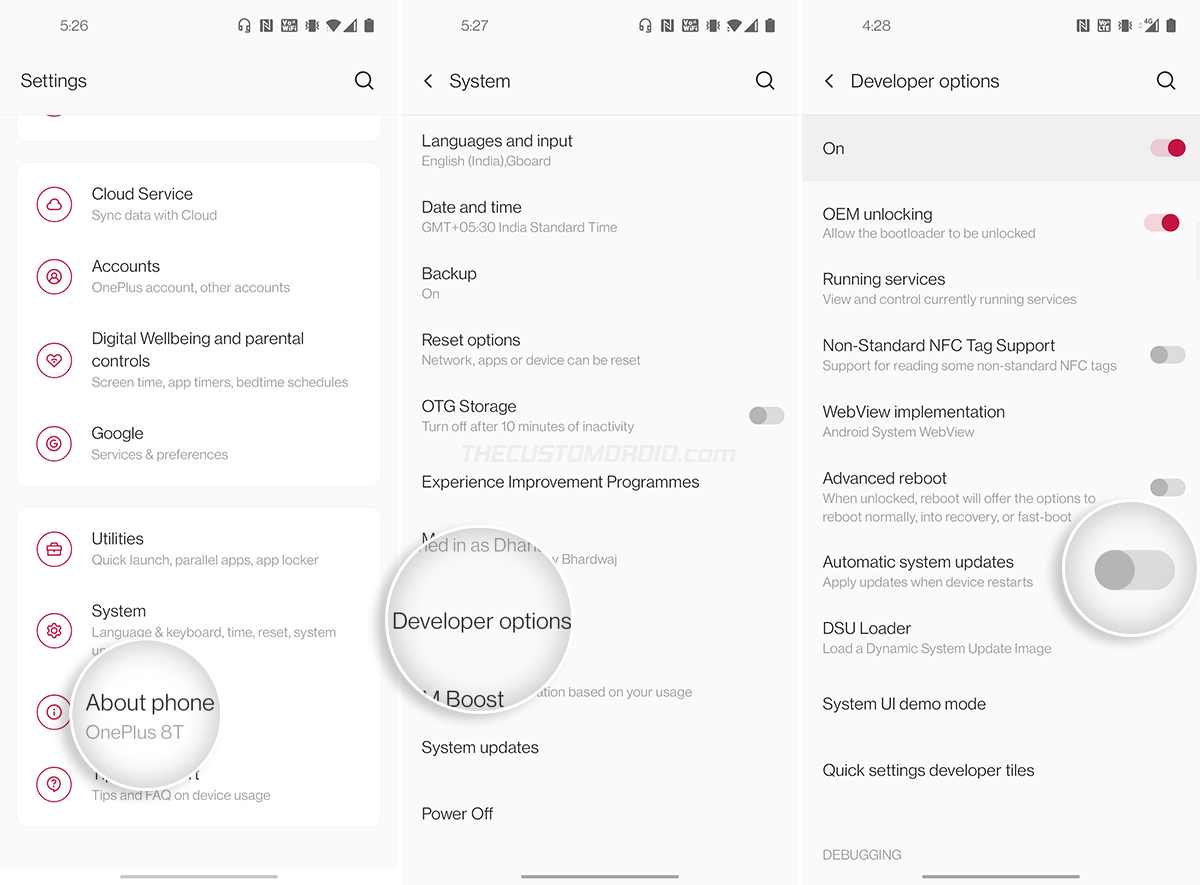
- First, enable the Developer Options screen on your phone.
- Go to “Settings” → “Developer options” and disable the “Automatic system updates” option. This will prevent your OnePlus 8T from automatically installing OTA updates in the background.
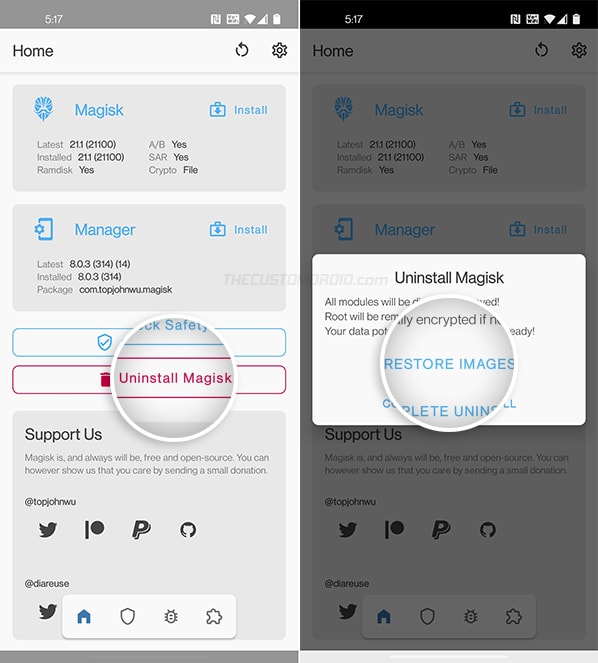
- Next, open the Magisk Manager application, select “Uninstall”, and choose the “Restore Images” option. Magisk will restore your phone’s stock boot image that was backed up during the rooting process.
- Now go to “Settings” → “System” → “System updates” and select “Download and Install Now” to install the OxygenOS OTA update on your rooted OnePlus 8T.
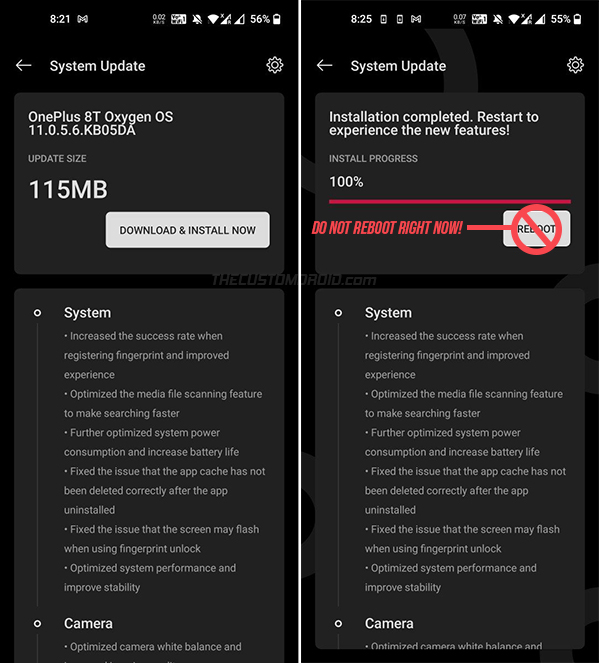
- After the update finishes, DO NOT REBOOT the phone. Since you restored the stock boot image, the root access will be lost if your reboot right now.
- Now open Magisk Manager, press “Install” and select “Install to Inactive Slot (After OTA)” from the list of available methods.
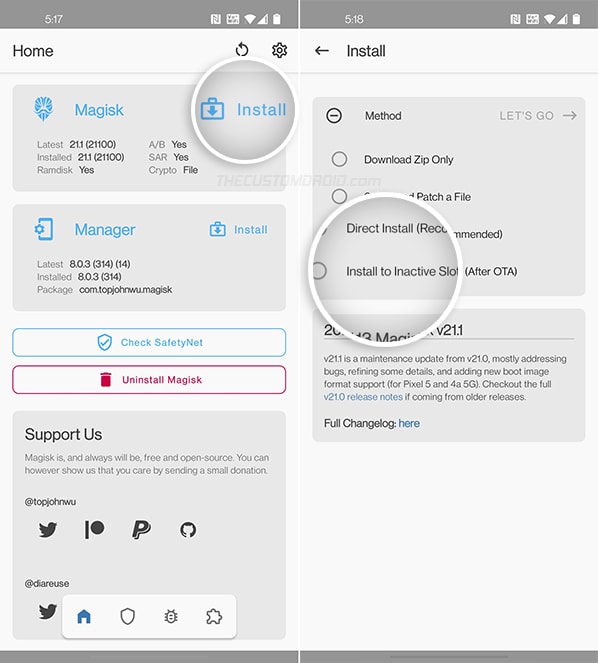
- Finally, select “Let’s Go” to confirm and install Magisk to the inactive slot (where the OxygenOS OTA has been installed).
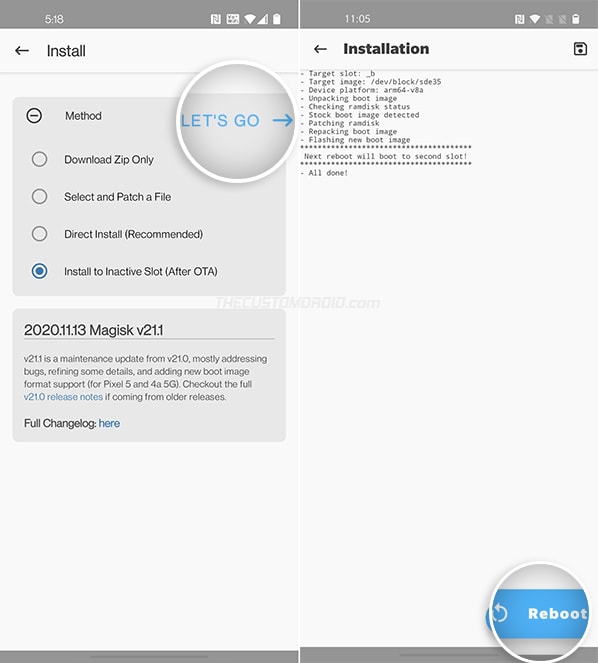
- After Magisk is installed, reboot your phone by pressing the ‘Reboot’ button.
That’s it! Your OnePlus 8T will now boot into the updated OxygenOS software with Magisk root still intact. You can repeat this same process every time a new OxygenOS OTA update is available for your phone.
Tip: In case the OTA installation fails at step #4 above and shows an error, you could alternatively download the latest OxyenOS full ROM from here and install it using Local Upgrade. Once done, follow step #5 and onwards.
So by now, you have learned how to root the OnePlus 8T using Magisk (without TWRP), and also how to install OTA updates after rooting. You can always unroot and restore the stock OxygenOS software on your 8T by following the instructions here. On the other hand, if your phone ever gets bricked (or shows the Qualcomm Crashdump mode screen), then you can easily unbrick the OnePlus 8T using MSMDownload tool.
If you have any questions or feel stuck while performing the instructions, let us know. Please make sure that you mention your device name, model number, and the installed OxygenOS version.
Comments 16 Comments
Comments are moderated, and published only if they are relevant to the topic and add value in a constructive way. If you disagree with something, please be polite and respectful. We suggest you read our comment policy before commenting.
I tried rooting my device via this guide and i was successful but wifi was not working after root. trying to install stock rom i stuck my device into bootloop and power button+ vol up down were hard bricking my device till battery ran out. Had it restored via service center.
I would try rooting via twrp but i have a doubt. Will this twrp only work with google pixel kebab rom or will it work with stock rom as well ? as i dont have good experience reinstalling stock rom with adb.
Hi Vivek. The problem you stated is generally caused by using a wrong boot image file.
You must ensure that you use the boot image of the same OxygenOS/firmware version that’s currently installed on your OnePlus 8T.
For instance, if your OP8T has OxygenOS version 11.0.8.14 installed, then you must ensure that you patch and use the boot image of the same.
Another thing to keep in mind is your device’s variant. Let’s say, it is the Indian variant, then you must use the boot image from the OxygenOS 11.0.8.14.KB05DA ROM package (adding to the above example).
Once you use the correct boot image, you shall not face any issues with WiFi, BT, or cellular not working.
As for TWRP, the official one does not support Android 11 (not yet). But there’s a new unofficial build in the works (here’s the XDA thread). However, it’s still a work-in-progress. If you do decide to try it, make sure that you go through the instructions stated in the thread, as well as the comments posted by other users.
Let me know if you have any questions, I will be more than happy to help.
Wow, this is far better than any guide currently available on XDA. You are a great writer (just saying). Anyways, I have one question. I am a little confused about the part where you said “do not reboot” but then the next step it says to open Magisk Manager and I know I can’t open Magisk Manager unless I boot boot it up.. I’m sorry to take your time but if you could just briefly tell me wether or not I can boot at that point and I’m sure I can figure it out from there. Thanks.
Thank you Anthony for your kind words.
I suppose you’re referring to the OTA installation part, am I right?
Once the update is installed, you do not have to hit the “Reboot” button. Rather, swipe up from the bottom to pull up the home screen, and go to the app drawer from there and launch the Magisk app (called the Magisk Manager app earlier). And then hit “Install” and select the “Install to inactive slot” option. Only once this is done, you can reboot.
I have updated my phone to the latest version (as of writing) 11.0.8.11.KB05AA. As far as I can find, the latest full rom update is 11.0.7.9.KB05AA. How do I go about rooting the new version? Can I just patch the boot.img from the 11.0.7.9 version and boot with that, or do I need to extract the boot.img from my current version and patch that? Or neither possible and I need to downgrade?
If your OnePlus 8T is now running OOS 11.0.8.11, you will need the corresponding boot image. Using a boot image from a different OxygenOS version is known to cause problems with audio, WiFi, mobile network, etc.
So, you will need to download the OOS 11.0.8.11.KB05AA full OTA package and extract the boot image from it. The problem is, unlike the EU or Indian counterparts, the OTA packages for the Global variant of the OnePlus 8T use different update servers, which makes it extremely hard to capture the OTA URL.
Due to this, we and you need to wait for OnePlus to publish the OTA over the official support page. Once it’s available, you can grab the OTA, extract the boot image, and continue with the rooting process. I will also do the same and then upload and publish the boot image to the OP8T boot image repository that I maintain.
Thank you very much for your reply. I kinda shot myself in the foot multiple times here and eventually bricked my phone (oof). I had to do a complete reset with the MSM tool but now I’m back up and running. Next time if I want to update I’ll check on this site first if the full OTA package is available, just in case I mess things up again.
Good that you got it to work again. And yes, that seems like a good idea if you want to root right after updating.
Omg I get it now. This whole time I was assuming that the update would boot us to some sort of recovery mode to install it. I didn’t realize that I would still be in regular android mode. Thanks for your help and I truly appreciate your generosity as I was reading through the comments. People like you are rare. Lol. Anyways. Cheers.
Yes, that’s the magic of seamless (A/B) updates. The updates are always installed to the inactive slots, so there’s no need for the device to go into the recovery mode (like it did some years ago) for the OTA installation.
I have covered a small write-up on Seamless Updates and you can always find more detailed information in the official Android documentation.
Thanks for the guides, super helpful!
Just wanted to say I’ve successfully rooted 11.0.5.6.KB05AA and upgraded to 11.0.7.9.KB05AA.
Wifi works, sound & mic work too, so without issues so far. No delay before reboot either.
Not sure if this could be the problem, but the letters corresponding do different regions (AA/DA/BA) are very easy to confuse — wonder if this could be causing issues for people?
Some caveats I had:
– during rooting, first time after I installed magisk, SafetyNet check failed — I had to enable “MagiskHide” in the settings first, after that it worked
– during OTA update: first time I tried “Settings” → “System” → “System updates”, it got stuck (along with the whole Settings app, apparently). I guess it’s kind of the thing you warned in “Tip: In case the OTA installation fails at step #4 above and shows an error”. I went back to magisk, installed it again (direct install), rebooted, downloaded the latest ROM and used the local install option — it worked fine this time
Glad to know, Karlicoss! Yes, the AA, DA, and BA suffixes are very important. They represent the model/variant for which the OxygenOS build is for. And like you said, it can be confusing.
It’s good that you paid attention to the details and it’s the reason why you didn’t encounter any weird issues with WiFi, audio, etc, which are generally caused due to the use of a boot image that’s from a different OxygenOS and/or model.
And thank you for sharing your experience. I am sure others who come to this page would benefit from it.
Thanks Dhananjay, I figured out that’s the way the built in update works.
However, Magisk hide is able to hide the rooting and it is now trying to do an incremental update.
I am assuming Magisk hide will be working even after temporarily uninstalling Magisk (till reboot which anyways I will only do after the update and the magisk reinstall is complete)
Do you know if the incremental update will be installed to the second slot so that we can reinstall Magisk there later? If so then that should be faster than doing a complete OTA download and update?
Good to know. And yes, the root and all its functionality will work until you reboot the phone.
Yes, all updates on devices that support A/B partitions (including the OP8T) are always installed to the inactive slot. Whether it’s an incremental update or a complete one. So, you will have to reinstall Magisk to the inactive slot to retain root access post the update.
In my One Plus 8T, the OTA update is detecting the Magisk root and trying to download the full upgrade instead of the incremental.
Should I use Magisk hide on the System Update process so that its an incremental update or should I continue with the full upgrade?
Anshuman, that’s the intended behavior of the in-built update mechanism. It basically checks the bootloader status. If it’s unlocked, the updater will always download full OTA packages for installation. So don’t worry and proceed ahead.