In this tutorial, we will show you how to unlock the bootloader and root the Samsung Galaxy S10, Galaxy S10+, and Galaxy S10e using Magisk. This guide is applicable to any Galaxy S10 series smartphone with an Exynos chipset, running Android 10 (One UI 2.5) and Android Pie.
Advertisement
Samsung has surely improved their game when it comes to the software, be it their new One UI skin or delivering faster updates to their smartphones. But it is also known for making things difficult when it comes to the development front, like rooting or flashing custom binaries (TWRP). During the past few years, they have implemented some new security features to the software that have hindered the development process such as the Prenormal RMM State, DEFEX, etc.
With the Galaxy S10 series, Samsung has introduced even more complexities that initially prevented users from rooting their phone and installing a custom recovery like TWRP by following the traditional method. So, before you head to the instructions, let’s take a bit of time to understand the new changes introduced by Samsung in the S10 series and how it affects the rooting process on the whole.
Did you know? You can easily remove bloatware from the Galaxy S10 series without root.
Advertisement
Samsung Galaxy S10 Series and Magisk Root – An Explanation by John Wu
According to John Wu’s explanation on XDA, Samsung started using an A-only system-as-root setup for the Galaxy S10 series, as well as other devices launched with Android 9 Pie and above. With Samsung’s own implementation, the ramdisk doesn’t reside inside the /boot partition anymore and has been moved to the /system partition instead.
Moreover, the bootloader also does not load anything but the kernel string, which ensures that it uses the system as the root directory. To deal with it, the developer came up with a genius solution to install Magisk directly to the /recovery partition, but that had some complications of its own. This new Magisk installation method detects the button key presses when the phone boots up. Since Magisk and recovery console co-exists in the same partition, you have the option to boot in either one of them using specific button combinations.
As per the developer “To make matters even worse“, Samsung added a new ‘VaultKeeper’ service which adds another lock on top of the ‘OEM Lock’ on the bootloader. The new security feature will relock the bootloader once the OEM Lock is enabled and data is wiped. The bootloader state is then verified after the initial device setup.
So overall, the development of a fool-proof root solution for the Galaxy S10 series and similar devices took a lot of effort and time. And finally, with the new installation method provided by John Wu, you can now root the Galaxy S10, S10+, and S10e using Magisk pretty easily. Let us show you how.
Important Note
Rooting your phone will wipe the data completely and trip the KNOX counter. This means your phone’s warranty will be void (destroyed) and you will not be able to use apps like Samsung Pay, Secure Folder, etc.
Should you root your Galaxy S10? — Read the unbiased answer by u/exelero88 on Reddit
Supported Devices
This guide is compatible with the following Galaxy S10 devices running Android 10 and Android 9 Pie, with corresponding model numbers.
- Samsung Galaxy S10: Exynos variants (codename: beyond1lte) with model number SM-G973F/FD are supported.
- Samsung Galaxy S10+: Exynos variants (codename: beyond2lte) with model number SM-G975F/FD are supported.
- Samsung Galaxy S10e: Exynos variants (codename: beyond0lte) with model number SM-G970F/FD are supported.
Page Contents
- Before You Begin
- Instructions
- Step 1: Enable OEM Unlocking
- Step 2: Unlock Galaxy S10 Bootloader
- Step 3: Verify the Software Build Number
- Step 4: Download the Stock Firmware Package
- Step 5: Extract the AP Firmware and Transfer it to your Phone
- Step 6: Patch the AP Firmware through Magisk Manager
- Step 7: Boot your Galaxy S10 into Download Mode
- Step 8: Download and Launch Odin Tool on the computer
- Step 9: Flash the Patched AP Firmware to Root Galaxy S10
- Step 10: Boot Galaxy S10 into Rooted System with Magisk
- Step 11: Complete the Additional Magisk Setup
- Your Galaxy S10 is now Rooted!
Before You Begin
Before you start performing the given instructions, there are a couple of things you should do.
1. Take a Complete Backup
Before anything, you should take a complete backup of all your important data stored on your phone. Unlocking the bootloader and rooting will completely erase all the data, including installed apps, messages, contacts, and everything stored in the internal storage.
You could also take a look at our article here on backing up different types of data stored on Android devices.
2. Install Samsung USB Drivers
Generally, your Windows computer will automatically install the required USB drivers for your Samsung Galaxy smartphone. But that is not always the case though. So, if you’re operating on a Windows machine, you might want to download and install the official Samsung USB drivers provided on this page.
If you’re using a macOS/Linux PC, you wouldn’t need any additional drivers at all.
3. Charge your Galaxy S10
If you’re new to things like bootloader unlocking, we strongly suggest that you take your time to understand what each step does.
Having a sufficient battery charge in your Galaxy S10 will ensure that it doesn’t power off while you’re following the instructions and performing them. We suggest charging your phone to a minimum of 40-50% battery level.
Instructions
The process of unlocking the bootloader and rooting the Galaxy S10 series is a true and tried method. We have split the instructions into nine steps so that it’s easy for you to understand the complete process.
The only things you’ll require to perform the instructions are:
- Your Galaxy S10/S10+/S10e
- A Windows computer
- A compatible USB Type-C cable
With the requirements out of the way, let’s begin with the instructions.
Step 1: Enable OEM Unlocking
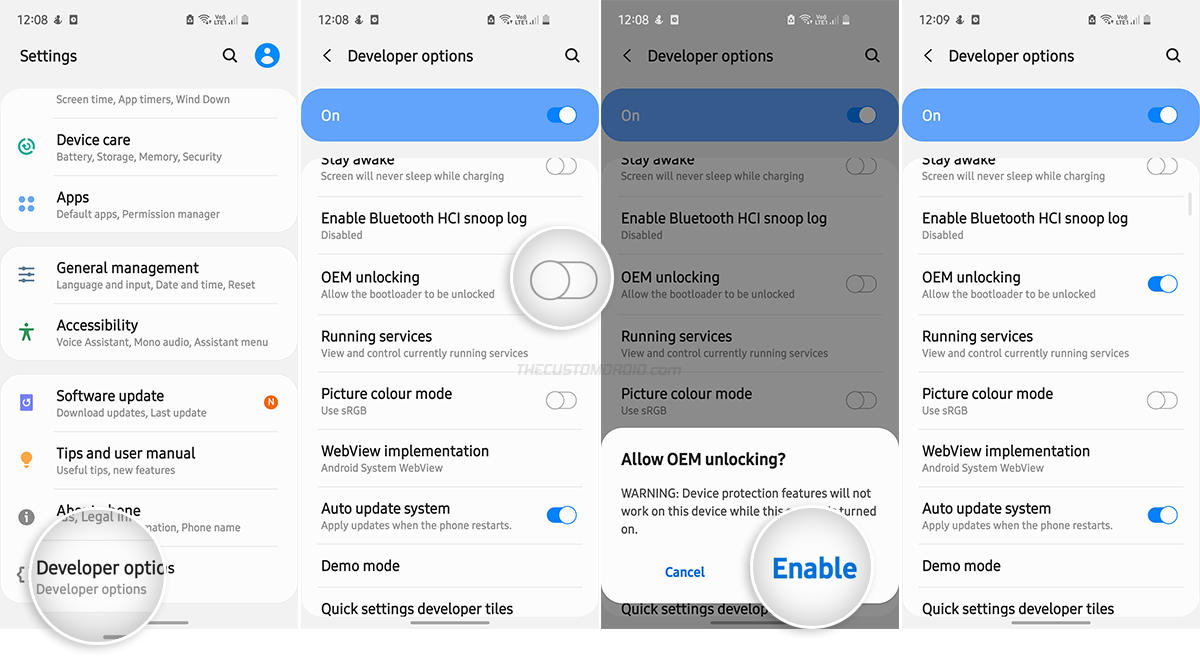
The first step is to enable the ‘OEM Unlocking’ toggle on your Galaxy S10. This option must be turned on before you can attempt to unlock the bootloader. OEM unlocking resides inside the ‘Developer options’ menu, which is hidden by default to prevent users from unknowingly accessing them.
Start by going to ‘Settings‘ → ‘About phone‘ → ‘Software information‘ and repeatedly tap the ‘Build number‘ section five times. Once the Developer Options menu is turned ON, you should see the ‘Developer mode has been enabled.’ message on the screen.
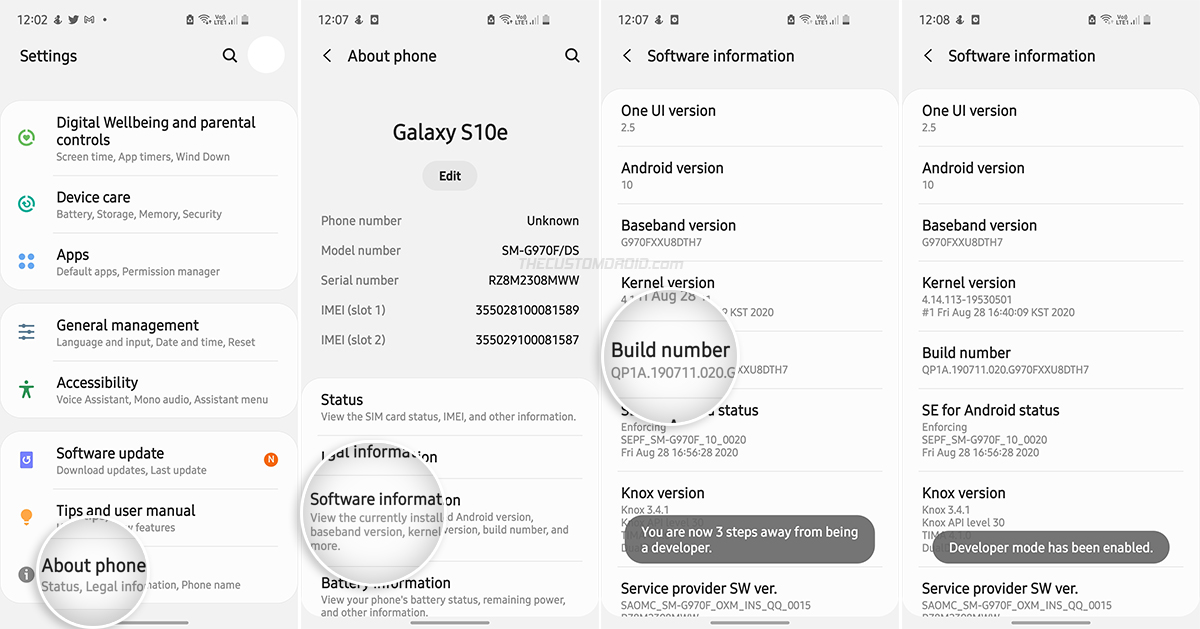
Now go to ‘Setting‘ → ‘Developer options‘ on your Galaxy S10 and turn ON the toggle next to ‘OEM unlocking‘. Then select ‘Enable‘ when prompted to confirm.
Step 2: Unlock Galaxy S10 Bootloader
With OEM unlocking enabled, you can now unlock the bootloader on your Samsung Galaxy S10, S10+, and S10e.
Unlike a majority of other OEM devices, Samsung doesn’t require using any fastboot commands or involve retrieving any unlock keys. It could be done straight on the device itself. When you turned ON the toggle, the bootloader enabled a special ‘Device Unlock Mode’ which is used for unlocking.
To unlock the bootloader, power off your Galaxy S10 first. Then connect it to the computer while holding the Volume Down and Bixby keys together. You should now see the bootloader screen.
Now long-press the Volume Up key to enter ‘Device unlock mode‘. You should now be presented with a confirmation prompt for unlocking the bootloader. Finally, press the Volume Up key to confirm and unlock the bootloader on your Galaxy S10.

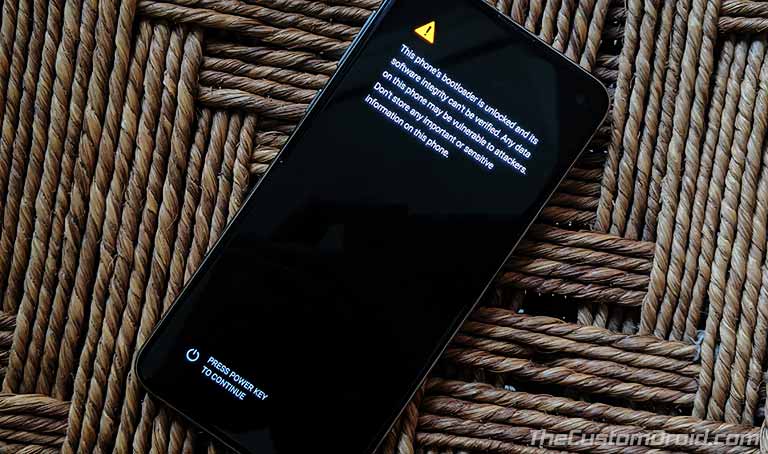
Your Galaxy S10’s bootloader is now unlocked and it should reboot automatically. You should also see a warning message right before the Samsung splash screen, just as shown in the picture below. This is an obligatory warning message and completely normal. And before you ask, no, there’s no way to get rid of it (unless of course, you relock the bootloader, which shouldn’t be done while rooted).
The first boot after unlocking the bootloader could take some time (took around 3-4 minutes for me). So be patient.
Now that the bootloader is unlocked, it is important to go through the initial setup and verify OEM unlocking to prevent the Vaultkeeper service from kicking in and relocking the bootloader. After your phone boots, set it up and connect it to the internet. Then enable the Developer options as shown in step #1 and go to ‘Settings‘ → ‘Developer options‘. The OEM unlocking toggle should be greyed out and say that the bootloader is already unlocked.
Now that the bootloader is unlocked, it’s time to start with the rooting process.
Step 3: Verify the Software Build Number
Before you can download the stock firmware package, it’s important that you verify the build number of the software installed on your Galaxy S10. This will ensure that you use and patch the correct firmware file in the steps that follow.
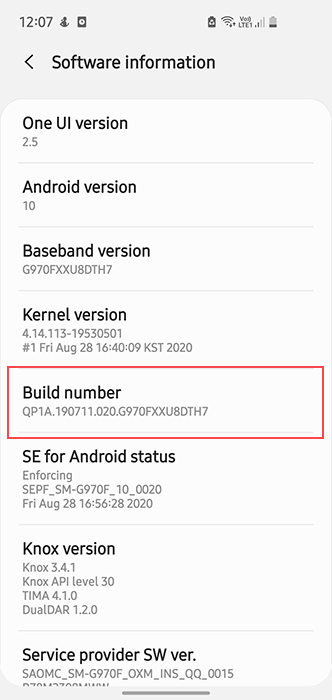
To verify the build number, go to ‘Settings‘ → ‘About phone‘ → ‘Software information‘ and note down the information right under the ‘Build number‘ section. The latter part of the shown information is the build number.
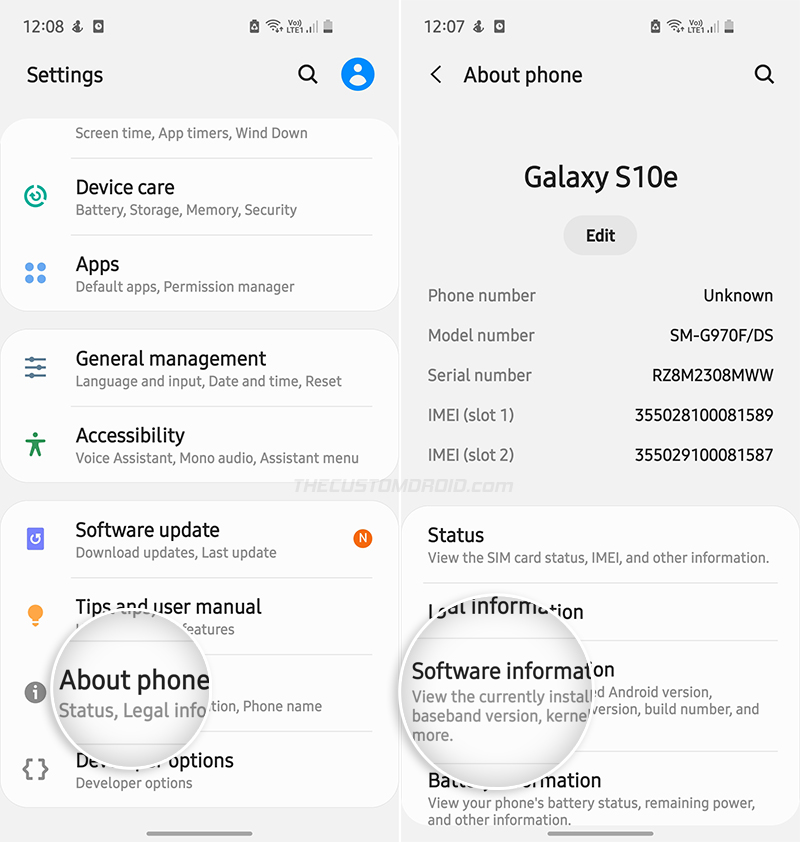
As an example, see the screenshot below. It shows the complete build number information on my Galaxy S10e (SM-G970F) as – “QP1A.190711.020.G970FXXU8DTH7“. Here, “G970FXXU8DTH7” is the software build number I will need.
Advertisement
Note: While you’re verifying the build number, it’s a good idea to also check for any pending software updates by going to ‘Settings’ → ‘Software update’ → ‘Download and install’. In doing so, you will ensure that your Galaxy S10 is on the latest available software and take out the hassle of manually updating right after rooting.
Step 4: Download the Stock Firmware Package
Rooting the Galaxy S10 series involves patching the AP firmware file with Magisk. So, begin by downloading the stock firmware package for the software build number currently installed on your Galaxy S10.
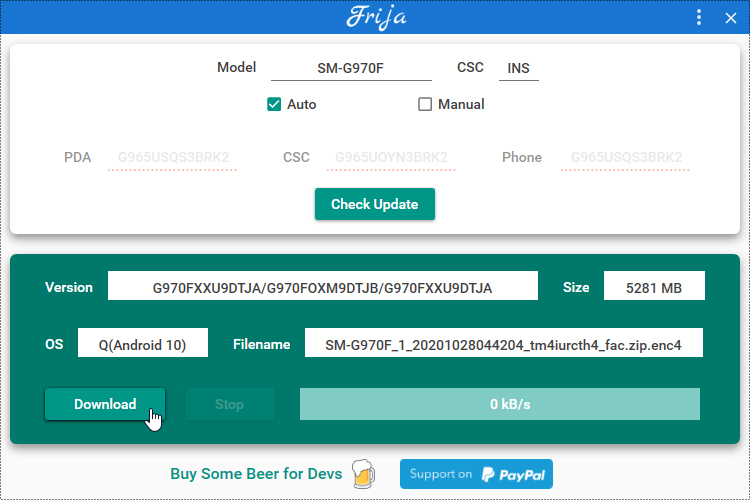
While you could use online databases like SamMobile, SamFrew, etc, we recommend using Frija or Samloader tool to download the stock firmware package. These tools download the latest firmware directly from Samsung’s update servers without any speed caps. These tools can download the firmware directly from official Samsung update servers without any data speed caps. In order to use them, you will need your phone’s model number and CSC/regional code.
First, verify the model number by going to ‘Settings’ → ‘About phone’. As for your phone’s CSC code, you can view it by downloading and using the ‘Phone Info SAM‘ app from the Play Store.
Once you have the information, you can launch the Frija tool, input the required data in the fields, and download the stock firmware package for your Galaxy S10 to your computer.
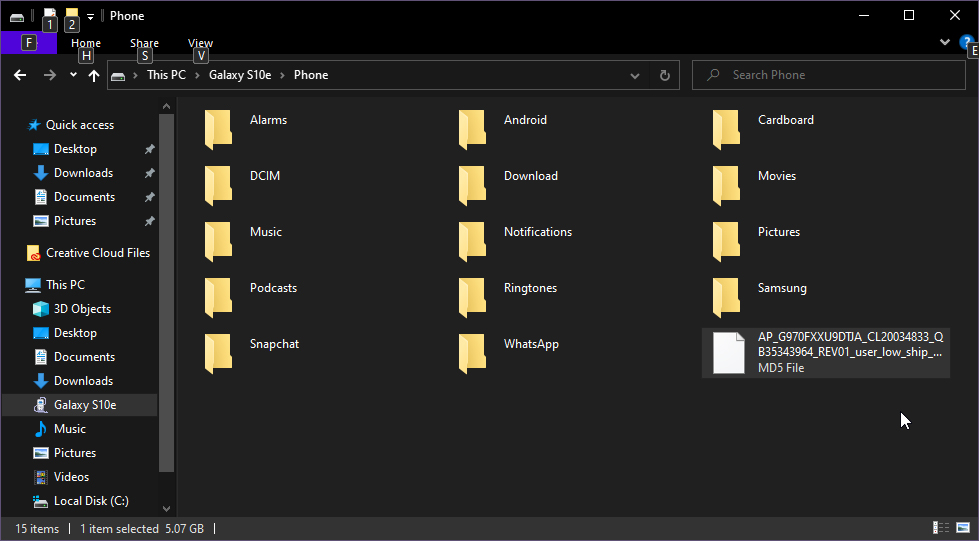
Step 5: Extract the AP Firmware and Transfer it to your Phone
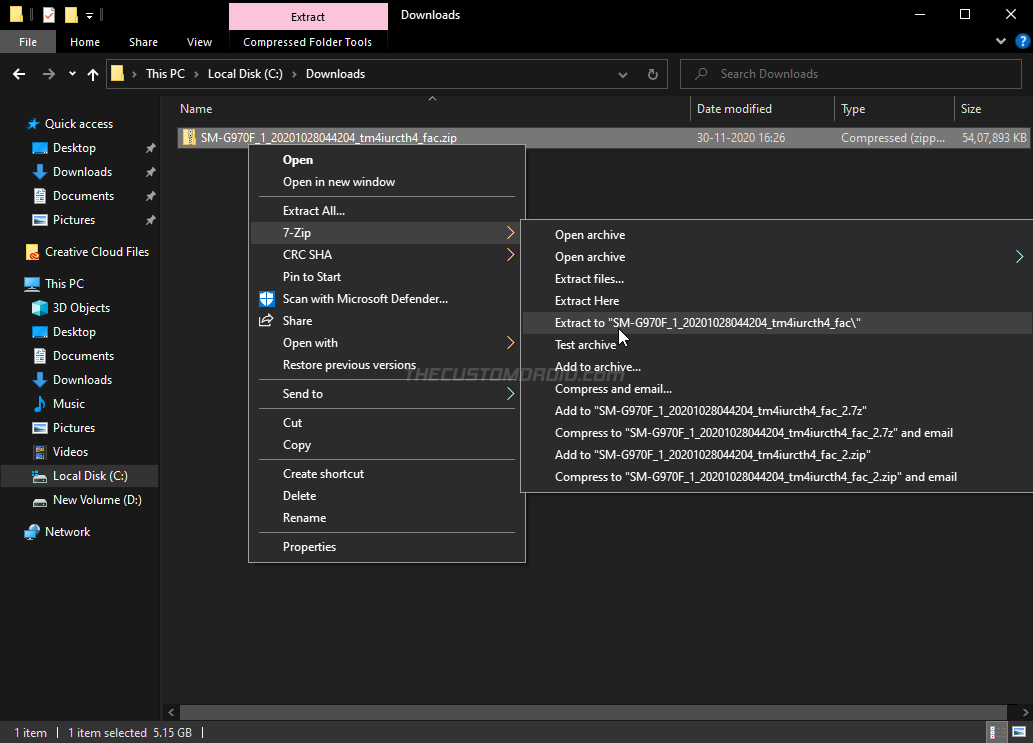
Once the firmware package has been downloaded, the next step is to extract its contents using an archive utility like 7-Zip. So, open the location on your computer where the firmware package was downloaded, right-click on it, then select ‘7-Zip’ and extract the contents to a folder.
The extracted folder should contain the individual firmware files in .tar.md5 format. These will be:
- AP
- BL
- CP
- CSC and HOME_CSC
While you’ll only need the AP firmware for patching, don’t delete the rest of the files. You will need these files later on during this guide.

Now, connect your Galaxy S10 to the computer via USB and enable the ‘File Transfer’ mode on it. Copy over the extracted AP firmware file to the phone’s internal storage. Although you can copy this file anywhere, we suggest copying it to the root directory (i.e. outside all the folders) for easier access.
Step 6: Patch the AP Firmware through Magisk Manager
With the required AP firmware now transferred to your phone, it’s time to patch it via Magisk Manager.
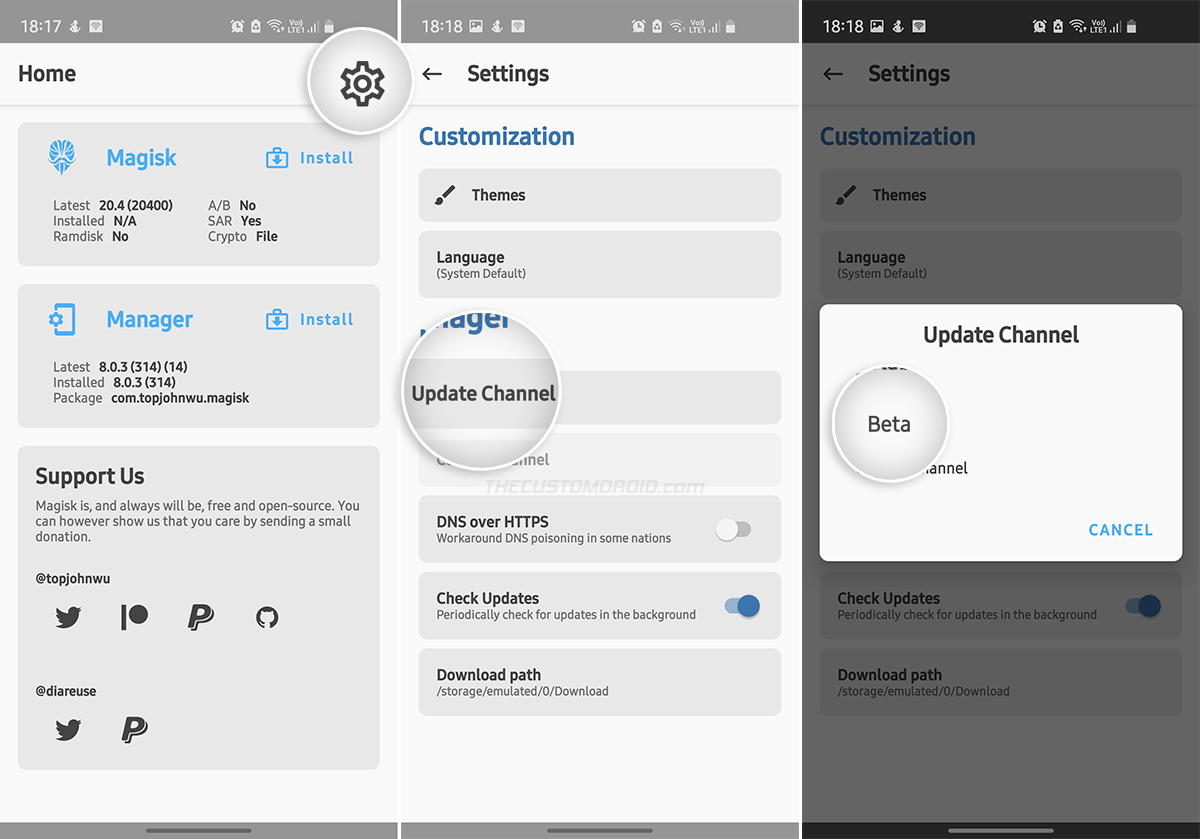
So, download the APK file of the latest Magisk Manager from the official Github page. Once downloaded, install the APK on your phone (Not sure how? See: How to Install an APK file).
Next, go to the app drawer and launch the Magisk Manager application on your Galaxy S10. Then press the settings icon (cogwheel) on the top-right of the app’s window and press the ‘Update channel‘ option. Select ‘Beta‘ from the list and go back to the app’s main screen.
Why would you want to do this? The latest version of Magisk, that is Magisk 21.1, is only available on the public beta channel for now. Don’t worry about it, builds on the public beta channel are completely stable as well.
Now, press the ‘Install‘ button and make sure that ‘Recovery Mode‘ is checked. Press ‘Next‘ and then choose ‘Select and Patch a File‘ from the list of available installation methods. This should instantly open the file selection window for you to choose the file you want to patch with Magisk. So, navigate to the location where you transferred the AP firmware file and select it.
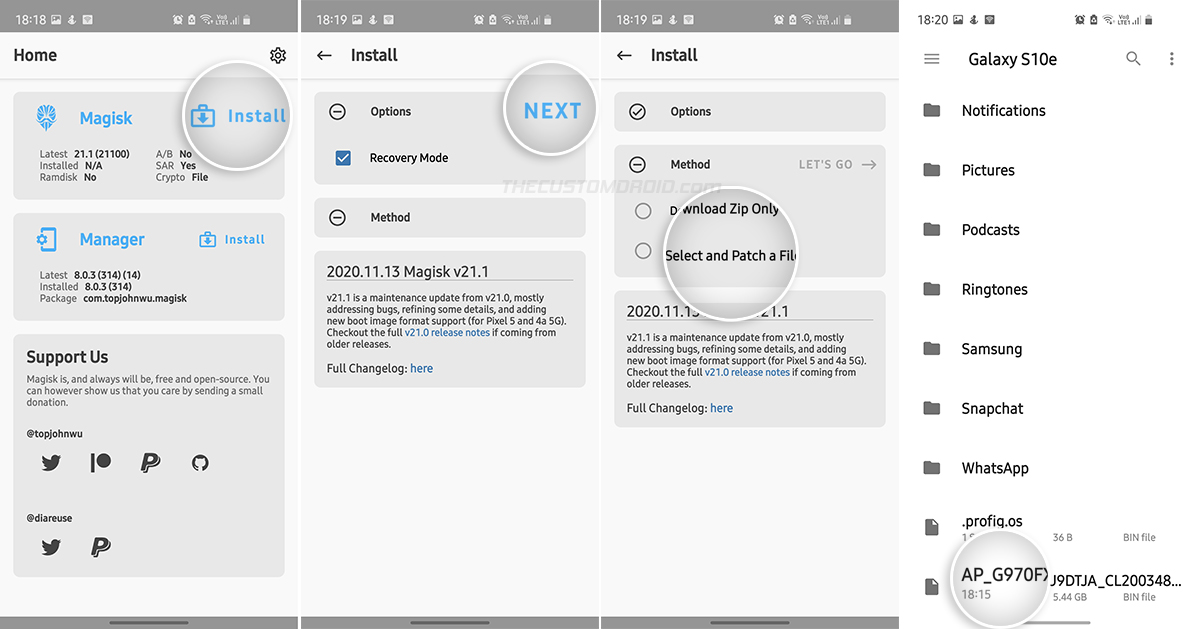
Once the file has been selected, press ‘LET’S GO!‘ to patch the file. Magisk Manager will download the latest version of Magisk and patch the AP firmware with it. The patching process might take a minute or two depending on the filesize.
Advertisement
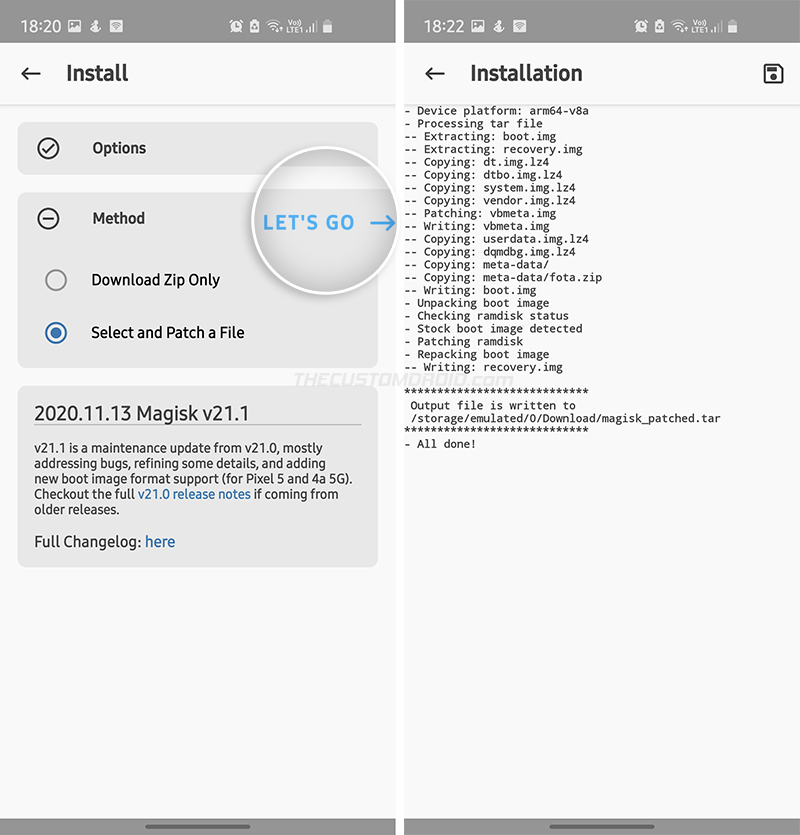
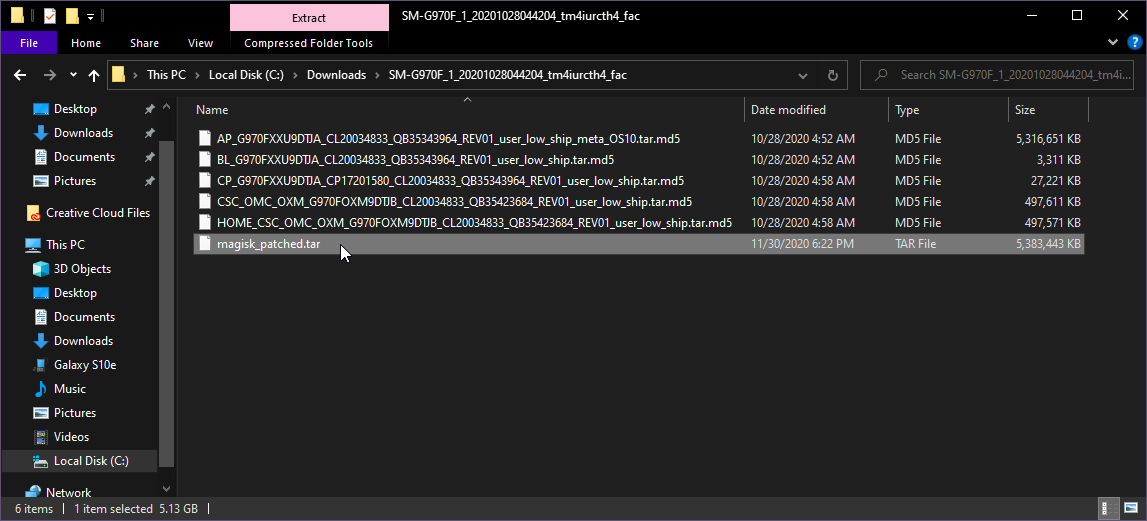
After the process finishes, the patched AP firmware (magisk_patched.tar) will be stored inside the ‘Download‘ folder of your Galaxy S10’s internal storage. Connect your phone to the computer and copy the patched AP firmware file to the folder where the rest of the firmware files are present (BL, CP, CSC, etc).
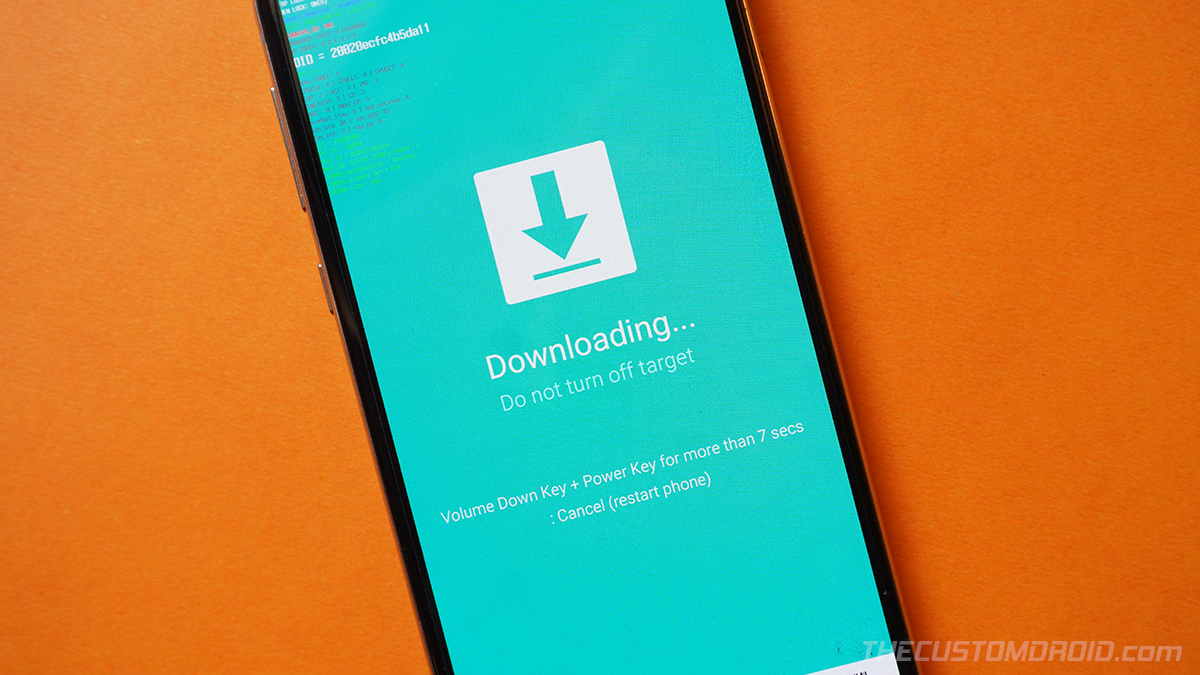
Step 7: Boot your Galaxy S10 into Download Mode
For Odin to recognize your Galaxy S10 and flash the patched AP firmware, you must boot it into Download Mode.
To do this, power off your phone first. Then connect it to your computer over USB while holding the Volume Down and Bixby keys together. You should now see the Bootloader screen (what you saw while performing step #2). Simply, tap the Volume Up key once to enter Download Mode.
- Detailed instructions: How to enter Download Mode on Samsung Galaxy S10 Series
Here’s how it looks like:
Step 8: Download and Launch Odin Tool on the computer
To flash the AP firmware file, you will need the infamous Odin Flash Tool. So, download Odin v3.14.4 from this repository and extract the contents of the ZIP package on your computer.
Now launch the Odin tool by double-clicking the ‘Odin3 v3.14.4.exe‘ executable file. If you’re prompted with a message on the screen, select “Ok“. You should now see Odin’s interface on your computer screen.
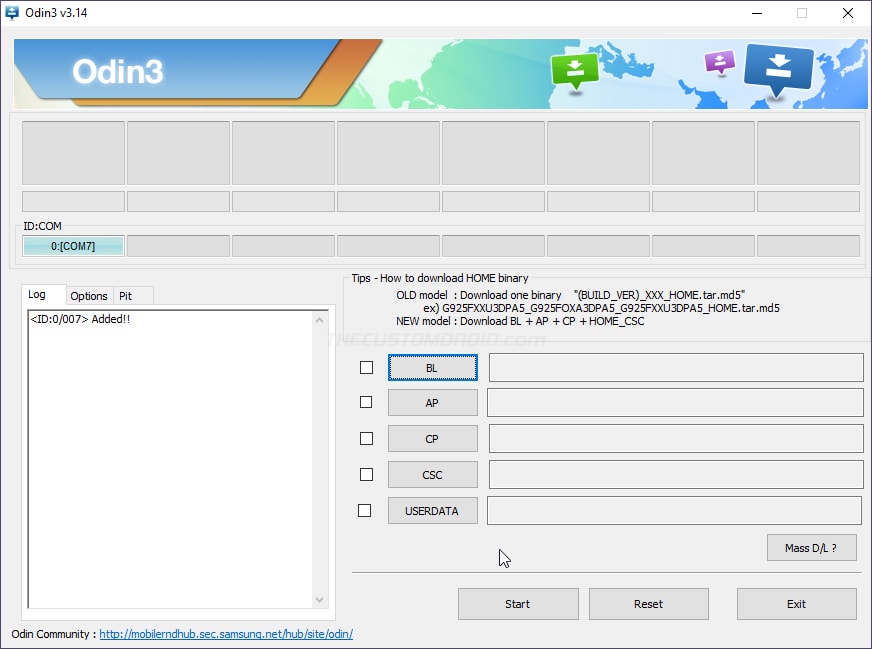
The tool will automatically recognize your Galaxy S10 in Download Mode and display the corresponding COM port number on the top-left of the interface.
Tip: If you’re operating on a Linux/macOS computer, you can flash the firmware on Samsung devices using Heimdall.
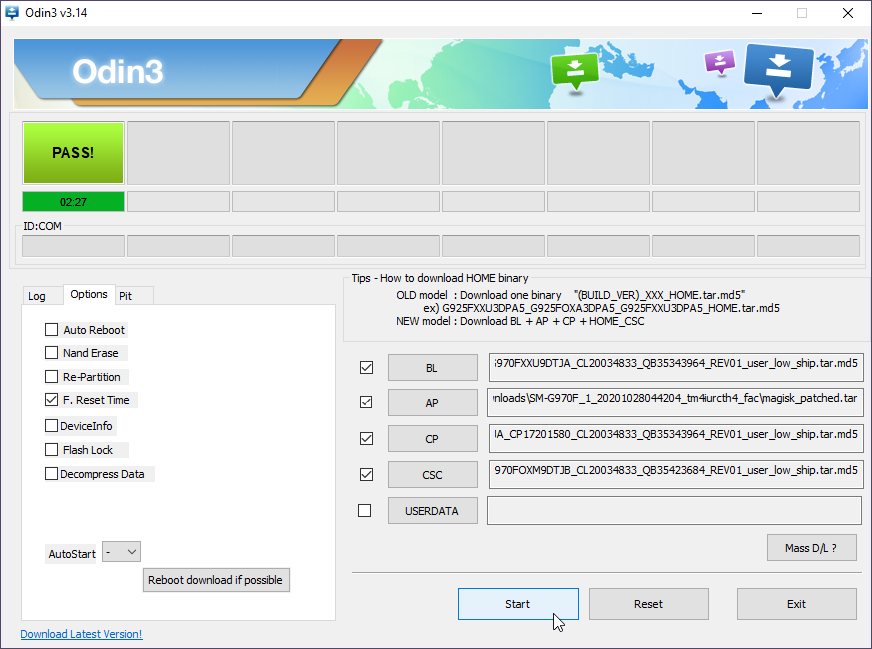
Step 9: Flash the Patched AP Firmware to Root Galaxy S10
With everything now ready, it’s time to flash the patched AP firmware file and root your Samsung Galaxy S10/S10+/S10e with Magisk.
Now, load the firmware files in the Odin tool as instructed below:
- First, click ‘BL‘ and select the BL firmware file (BL_xxxxxxxxxxx.tar.md5)
- Click ‘AP‘ and select the Magisk-patched AP firmware file (magisk_patched.tar)
- Next, click ‘CP‘ and select the CP firmware file (CP_xxxxxxxxxxx.tar.md5)
- Finally, click ‘CSC‘ and select the CSC firmware file (CSC_xxxxxxxxxxx.tar.md5)
Few things to note:
- It’s essential to perform a factory reset when installing Magisk for the first time. For this very same reason, it’s recommended to use the regular CSC file instead of HOME_CSC.
- Do not attempt to flash the patched AP firmware on its own. Always flash it along the rest of the firmware files like BL, CP, and CSC).
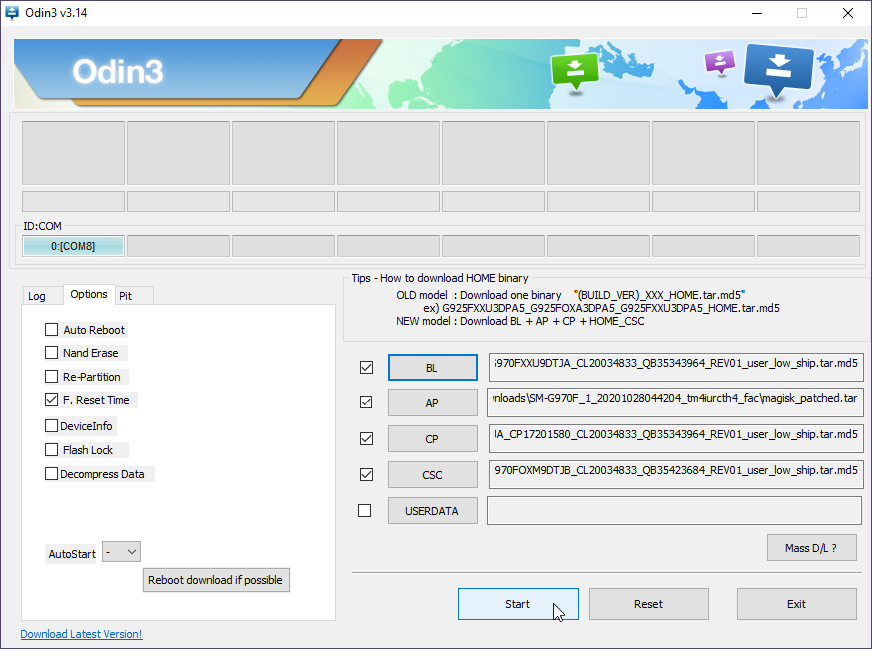
Once all the firmware files have been loaded in their corresponding slots, click the ‘Options‘ tab in Odin and uncheck ‘Auto Reboot‘ (This is important). Finally, click ‘Start‘ to begin the flashing process.
After the flashing process is complete, you should see a ‘PASS!‘ message in Odin. You can close the tool and disconnect your phone from the computer.
Step 10: Boot Galaxy S10 into Rooted System with Magisk
Both Magisk and stock recovery now co-exist in the same partition. We asked you to uncheck the ‘Auto Reboot’ option in Odin, right? That’s because a regular boot (without any button combination) will boot the phone into an unrooted system. So, how do you boot the phone into the rooted system or stock recovery mode?
Advertisement
The developer implemented a solution that will detect the button combination to figure which mode the device should boot in. Once your Galaxy S10 is rooted, you need to follow the combination mentioned below when booting.
First, exit Download Mode by holding the Volume Down and Power keys together for 5-10 seconds. Then, to boot into:
- Unrooted System: Press the Power button to power up normally.
- Rooted System with Magisk: Hold the Power, Bixby, and Volume Up keys together. Release all the buttons as soon as the Bootloader Warning screen appears to boot your Galaxy S10 into the Rooted System with Magisk.
- Stock Recovery: Hold the Power, Bixby, and Volume Up keys together. Then release the Power and Bixby keys and keep holding the Volume Up key until you see the stock recovery screen.
Remember, you just have to get the timing right. It just takes some getting used to.
Once your phone boots, just set it up by following the on-screen instructions.
Step 11: Complete the Additional Magisk Setup
While the rooting process is now complete, there are just a couple of things left to do before you could start using Magisk.
Now, go to the app drawer and launch the Magisk Manager app. The app initially installs a stub and will prompt you to install the full Magisk Manager app. So select ‘Ok’ and then ‘Install.
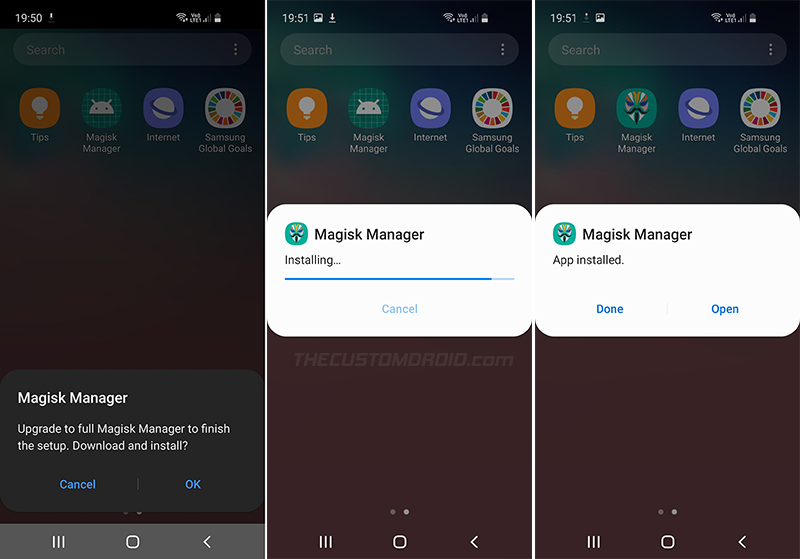
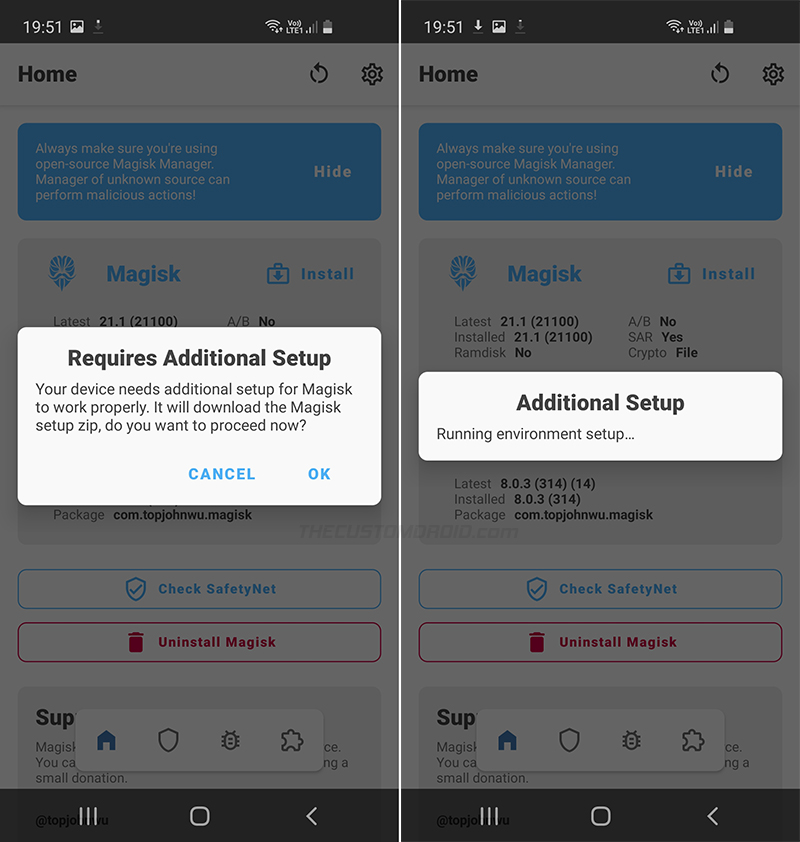
Once the full Magisk Manager is installed, launch the app and it will prompt you to complete the additional setup. So press ‘Ok’ and wait for the magic to happen. Once it is complete, your phone will reboot automatically.
Your Galaxy S10 is now Rooted!
That’s it! You have successfully rooted your Galaxy S10/S10+/S10e. To verify this, you can launch the Magisk Manager app and you should see the installed Magisk version right next to the ‘Installed’ label. You can further check if your rooted phone passes SafetyNet by pressing the ‘Check SafetyNet’ button in Magisk Manager.
From Magisk v20.4 onwards, Magisk Hide is turned off by default on new installations. So, make sure to turn it ON from the Manager app’s settings and then recheck SafetyNet status.
Now go ahead and start using root applications like Titanium Backup. You could also hide root from banking and security apps that might generally not work on a rooted device.
You could install some famous mods like ViPER4Android, EdXposed Framework, and more. With Magisk, you also have the ability to apply modifications to the software systemless-ly using modules, like FOSSAPPS.
Frequently Asked Questions (FAQs)
Q. A new update for Magisk has arrived, how can I update?
- It’s easy. Open Magisk Manager and tap on the ‘Update’ button and let it do the rest for you. According to the developer, you can only upgrade Magisk from within the Magisk Manager app.
Q. Can I flash Magisk using a custom recovery like TWRP to root my Galaxy S10?
- No, you cannot. The developer has not yet figured out a way to flash Magisk to the recovery partition in custom recoveries like TWRP. TWRP should be installed after you have finished rooting. If you’re looking for the instructions, you will find them here.
Q. Can I get re-lock the bootloader and get rid of the warning message?
- Yes, it’s possible to relock the bootloader of your Galaxy S10. Make sure that you do it after you have restored the stock firmware. Another thing worth noting is that relocking the bootloader WILL NOT RESTORE THE KNOX COUNTER. This means you would still not be able to use apps/services likes Samsung Pay, Health, etc.
Q: How can I install software updates on my Galaxy S10 after rooting?
- Do not install OTA updates once your phone is rooted. After a new software update is released, download its firmware package and re-perform step 5-9 of this tutorial again. Do not attempt to flash the stock AP firmware file once you have rooted.
- During the upgrade process, you can use the HOME_CSC file when performing step #9 instead of the regular CSC. This will ensure that no data is erased while performing the upgrade.
Q: My rooted Galaxy S10 doesn’t pass the SafetyNet test and shows Hardware evalType. Is there anything I could do?
- There’s very little to nothing that can be done in this case. This is caused by the new hardware-based SafetyNet attestation and it’s something controlled by Google on their end.
- However, you could try using the MagiskHide Props Config module and try spoofing your Galaxy S10 as another device to pass SafetyNet temporarily.
So by now, you have learned how to unlock the bootloader and root Samsung Galaxy S10, S10+, and S10e using Magisk. If you have any questions or find yourself in a difficult position while performing the instructions, let us know.
Source: Magisk’s Github
Comments 6 Comments
Comments are moderated, and published only if they are relevant to the topic and add value in a constructive way. If you disagree with something, please be polite and respectful. We suggest you read our comment policy before commenting.
I try to do it according to instructions but every time I flash only official released binaries are allowed to be flashed (VBMETA)
Nick, which version of the Magisk app did you use for patching the firmware AP tar?
Hi Ali Many thanks for your quick reply It is the stock firmware for the G975F updated 3Dec 2020. I downloaded firmware SM-G975F_1_20201116171140_gnww4vsynz_fac using Frija and copied AP to the phone and used magisk to patch it and then used Odin to load BL CP CSC and patched file as AP, Reboot disabled. When I start the phone it doesn’t boot and alternates between Bootloader unlocked and boot screen with red warning label
Hope this helps
Okay. Here’s what I would suggest doing first. Flash the stock firmware you downloaded using the Odin tool and confirm that the phone can boot after that.
Once this is done, reperform the instructions from Step #6 and let me know how it goes.
And do one more thing after Step #9: Boot the phone into the stock recovery and perform a factory data reset. Only after that try booting into the OS using the mentioned key combo.
Hi Would you please help me to activate Carstream on my s10 plus Device
Hi Rahul. For Carstream, I searched and found a perfect guide for you on XDA. Please click here to read it.